


Analogue light controlling desk
Design by Tomi Engdahl 1998-2000
This circuit is a very simple manual analogue light controlling desk which outputs standard 0-10V control signals suitable for controlling professional light dimmers and other lighting equipments.
0-10V light controlling interface details
The output of the controller shall be a steady DC voltage varying between 0 and 10V. 0V represents off condition and 10V is full on. Passive controllers, with unbuffered outputs, shall use potentiometers with a resistance value of 10K ohms or less. This circuit uses 1 kohm for good performance and low output impedance.
It is recommended that controllers and output devices have current limiting on all outputs such that they are not damaged by short circuits to signal common. The control signal and all control connector pins shall be isolated from AC mains (line and neutral). It is encouraged that the control signal be isolated from earth ground. The short circuit protection in this circuit is provided in case when the power supply powering this circuit has limited output current capability. The control signals are fully isolated in this design.
ESTA E1.3, Entertainment Technology - Lighting Control System - 0 to 10V Analog Control Protocol, Draft 9 June 1997 (CP/97-1003r1) describes also that controllers and output devices shall be provided with a blocking diode (or similar circuit) such that each output presents an open circuit to any source voltage of more than itself. The blocking diodes allow multiple controllers or outputs to be paralled to control the same dimmers or receivers on a "highest takes precedence" basis. My design does not include those blocking diodes bacause I did not feel that parallelling of many controllers was necessary in the simple applications where I planned to use this controller. If you need to parallel multiple controllers then you can add the blocking diodes, but be warned that this causes some nonlinearity to the control signal.
Circuit diagram
This lighting control circuit diagram is very simple. It just consists of voltage regulator (LM317 and R1) and the potentiometers. The regulator gives out regulated +10V voltage and the potentiometers adjust the output voltages.
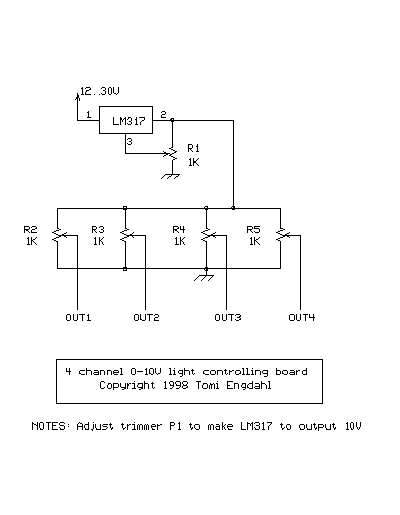
The voltage regulator needs to be adjusted to give out exactly 10V output voltage. The output voltage is adjusted by turning trimmer R1 and checking the output voltage with a multimeter. Adjustable outrput voltage makes it possible to adjust the board also to other control voltage standard (those are quite rate but exist in some applications). The regulator IC does not need any special heatsink this this circuit because the output current needed from it is quite slow (around 40 mA + current taken from the outputs).
Construction tips
Good mechanical construction is essential for reliable operation. The circuit does not need any special shielding because the DC control signals are not very sensitive to interference. A good small plastic case is ideal for this application but you can as well use a metal case. Because there is so small number of components in this circuit you don't necessarly need to make any special circuit board for this circuit. The wiring can be made directly from the potentiometer to potentiometer. The regulator IC can be fitted near the power input connector quite easily.
The potentiometers R2..R5 should be linear type because the 0 to 10V control is intended to be linear. The best type of potentiometer to use is the potentiometers with linear slider construction because you get in this way the touch and feel of a real lighting desk. You can also use rotary dial potentiometers but the usability of the desk will suffer from that.
You can use whatever output connector you want for the signl output. The connector selection depends on the equipment you want to control. Good choices for connectors are for example 9 pin and 25 pin D connector. Controllers or sending devices are recommended to use connectors with female contacts (sockets) if suitable connector is available. I recommend you to use wiring recommended in standards and used in existing equipments if there is no other good way to do otherwise. Whatever wiring you use it is advisable to put the description of the connector wiring near the connector to the equipment case for future reference.
Component list
IC1    LM317
R1     1 kohm trimmer
R2-R5  1 kohm linear potentiometer
Powering the circuit
You can power this circuit quite easily with a small 12V wallwart. The circuit needs less than 100 mA current so a small wallwart will do nicely. In some cases the equipment you control can supply you the operating voltage for this circuit from it's control connector.
Output connector
You can use practically any kind of connector for the output of the circuit. I used a 5 pin DIN connector on my prototype. One suitable output pin arrangement for 5 pin DIN cobnnector is following:
Pin 1 = Channel 4 out
Pin 2 = Ground (connected to circuit ground)
Pin 3 = Channel 1 out
Pin 4 = Channel 3 out
Pin 5 = Channel 2 out
Here is the pinout of 5 pin DIN connector:

For other connector types usually the best pinout arrangement is to use the pin so that the pin number matches the control channel connected to the connector pin and the highest number pin is the common ground for all channels. For other pinout ideas take a look at my 0 to 10V Analog Control Protocol document which has pinouts of many different lighting equipments listed.
Modification ideas
Blocking diodes to outputs
If you want to parallel this circuit with some existing lighting controllers you need to add the blocking diodes to the outputs of the circuit. You can use for example 1N4184 or almost any other general purpose diode for this. You need to add one diode in series with each output. The diode should be put in the way that it passes positive voltage form the potentiometer to output but does not any positive voltage on the other way. Because the diodes cause voltage drop you might need to adjust the regulator voltage up a little bit so that you really get 10V from the output when the sliders are set to full on position.
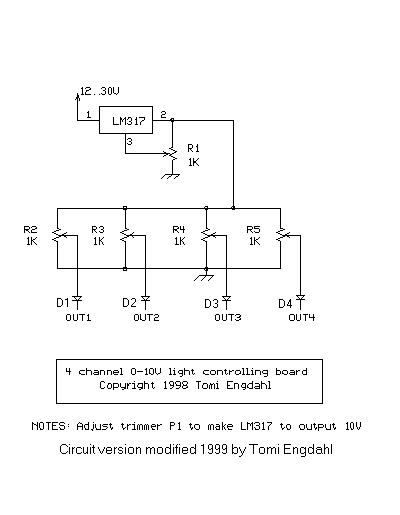
I have modifed my original light desk prototype to this modifed version and I am very happy with it now. I recommend you to build this version instead of the original one.
Component list for modified version:
IC1    LM317
R1     1 kohm trimmer
R2-R5  1 kohm linear potentiometer
D1-D4  1N4148 diode
Hard to get 1 kohm potentiometers
1 kohm linear slider potentiometers seems to be nowdasy to be a litthe hard to get item. If you can't get 1 kohm pontentiometers, you can try some somewhat larger resistance values. Values to around 10 kohm shoudl work well (I have heard that some commercial desks use 10 kohm pontentiometers).
Channel flash buttons
If you want a flas button to momentarily turn on one channel
full on briefly without moving the pontentiometer itself,
you can build a flas button to any channel by adding one
diode and one button switch to the circuit.
Just add the following circuit to any output channel
you want:
                    Switch
                     ----
  +10V power --------o  o-------|>|----- to channel output pin
(LM317 pin 2)                  1N4148
More output channels
You can add more output channels just by wiring more potentiometers in parallel with the existing potentiometers P2..P5. Because more potentiometers take more current form the regulator you need to add a heatsink to the regulator. With the heatsink the regulator will easily handle 10-20 channels without any problems.
Protection against wrong polarity input voltage
If you think that it is probable that you can accidentally put a wrong polarity input to the circuit (and so possibly damage LM317 IC) then it is a good idea to add protection agains wrong polarity signal. The protection can be easily added by adding for example 1N4007 diode in series with the power input.
Output short circuit protections
If you want to be sure that the outputs of the circuit are not damaged in any short circuit case then this can be easily accomplished by adding a 470 ohm (1/2W) resistor in series with each output. This resistor will always limit the short circuit current to safe value.
Two scene preset system
Most commercial manual controllers have two scenes: one for what you are showing on stage right now and one to set up what you are going to do next, with a crossfader between. This is usually enough for almost all applications with small number of dimmer channels (4-6 dimmers) and there is no need to spend money on more than two scenes.
You can build a basic manual two scene preset system by expanding my design. First you build two of those 4 channel lighting desk circuits decribed above and remember to add the output diodes to them, Then you just connect their outputs in parallel. When you add switch which sends the operation power to only one of the the 4 channel dimmer dimmer circuit, you have now a lighting desk where you can put in two scenes and switch between them.
If you want to nicely fade between two scenes, then you can replace the normal 10V output circuit with an adustable regulator or emitter-follower circuit which can output voltage of 0-10V range by adjustment of a potentiometer. You can have two pots for this so that you can control the amount of of light each preset gives to output ow you can have a one dual potentiometer which acts as a crossover (decreases one voltage and increases other when moved).
The problem with a crossfader is getting a smooth fade.. if you linearly decrease the voltage on one set of pots (scene) while linearly increasing on the other, in the middle both scenes will be at 5 volts (only half). Lights that are supposed to stay the same (because they are set the same on both scenes) will go down to half the correct level. The way most manual boards do it now is they use the crossfader to pulse-width modulate the input to one scene, from 0% to 100% duty cycle. The other scene gets the same thing, inverted. This results in an output which is the algebraic sum of the two scenes, which is what you want for a smooth fade. To avoid the pulses entering the ouptput wires, some simple filtering must be used at the voltage output (small capacitor etc.).
Application ideas
I have used my small light controlling desk for controlling 0-10V light dimmer module built from Velleman K8003 DC Controlled Dimmer Kit. I have also used the circuit to control a 4 channel dimmer circuit which was a modified version of the circuit described at http://www.hut.fi/~khautio/ps/dimmeri.ps.
I have also used this circuit for controlling a small homebuilt laser effect circuit which uses 0-10V inputs for controlling the laser deflection mirrors (small mirrors mounted to small DC motors).
Tomi Engdahl <[email protected]>