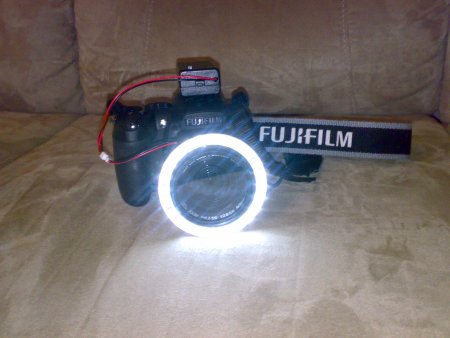
I bought Fuji HS20 camera few months ago (just some months before the model was discontinued). HS20 is a pretty good superzoom digital camera. It has a very long zoom lens and good macro properties. I have taken many of the photos posted recently to this blog using this camera.
To take good macro photographs a good lighting is needed. In many cases a ring light around the lens is a good light to use for macro photography. My old DIY macro LED light did not fit it it. So I needed to make a new one.

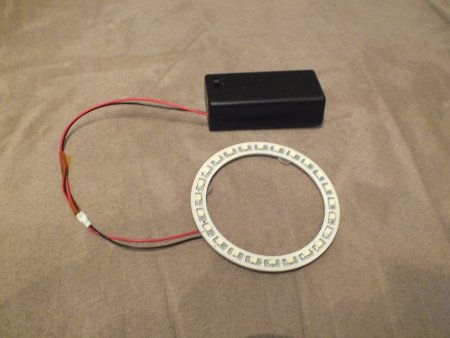
To build it I bought T10 24-LED White Light Car Angel Eye (80mm Diameter) for the project. I selected it because in previous macro light project I used similar 12V LED light ring (just a smaller side) successfully with 9V battery with some simple modifications (replacing current limiting resistors). This time (like eariler) before doing any electrical modifications I tried connecting T10 24-LED White Light Car Angel Eye (80mm Diameter) directly to 9V battery to see how much light I get.

I got quite good amount of light. I measured that I get around 200-250 lux measured on the center at 5-10 cm distance from the LED ring. This was well enough to take good picture with my new camera. So all I needed was to add a suitable 9V battery holder (a small box with on/off switch) and three small subber pads (to keep the right tightly around the camera lens) to make the project ready. Final touch was a small piece of plastic glued on the bottom of the battery holder box that allows to secure the battery box to camera flash shoe.
Update: An example picture taken with the new LED ring macro light and Fuji HS20 camera

11 Comments
Marinda Roggenbaum says:
LED lights are usually great because they are really efficient and will not produce a lot of heat. It saves me a whole lot from electricity bills.
Steve Conrad says:
Tom,
I’m a L o n g time ePanorama lurker
I try to read all your blogs
Just thought i would share an alternative source for the “Ring LED lights
Here’s one for $12
Outdoor LED Umbrella Light Camping Light Patio Cordless Deck
http://www.amazon.com/Outdoor-Umbrella-Camping-Cordless-Silver/dp/B001OJZ0TM
tomi says:
Thank you for your alternative LED ring idea.
Giuseppe Gayer says:
LED lights are always the best since they consume less electricity. *
Kourtney Moehring says:
LED Lights are the best because of low power consumptions *
The latest write-up from our personal blog site
http://www.beautyfashiondigest.com/best-face-wash/
Tomi Engdahl says:
Here is link to another macro light project:
Project : Ring Light
http://metku.net/index.html?path=mods/ring-light/index_eng
Fast, cheap and easy project for a photographer in a need for better lighting in close up photography.
One can buy a ring light from a store but that is no fun. In a true Metku spirit we will try to find a cost effective replacement for a commercial unit. Something that one can do with a low budget and with tools that most people have. Read on and see if the succeeded in our mission this time.
LEDs are good for photography as they operate with DC voltage (no flickering) and as they emit very little heat. I had an option to make my own PCB for the ring light but I happened to notice some sweet, ready-made PCBs with leds already attached to them with a very low price.
So there you have it, a quick’n’dirty, cheap and quite useful weekend project that resulted a piece of kit that one can do by themselves. I took bit of a shortcut by utilizing these amazing car lights but their cheap price, small size and bright light justified their usage.
The project is also doable and valid with compact digital cameras too.
Tomi Beeghly says:
Always do more than is required of you
google.com says:
Hi, I would like to subscribe for this web site to get most up-to-date updates, therefore where
can i do it please help.
Tomi Engdahl says:
Click social media on left menu: you find how to follow with twitter, facebook or rss feed.
lainataan.fi says:
I have read so many posts concerning the blogger lovers however this paragraph is
actually a good post, keep it up.
Tomi Engdahl says:
Some ideas to build similar lights:
3D Printed Diffuser Lights Up This Magnifier
http://hackaday.com/2016/07/17/3d-printed-diffuser-lights-up-this-magnifier/
3D print a surround for a lens from a set of helping hands. This is no simple print though, it’s made of three layers. There is a translucent diffuser, a layer that holds a set of LEDs and attaches to the arm, and a cover to hold the lens in place. Power for the LEDs comes via USB.
The print itself was a bit tricky, his diffuser used T-glase translucent filament, and was fused to the PLA LED ring in a single print from his dual-extruder printer.
Hobby Creek Arm Mod – 3D Printed Illuminated Magnifying Glass
https://theccontinuum.com/2016/07/08/hobby-creek-arm-mod-3d-printed-illuminated-magnifying-glass/
After I successfully managed to replace the transistor, my subconscious mind had already made the decision: I was going to make an illuminated magnifying glass arm!
I followed a pretty inefficient iterative process and ended up with a couple of useless 3D printed parts on the way, but in my defence I’m a software engineer so CAD modelling is not something I’m really experienced at.
The electronics of this project are very simple, it is just an LED circuit with 12 LEDs in parallel and a current limiting resistor in series with the supply.
Modelling the glass holder as I envisioned it was probably the most difficult part. To create all the models I used Onshape which is a pretty cool 3D CAD modelling software which works pretty well on the browser. The model itself had a couple of requirements such that it should fit the 60mm magnifying glass, the 12, 5mm LEDs and the μUSB breakout board.
The material choice I went for was Clear Taulman T-Glase. T-Glase is very well known for its optical properties so it was the perfect choice for the job.
Unfortunately, once I made the decision, I opened a small Pandora’s box of my own. T-Glase is famous for being difficult to print with problems ranging from terrible overhangs, irregular extrusion, flimsy layer adhesion and, to make matters worse, T-Glase has very little adhesion to PLA,
If you used Taulman T-Glase but didn’t manage to get such a uniform light diffusion, you can try printing the part again increasing the nozzle size and reducing the temperature. According to Taulman, this will produce a clearer print with improved optical properties.