I have written about Arduino boards a lot, but there are also other small interesting quite similar development board recommended for me to check out. The Teensy is a complete USB-based microcontroller development system, in a very small footprint, capable of implementing many types of projects. All programming is done via the USB port and Teensy 2.0 boards are based on Atmel AVR micro-controllers, so they are quite similar to Arduino with USB with different form factor.
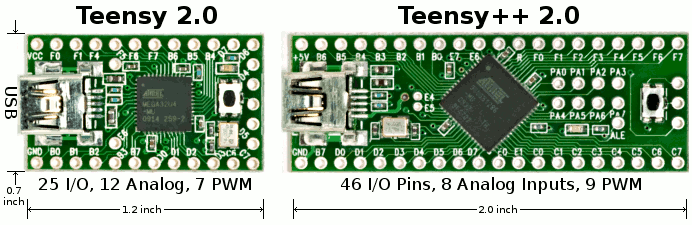
The main software development tools for writing software for Teensy is WinAVR C compiler. Most programs written for Arduino work on Teensy using Teensyduino add-on for Arduino IDE. All of the standard Arduino functions (digitalWrite, pinMode, analogRead, etc) all work on Teensy. Teensyduino is also compatible with many Arduino libraries.
There are also ARM based Teensy boards. Teensy 3.0 that costs $19. Teensy 3.0 is an affordable 32 bit ARM Cortex-M4 board, for development in Arduino or C/C++. RCArduino blog article Arduino Due has a nice compares several Arduino platforms and Teensy 3.0. New Teensy 3.1 has the same size, shape & pinout; is compatible with code written for Teensy 3.0, and is well supported on the Arduino IDE using Teensyduino.
There are several interesting Projects Using Teensy, and here is one video example of one:
102 Comments
Tomi Engdahl says:
TFT LCDs Hit Warp Speed with Teensy 3.1
http://hackaday.com/2014/08/18/tft-lcds-hit-warp-speed-with-teensy-3-1/
[Paul Stoffregen], known as father of the Teensy, has leveraged the Teensy 3.1’s hardware to obtain some serious speed gains with SPI driven TFT LCDs. Low cost serial TFT LCDs have become commonplace these days. Many of us have used Adafruit’s TFT LCD library to drive these displays on an Arduino.
[Paul] has turbocharged the library by using hardware available on Teensy 3.1’s 32 Freescale Kinetis K20 microcontroller.
Another huge bump was SPI chip select. The Kinetis can drive up to 5 SPI chip select pins from hardware. The ATmega328 doesn’t support chip selects. so they must be implemented with GPIO pins, which takes even more time.
Tomi Engdahl says:
The Teensy Audio Library
http://hackaday.com/2014/09/30/the-teensy-audio-library/
[Paul Stoffregen] has just released his Teensy Audio Library, a library for the ARM Cortex M4 found in the Teensy 3 that does WAV playback and recording, synthesis, analysis, effects, filtering, mixing, and internal signal routing in CD quality audio.
This is an impressive bit of code, made possible only because of the ARM Cortex M4 DSP instructions found in the Teensy 3.1. It won’t run on an 8-bit micro, or even the Cortex M3-based Arduino Due.
In addition to audio recording and playback, there’s also a great FFT object that will split your audio spectrum into 512 bins, updated at 86Hz. If you want a sound reactive LED project, there ‘ya go. There’s also a fair bit of synthesis functions for sine, saw, triangle, square, pulse, and arbitrary waveforms, a few effects functions for chorus, flanging, envelope filters, and a GUI audio system design tool that will output code directly to the Arduino IDE for uploading to the Teensy.
Teensy Audio Library
http://www.pjrc.com/teensy/td_libs_Audio.html
A toolkit for building streaming audio projects, featuring:
Polyphonic Playback
Recording
Synthesis
Analysis
Effects
Filtering
Mixing
Multiple Simultaneous Inputs & Outputs
Flexible Internal Signal Routing
Automatic Streaming as the Arduino Sketch Runs
CD Quality: 16 bits, 44.1 kHz
Audio System Design Tool for Teensy Audio Library
http://www.pjrc.com/teensy/gui/
Tomi Engdahl says:
The Teensy Becomes an MPC
http://hackaday.com/2014/10/04/the-teensy-becomes-an-mpc/
[Michele] created his own MPC-style MIDI pad controller with the Teensy 3.0, the Teensy audio adapter board, and an ingenious PCB design that uses replacement MPC pads.
DIY USB MIDI controller MPC style
http://hackaday.io/project/1601-DIY-USB-MIDI-controller-MPC-style
An MPC style MIDI controller featuring a 4×4 FSR matrix and based on Teensy 3.0, fully compatible with the Teensy Audio Adaptor Board
Tomi Engdahl says:
New to the Store: Teensy 3.1
http://hackaday.com/2014/10/15/new-to-the-store-teensy-3-1/
New today in the Hackaday Store is the Teensy 3.1. This development board blows away most others in its class. The board plays nicely with the Arduino IDE, but embedded developers who are hardcore enough have the option of bare metal programming for the Coretex-M4 chip.
Why would we say this blows most others away? In our minds, the 64k of RAM and 72 MHz clock speed place this far outside of what you would normally see hanging out in the Arduino ecosystem. That may be changing with new players like the Edison, but the Teensy 3.1 doesn’t require a host board and comes in just under $20 compared to the Edison’s $50 price tag.
Tomi Engdahl says:
Teensys and Old Synth Chips, Together At Last
http://hackaday.com/2014/11/10/teensys-and-old-synth-chips-together-at-last/
Every major sound chip from the 80s is included in this roundup. The Commodore SID is there with a chip that includes working filters. The SN76489, the sound chip from the TI99 and BBC Micro are there, as is the TIA from the Atari consoles. Also featured is the Atari POKEY, found in the 8-bit Atari computers. The POKEY isn’t as popular as the SID, but it should be.
[Brian] connected all these chips up with Teensy 2.0 microcontrollers, and with the right software, was able to control these via MIDI.
http://www.worldwidewebside.com/brianpeters/?page_id=209
Tomi Engdahl says:
This Little USB Necklace Hacks Your Computer In No Time Flat
http://techcrunch.com/2014/12/18/this-little-usb-necklace-hacks-your-computer-in-no-time-flat/
Quick! The bad guy/super villain has left the room! Plug in a mysterious device that’ll hack up their computer while an on-screen progress bar ticks forward to convey to the audience that things are working!
It’s a classic scene from basically every spy movie in history. In this case, however, that mystery device is real.
Tomi Engdahl says:
TRINKET EDC CONTEST DRAWING #5 RESULTS
http://hackaday.com/2014/12/30/trinket-edc-contest-drawing-5-results/
The final random drawing for Hackaday’s Trinket Everyday Carry Contest was held tonight, and the winner is [flaming_goat] with Trinket Pocket IR Analyser/Transmitter!
The IR portion of the project is handled by a Vishay TSOP38238
The 38238 will decode IR signals at 38 kHz.
The demodulated IR signals are fed into the Pro Trinket, where they can be analyzed. Data is either sent through the serial terminal or displayed on the on-board 1.44″ TFT LCD.
[flaming_goat] will be receiving a Teensy 3.1 and an Audio+SD adapter
Tomi Engdahl says:
BLDC Controller With The Teensy 3.1
http://hackaday.com/2015/01/13/bldc-controller-with-the-teensy-3-1/
[Will] is on the electric vehicle team at Duke, and this year they’re trying to finally beat a high school team. This year they’re going all out with a monocoque carbon fiber body, and since [Will] is on the electronics team, he’s trying his best by building a new brushless DC motor controller.
Last year, a rule change required the Duke team to build a custom controller
The most efficient strategy of driving a motor is to pulse the throttle a little bit and coast the rest of the time.
Duke Electric Vehicles BLDC Controller v0.1
http://www.willfj.com/bldc-controller-v01/
Tomi Engdahl says:
Using RC Transmitters With Flight Simulators
http://hackaday.com/2015/01/26/using-rc-transmitters-with-flight-simulators/
It’s winter, and that means terrible weather and very few days where flying RC planes and helicopters is tolerable. [sjtrny] has been spending the season with RC flight simulators for some practice time.
The usual way of using an RC transmitter with a computer is to buy a USB simulator adapter that emulates a USB game pad through a port on the transmitter. Buying one of these adapters would mean a week of waiting for shipping, so [sjtrny] did the logical thing and made his own.
After connecting the rudder, elevator, aileron, and throttle signals on the receiver to an Arduino, a simple bit of code and the UnoJoy library allows any Arduino and RC receiver to become a USB joystick.
[sjtrny] went through a second iteration of hardware for this project with a Teensy 3.1.
http://sjtrny.com/posts/2015/1/26/interfacing-an-rc-radio-with-your-computer.html
Tomi Engdahl says:
Interesting project using Teensy:
REFLOW CHÂTEAU
http://hackaday.com/2015/02/02/reflow-chateau/
[Will] had a few reasons for turning a toaster oven into a reflow oven
– a reflow oven with touchscreen controls.
http://www.willfj.com/reflow-chateau/
If you don’t know what a reflow oven is, it’s a specialized oven which can heat up according to a specific temperature vs. time curve in order to solder surface mount parts to PCBs. It’s how practically every circuit board is assembled in industry, and it’s my preferred method for soldering because in my opinion it’s easier (though not necessarily faster) than hand soldering. Industrial reflow ovens are large and expensive, so many hobbyists decide to hack a toaster to do their reflowing.
The toaster I decided to get for this project is from Sears. I decided on this one in particular because they call it a “digital toaster”, which I thought meant it would be easy for me to tap into and control its heating elements.
I used OpenSCAD to design the 3D printed front panel for the toaster. Its clever design allows it to be secured to the toaster without the screws visible from the outside.
The Teensy firmware on this toaster primarily does uninteresting stuff to draw the user interface. The settings menu allows the six most important parameters of the reflow process to be set. All six of these values are bounded to ensure that the user doesn’t enter something totally unreasonable.
I used a PID loop to regulate the temperature of the oven. It switches both of the heating elements at a certain duty cycle based on the controller output. The setpoint of the controller is updated continuously.
Tomi Engdahl says:
The Teensy LC. LC Means Low Cost.
http://hackaday.com/2015/02/03/the-teensy-lc-lc-means-low-cost/
For one reason or another, we’ve been seeing a lot of builds featuring the Teensy 3.1 filtering in on the tip line recently. In retrospect, it’s somewhat obvious; it’s a good board that’s cheap and fast. Yes, somehow [Paul] hit all three in the good/cheap/fast mutually exclusive triumvirate.
Now, there’s a new Teensy. It’s the Teensy LC – Low Cost. It’s not as powerful as the Teensy 3.1, but it does give you the power of an ARM for something that’s just about as cheap as a board with an ATMega.
The chip [Paul] chose for the Teensy LC is the Freescale MKL26Z64
The pins aren’t 5V tolerant
Most of the pins can drive 5mA with a few capable of driving 20mA, and there is a single 5v output pin for driving WS2812 Neopixel LEDs.
Teensy LC – Coming March 2015
http://www.pjrc.com/teensy/teensyLC.html
Teensy-LC delivers an impressive collection of capabilities to make modern electronic projects simpler. It features an ARM Cortex-M0+ processor at 48 MHz, 62K Flash, 8K RAM, 12 bit analog input & output, hardware Serial, SPI & I2C, USB, and a total of 27 I/O pins. See the technical specifications and pinouts below for details.
Teensy-LC maintains the same form-factor as Teensy 3.1, with most pins offering similar peripheral features.
Teensy-LC has the same powerful USB hardware as Teensy 3.1. All USB data transfer is done directly to memory with minimal CPU overhead.
Teensy-LC supports USB Serial, MIDI, Keyboard (international layouts), Mouse, Joystick, and RawHID protocols. A full set of 16 bidirectional USB endpoints are supported by the hardware, allowing any type of USB device. As more USB protocols are added to Teensyduino, despite its low cost, Teensy-LC will be up the task.
Teensy-LC has 13 pins than can function as analog inputs. The effective analog resolution is 12 bits.
The Cortex-M0+ processor is a powerful, full 32 bit CPU, designed for lower power, lower cost devices.
Cortex-M0+ has fewer instructions and a simpler bus structure than the more powerful Cortex-M4 on Teensy 3.1. For simple code, M0+ often runs at similar speed, when running at the same clock frequency.
Cortex-M0+ at 48 MHz is much faster than 8 bit AVR processors at 16 MHz, especially when manipulating 16 and 32 bit variables!
Teensy-LC provides a 5V output to directly drive WS2812/Neopixel LEDs.
Tomi Engdahl says:
Pac-Man Clock Eats Time, Not Pellets
http://hackaday.com/2015/02/05/pac-man-clock-eats-time-not-pellets/
[Bob’s] Pac-Man clock is sure to appeal to the retro geek inside of us all. With a tiny display for the time, it’s clear that this project is more about the art piece than it is about keeping the time. Pac-Man periodically opens and closes his mouth at random intervals.
The project runs off of a Teensy 2.0.
The Teensy uses an external real-time clock module to keep accurate time. It also connects to a seven segment display board via Serial. This kept the wiring simple and made the display easy to mount. The last major component is the servo.
Tomi Engdahl says:
SmartMatrix Bundle for Teensy 3.1
http://store.hackaday.com/products/smartmatrix-bundle
Make a colorful display for playing patterns and animated GIFs with this easy to assemble kit.
Basic soldering is required to assemble the board using all through-hole parts.
Load the prebuilt Aurora software on the Teensy 3.1 to play patterns and animated GIFs with no programming or Arduino experience required.
The remote control lets you easily choose an animation or pattern to display, and change option
32×32 Pixel RGB LED Matrix Display Panel – 192mm (7.56”) square.
5V 4A Power Supply, 6’ USB Cable.
Tomi Engdahl says:
1-Pixel Pacman
http://hackaday.com/2015/06/01/1-pixel-pacman/
retro-gaming projects using tiny screens with a fair number of pixels (64×64)
This piece of hardware made the project build really easy: the Smartmatrix.
The display module itself is a commodity item that is used in LED billboards. There are shrouded headers on the back of the panels, to the left and right sides, which allow them to be daisy chained. The Smartmatrix PCB plugs into one of these shields, provides a soldering footprint for the Teensy 3.1 which drives the display, and gives you the wiring to connect screw terminals from the PCB to the power terminals on the module.
The hardware and software running the Smartmatrix made the display portions of the project really simple. First off, the Teensy 3.1 is fast, running at 96MHz in this case. Second, it has Direct Memory Access (DMA) which [Louis] used in the Smartmatrix library. This means that driving the display takes almost no CPU time at all, leaving the rest for your own use. This example of a game is under-utilizing this power… it’s totally capable of full-motion video and calculating amazing visualizations on the fly.
extra surface-mount IO pins on the bottom of the Teensy to connect the Atari joystick (which is simply a set of switches).
The kit also includes an IR receiver and remote, and also a microSD card to loading animations (there’s an SD socket on the PCB).
http://store.hackaday.com/products/smartmatrix-bundle
Comments:
As Mike mentions, the 1-Pixel Pac-Man game doesn’t show off all the graphical capabilities of SmartMatrix. The driver in the SmartMatrix Library refreshes the panels at 120Hz with 36-bit color so graphics look really good especially subtle changes like fading to black. There’s plenty of CPU cycles left over after refreshing, so you can use FastLED to draw patterns on the fly, or decode Animated GIFs from an SD card. This project on Hackaday.io really shows off what you can do with SmartMatrix:
https://hackaday.io/project/5900-smartmatrix-led-art-display-and-music-visualizer
Tomi Engdahl says:
Teensy Adds S/PDIF to Library
http://hackaday.com/2015/06/09/teensy-adds-spdif-to-library/
With Arduino library support on an ARM Cortex M4 processor, it’s no surprise that we’re fans of the Teensy 3.1. And lately, [Paul Stoffregen] has been building out the Audio Library for this platform, making it even more appealing to the synth / audio geeks among us. And now, with just the addition of a highfalutin LED and some software, the Teensy can output digital audio over optical fiber.
S/PDIF, and more specifically optical TOSLINK, uses LED light sent down an optical fiber to encode audio data.
Teensy Audio Library Gets S/PDIF Support
http://www.dorkbotpdx.org/blog/paul/teensy_audio_library_gets_spdif_support
S/PDIF uses a 32 bit format for each sample, where 20 bits represent the audio data. The data is send LSB first. The other 12 bits include a preamble, so the decoder can recognize where each 32 bit, and some other data fields we can (mostly) ignore.
Except for the preamble, the each bit is biphase mark encoded, which just means it’s transmitted as 2 bits.
Frank used some crafty optimizations to achieve the S/PDIF encoding. He used a lookup table to convert each 8 bits of audio data to the biphase mark format.
The encoded data is piled up into a DMA buffer, where the I2S peripheral simply streams it to pin 22. The I2S has to be run faster than normal, since it’s transmitting many more bits per sample.
The S/PDIF output object is available in the Audio System Design Tool, so you can easily connect it to other stuff from the audio library.
Tomi Engdahl says:
BeagleBones And Teensies Become KVMs
http://hackaday.com/2015/06/25/beaglebones-and-teensies-become-kvms/
The BeagleBone Black as a Hackable KVM
http://hacks.pmf.io/2015/06/24/the-beaglebone-black-as-a-smart-kvm/
a device which switches which device your keyboard and mouse’s input goes to
This KVM is hackable because it has a computer sitting at the core of it, listening to all the input and replaying it to the selected phone or desk computer. Since the computer inside the KVM has access to the data, this opens up all sorts of possibilities.
Tomi Engdahl says:
Teensy Super Audio Board
Super high quality, 24 bit, 192kHz audio board for Teensy 3.x and Raspberry Pi
https://hackaday.io/project/5912-teensy-super-audio-board
Really high quality audio board for Teensy 3.x and Raspberry Pi.
Design is open sourced under Creative Commons CC-BY-SA-NC v4.0 license.
The Teensy super audio board is based around the CS4272 audio codec.
One issue with the CS4272 is that it doesn’t include the analog input and output buffers that are commonly integrated into lower quality audio codecs. This necessitates a lot of additional external circuitry that must be carefully designed to avoid compromising the audio quality of the codec itself.
Tomi Engdahl says:
Interesting Teensy project:
MIDI Sampling Off Magnetic Tapes
http://hackaday.com/2015/08/27/midi-sampling-off-magnetic-tapes/
Tomi Engdahl says:
Building A Software Defined Radio With A Teensy
http://hackaday.com/2014/04/25/building-a-software-defined-radio-with-a-teensy/
[Rich, VE3MKC] has been wanting to get into Software Defined Radio for a while now, but didn’t want to go the usual PC route. He initially thought the Raspberry Pi would be the best platform for a small, embedded device that could manipulate audio, but after discovering the ARM-powered Teensy 3.0, had an entirely different project in mind.
[Rich] is using a SoftRock SDR to take RF from an antenna and downconvert it into the audio range. Doing DSP for SDR is fairly computationally intensive, but he found a Teensy 3.0 with the audio adapter board was more than up to the task.
Tomi Engdahl says:
Teensy Super Audio Board
Professional quality, 24 bit, 192kHz audio breakout board for Teensy 3.x, Raspberry Pi, and more.
https://hackaday.io/project/5912-teensy-super-audio-board
Professional quality audio breakout board, mainly targeted towards Teensy 3.x and Raspberry Pi 2, but also should be compatible with any boards having an I2S and I2C interface broken out (FPGA boards with enough GPIO included).
The hardware design is open sourced under Creative Commons CC-BY-SA-NC v4.0 license.
Tomi Engdahl says:
Microcontroller Audio Workshop & HaD Supercon 2015
https://hackaday.io/project/8292-microcontroller-audio-workshop-had-supercon-2015
A collection of information and documentation for the Advanced Micrcontroller Audio Workshop. Currently just a placeholder page…. but all the workshop material and source code will be available here, to serve as a reference for everyone who attended, and for anyone who couldn’t make it to learn at home.
Tomi Engdahl says:
Turning A Teensy Into A U2F Key
http://hackaday.com/2015/11/09/turning-a-teensy-into-a-u2f-key/
Last month, GitHub users were able to buy a special edition Universal 2nd Factor (U2F) security key for just five bucks. [Yohanes] bought two, but wondered if he could bring U2F to other microcontrolled devices. he ended up building a U2F key with a Teensy LC, and in the process brought U2F to the unwashed masses.
Universal 2nd Factor is exactly what it says on the tin: it doesn’t replace your password, but it does provide a little bit of extra verification to prove that the person logging into an account is indeed the person that should. Currently, Google (through Gmail and Google Drive), Github, Dropbox, and even WordPress (through a plugin) support U2F devices, so a tiny USB key that’s able to provide U2F is a very useful device.
Teensy LC U2F key
http://tinyhack.com/2015/11/08/teensy-lc-u2f-key/
After receiving the keys, I got curious and started to read the U2F specifications. The protocol is quite simple, but so far I haven’t been able to find an implementation of a U2F key device using existing microcontrollers (Arduino or anything else). The U2F protocol uses ECC signing
A U2F device is actually just a USB HID Device
The U2F protocol is actually quite simple. When we want to use the hardware U2F key in a webapp (or desktop app), we need to add the USB key that we have to the app database. Practically, in the website, you would choose a menu that says “Add device” or “register new device”.
When you choose the register/add device, the app will send a REGISTER request to they hardware U2F USB key with a unique appid (for web app, this consist of domain name and port). The hardware U2F key will generate a private/public key pair specific for this app id
Next time the user wants to login, the app/webapp will send authentication request to the hardware U2F key. In practice, when logging in, the website will request you to plug the hardware U2F key and press the button in the hardware key.
The app will send a random challenge and the appid (to identify which app it is), and the “key handle”
Google provides U2F reference code including something to test USB U2F keys.
Teensy LC doesn’t provide a user button (just a reset button), and I don’t want to add a button to it (it wouldn’t be portable anymore). So I just implemented everything without button press. This is insecure, but its ok for me for testing.
Most of the time implementing your own device is not more secure than buying commercial solution, but sometimes it has some advantages over commercial solutions.
For example: most devices that I know of doesn’t have a ‘reset’ mechanism.
In our custom solution we can reset/reflash our own device (or just change the encryption key)) and have a plausible deniability that we are not related to that site (the suggestion in the U2F specification was to destroy a device if you no longer want to associate a website with your device if your device doesn’t have reset mechanism).
Tomi Engdahl says:
Two Turntables and No Microphone
http://hackaday.com/2015/11/09/two-turntables-and-no-microphone/
It used to be that you had to spend real money to get an alternative controller for your electronic musical arsenal. These days, with cheap microcontrollers and easily-accessible free software libraries, you can do something awesome for pocket change. But that doesn’t mean that you can’t make a sexy, functional piece of art along the way!
Wooden sensor box w/ 2 rotary disks
A homebuilt wooden sensor box i made, mainly for controlling PureData.
https://hackaday.io/project/8371-wooden-sensor-box-w-2-rotary-disks
A homebuilt wooden sensor box using different kinds of sensors and the Teensy 3.1 microcontroller.
For sensing the disk movement, I’m making use of IR LEDs and phototransistors and a technique called “Quadrature Encoding”. I hacked two old hard drives for the motors and the hard drive platters.
Currently I’m receiving raw data. I’m writing PD patches to find reasonable applications for music. I use Processing for any kind of visual representation. It’s not meant for DJing in the first place, but I am interested in using jog wheels as sensors, for whatever case, I’ll see.
Tomi Engdahl says:
Automated Star Wars Themed Nerf Targets
http://hackaday.com/2015/11/20/automated-star-wars-themed-nerf-targets/
Star Wars themed Nerf gun shooting gallery.
icons-390Using a Teensy 2.0, he’s controlling nine RC servo motors attached to two-sided targets which randomize themselves every round — The Empire is bad, the Rebels, good. They’re also color coded red and green in case the images are too hard to see.
To keep track of scoring, there are piezo elements which register the impact of a Nerf dart.
Star Wars Nerf Targets
Star Wars themed moving Nerf targets
https://hackaday.io/project/8478-star-wars-nerf-targets
Tomi Engdahl says:
DTMF Decoding in Software
https://hackaday.io/project/139-dtmf-decoding-in-software
Testing the tone detection object in the Teensy Audio library.
https://github.com/PaulStoffregen/Audio
Tomi Engdahl says:
Small-farm Automation Keeps Livestock Safe and Happy
http://hackaday.com/2015/12/15/small-farm-automation-keeps-livestock-safe-and-happy/
A Teensy with an RTC opens and closes the door according to sunrise and sunset times, and temperature and humidity sensors provide feedback on conditions inside the coop. The sheep benefit from a PTZ webcam to keep an eye on their mischief, and the whole thing is controlled by a custom web interface from [Vince]’s smartphone.
Modern Farmer
Chicken coop and sheepfold controler
https://hackaday.io/project/4113-modern-farmer
The goal of the project is to control coop door, T° and H° and survey the sheepfold with an IP cam.
The coop door is driven by the time of sunrise /sunset on a given date.
I add the possiblity to adjust open/close time on dawn and twilight within +/-30mn.
I can also handle the door with up/down switchs.
A PTZ cam and 4 preset positions, I can check the coop and sheepfold, the main door and…. if eggs are available !
You can see the Teensy, RTC, DHT1, the arduino ethershield (later remplaced by enc28j60) and finaly 2 relays to drive…
Tomi Engdahl says:
Drum Master
Electric drum set based on Teensy 3.1 and Audio Board
https://hackaday.io/project/6881-drum-master
My solution (which started me out on my journey of embedded programming and electronic design) was the original Drum Master. Started in 2008 with an Arduino (for ADC readings) talking to a computer (for sound synthesis / playback), I got a result which worked reasonably well. However, it still had some problems: the two most critical issues being a difficulty in accurate velocity sensing and the fact that you needed a separate computer to actually play the sounds.
The ADC part of the circuit now uses peak detection hardware to ensure a stable signal, and the sample playback is done via a Teensy 3.1 with Audio Board.
Tomi Engdahl says:
Teensy 3.1 Controlled VFO
http://hackaday.com/2016/03/05/teensy-3-1-controlled-vfo/
[Tom Hall], along with many hams around the world, have been hacking the Silicon Labs Si5351 to create VFOs (variable frequency oscillators) to control receivers and transmitters. You can see the results of his work in a video after the break.
[Tom] used a Teensy 3.1 Arduino compatible board, to control the Si5351 mounted on an Adafruit breakout board.
So what is the Si5351? The data sheets calls it an I2C-Programmable Any-Frequency CMOS Clock Generator + VCXO.
The purpose of the chip is to generate clock outputs from 8 kHz to 160 kHz.
Teensy 3.1 VFO with encoder and si5351 board
http://ak2b.blogspot.fi/2015/06/teensy-31-vfo-with-encoder-and-si5351.html
Tomi Engdahl says:
Teensy Gets A Prop Shield
http://hackaday.com/2016/03/29/teensy-gets-a-prop-shield/
God of microcontrollers and king of electrons [Paul Stoffregen] is famous for his Teensy microcontroller dev boards, and for good reason. If you have a project that does more than blink a few pins, but doesn’t need to run a full Linux build, any one of the Teensy dev boards are a great option. As a dev board, [Paul] has released a few ‘shields’ that add various functionality – for example the audio adapter board that is able to play CD quality audio and perform DSP and FFT operations. Now, [Paul] has launched a new shield designed for interactive light and sound effects on art installations and for the rest of the crew at Burning Man. It’s called the Prop Shield, and adds more sensors, audio amps, and blinkies than a Teensy has ever had.
The Teensy Prop shield is equipped with 10DOF motion sensors, including a FXOS8700 accelerometer/magnetometer, a FXAS21002 gyroscope, and an MPL3115 altimeter and temperature sensor. A two Watt LM48310 audio amplifier can drive 4 or 8 ohm speakers, and 8 Megabytes of Flash memory can hold all the data for audio or a very long string of APA102 individually addressable LEDs.
Prop Shield With Motion Sensors
http://www.pjrc.com/store/prop_shield.html
Tomi Engdahl says:
Marvelous MIDI Button Box
http://hackaday.com/2016/06/18/marvelous-midi-button-box/
Most DJ tools are just ripe for DIY rework. Everything at least speaks MIDI, and the firmware side of the equation that makes a physical interface for your laptop can be downloaded and flashed with minimal effort. And this means that there’s no time better than the present to wire up a ton of buttons to a Teensy and call it a controller.
http://www.instructables.com/id/Arcade-MIDI-Controller/
Tomi Engdahl says:
Sonic 3D Printer Auto Bed Leveling Makes a Swoosh
http://hackaday.com/2016/07/18/sonic-3d-printer-auto-bed-leveling-makes-swoosh/
Compelled by the idea of eliminating the last manual calibration step, I wanted to make Zortrax’s method of contact sensing compatible with non-conductive PEI, Garolite and glass build plates.
I figured that I could just strap a sufficiently heat resistant piezo sensor to the print bed to sense the little knock the nozzle would make when it collides with the print bed. However, not much sound energy is released when a nozzle runs into a build plate at blazing 1 mm/s.
To fix this, I acquired a 10 W structure-borne sound exciter and attached it to the extruder.
For the required realtime DSP, I hooked up the piezo discs to a plain Teensy Audio Shield equipped with a Teensy 3.1, which practically completed the hardware portion of this project in one step. Using Paul Stoffregen’s amazing DSP library, it took only a few lines of code to run a 256 point FFT on the input signal and a few more to generate a time-averaged amplitude spectrum.
Teensy Audio Library
http://www.pjrc.com/teensy/td_libs_Audio.html
A toolkit for building streaming audio projects, featuring Polyphonic Playback, Recording, Synthesis, Analysis, Effects, Filtering, Mixing, Multiple Simultaneous Inputs & Outputs, and Flexible Internal Signal Routing.
All audio is CD quality (16 bits, 44.1 kHz) and streams automatically as your Arduino Sketch Runs
Tomi Engdahl says:
Introducing The Teensy 3.5 And 3.6
http://hackaday.com/2016/08/17/introducing-the-teensy-3-5-and-3-6/
Paul Stoffregen has built a new Teensy. The latest in the line of very powerful, USB-capable microcontrollers is the Teensy 3.5 and 3.6 development boards. It’s faster, more capable, and bigger putting even more pins on a solderless breadboard.
The first Teensy was one of the first Arduino compatible boards with native USB. The Teensy 2.0 was even better with support for USB keyboards, mice, and MIDI. Even today, the Teensy 2.0 is the de facto board to use if you want to build anything like a USB keyboard. The Teensy 2.0 was followed by the exceptionally powerful Teensy 3.0, the first 32-bit Arduino compatible board
Teensy 3.5 & 3.6
https://www.kickstarter.com/projects/paulstoffregen/teensy-35-and-36
Tomi Engdahl says:
Hacklet 126 – Teensy Projects
http://hackaday.com/2016/09/24/hacklet-126-teensy-projects/
The Arduino has proved to be a great platform for electronics projects. The same goes for the Raspberry Pi. However, there are some projects that fall in the gap between these two options. Projects that need more memory or processing power than the ATmega microcontrollers have to offer, but not so much as to require a full Linux/ARM powerhouse. For those projects, there is the Teensy series.
Tomi Engdahl says:
Teensy Software Defined Radio
https://www.eeweb.com/project/teensy-software-defined-radio/
For Rich, his Software Defined Radio (SDR) project has been the most educational and interesting project he’s done so far. It wasn’t easy for him at first, but due to his willingness to create his own simple version, he was able to build an SDR using a Teensy 3.1 microcontroller and an Audio Shield.
Software Defined Radio with the Teensy 3.1
http://rheslip.blogspot.fi/2014/04/software-defined-radio-with-teensy-31.html
here’s how it works:
- SoftRock audio goes into Teensy Audio shield mic input (its mono but I needed the extra gain)
- audio is digitized and multiplied with a software generated VFO running around 5 kHz
- output of the multiplier goes through a lowpass filter
- output of the filter goes to the headphone jack on the Audio Shield
- I’m using a pot on the Audio Shield to tune the VFO. Not terribly stable but OK for experimenting
- I’m using a small TFT LCD to show the spectrum display and indicate the VFO frequency
Tomi Engdahl says:
Stormtrooper Voice Changer Helmet uses Teensy to Mangle Audio
http://hackaday.com/2016/11/09/stormtrooper-voice-changer-helmet-uses-teensy-to-mangle-audio/
Halloween has come and gone, but this DIY voice changing Star Wars Stormtrooper helmet tutorial by [Shawn Hymel] is worth a look for a number of reasons. Not only is the whole thing completely self-contained, but the voice changing is done in software thanks to the Teensy’s powerful audio filtering abilities. In addition, the Teensy also takes care of adding the iconic Stormtrooper clicks, pops, and static bursts around the voice-altered speech.
Vox Imperium: Stormtrooper Voice Changer
https://learn.sparkfun.com/tutorials/vox-imperium-stormtrooper-voice-changer
The Empire’s finest have a distinct nasal and mechanical voice when talking through their intercoms. As you work diligently on that Stormtrooper costume and apply for the 501st, you can up your armor game by including a voice changer.
There are pre-built solutions available for budding Stormtrooper cadets, but most are bulky and sometimes require wiring outside the helmet. However, with a little bit of coding and wiring, you can build your own inside a helmet using SparkFun parts.
Tomi Engdahl says:
Barely-There GSM GPS Tracker
http://hackaday.com/2016/11/19/barely-there-gsm-gps-tracker/
What’s the most un-intrusive GPS you’ve ever seen? How about for a bike? Redditor [Fyodel] has built a Teensy-based GPS/GSM tracker that slides into your bike’s handlebars and really is out of sight.
The tracker operates on T-Mobile’s 2G service band — which will enable the device to work until about 2020 — since AT/T is phasing out their service come January. Since each positioning message averages 60 bytes, an IoT data plan is sufficient for moderate usage, with plans to switch over to a narrow-band LTE service when it becomes more affordable. [Fyodel] admits that battery life isn’t ideal at the moment, but plans to make it more efficient by using a motion sensor to ensure it’s only on when it needs to be.
I made a Teensy-based GPS/GSM tracker with lots of features that fits in handlebars
https://www.reddit.com/r/electronics/comments/5bu30a/i_made_a_teensybased_gpsgsm_tracker_with_lots_of/
Tomi Engdahl says:
Tiny SCSI Emulator
Teensy 3.5 & NCR 5380 based SCSI device emulator.
https://hackaday.io/project/18974-tiny-scsi-emulator
SCSI target emulator based on the Teensy 3.5 (Kinetis MK64FX MCU) and classic NCR 5380 SCSI PHY. Supports multiple targets (Device IDs), LUNs, and device types. 3.2″ x 1.6″ footprint, optionally uses or provides bus termination power. 64×48 pixel OLED status display.
Tomi Engdahl says:
Rocket real-time transponder and GUI
https://hackaday.io/project/15425-rocket-real-time-transponder-and-gui
My goal for this project was to use off the shelf components to build a real-time rocket altimeter on steroids at a reasonable price.
Phase 1 would be built with the following features: 2 mile or more line of sight transceivers (more if using a directional base antenna), orientation (9dof) sensors and visual display on the base station laptop, and altimeter sensor.
The Processing display, and the transceivers being two directional make a lot of things possible.
Tomi Engdahl says:
MIDI DAC for Vintage Synth Hacks
http://hackaday.com/2017/01/09/midi-dac-for-vintage-synth-hacks/
A lot of classic synthesizers rely on analog control voltages to vary parameters; this is a problem for the modern musician who may want to integrate such hardware with a MIDI setup. For just this problem, [little-scale] has built a MIDI-controllable DAC for generating control voltages.
It’s a simple enough build – a Teensy 2 is used to speak USB MIDI to a laptop. This allows the DAC to be used with just about any modern MIDI capable software. The Teensy then controls a Microchip MCP4922 over SPI to generate the requisite control voltages.
Let’s Make: A MIDI DAC
https://www.youtube.com/watch?v=wa4Z6aX7JL8
Tomi Engdahl says:
Download Teensyduino, Version 1.34
Teensyduino is a software add-on for the Arduino software.
https://www.pjrc.com/teensy/td_download.html
When using Arduino, be sure to select Teensy in the Tools > Boards menu. Arduino’s File > Examples menu automatically changes to show the libraries and examples for the selected board.
Tomi Engdahl says:
Laser Harp I
Affordable and pretty simple to build framed laser harp using cheap laser pointer modules and a Teensy 3.2
https://hackaday.io/project/20208-laser-harp-i
Framed laser harp with up to 16 beams, MIDI over both USB and 5-pin DIN, adjustable octave and transposition, plus a whole bunch of selectable scales. Estimated cost less than €50.
Tomi Engdahl says:
Wireless Wearable Watches your Vital Signs
http://hackaday.com/2017/03/13/wireless-wearable-watches-your-vital-signs/
Is it [Dr. McCoy]’s long-awaited sickbay biobed, with wireless sensing and display of vital signs? Not quite, but this wearable patient monitor comes pretty close. And from the look of it, [Arthur]’s system might even monitor a few more parameters than [Bones]’ bleeping bed from the original series.
Starting with an automatic blood pressure cuff that [Arthur] had previously reversed engineered, he started adding sensors. Pulse, ECG, respiration rate, galvanic skin response, and body temperature are all measured from one compact, wrist-wearable device. It’s not entirely wireless – the fingertip pulse oximetry dongle and chest electrodes still need to be wired back to the central unit – but the sensors all talk to a Teensy 3.2 which then communicates to an Android app over Bluetooth
BigCorvus/Physio
https://github.com/BigCorvus/Physio
A versatile wireless monitoring device that combines ECG, impedance pneumography, photoplethysmography, SPO2 calculation, galvanic skin response, NIBP wrist measurement as well as well as body temperature measurement in one wearable.
Tomi Engdahl says:
Teensy and 3D Printer Make Beautiful Music Together
http://hackaday.com/2017/04/29/teensy-and-3d-printer-make-beautiful-music-together/
[Otermrelik] wanted to experiment with the Teensy audio library and adapter. That, combined with his 3D printer, led to a very cool looking build of the teensypolysynth. The device looks like a little mini soundboard with sliders and 3D printed knobs. You can see (and hear) it in the video below.
Even more interesting is there is an audio design tool that runs in your web browser for building the audio portion of your code graphically. Even though it is in a browser, it isn’t tied back to a server so you can run the tool offline and you don’t have to worry about your world-changing audio design leaking out on the Internet. Browsing the tool is a good way to get a feel for just how much capability the library provides.
Audio System Design Tool for Teensy Audio Library
https://www.pjrc.com/teensy/gui/index.html
Tomi Engdahl says:
Adding a debugger to a Teensy 3.5/3.6
http://hackaday.com/2017/05/01/adding-a-debugger-to-a-teensy-3-53-6/
The Teensy is a powerful ARM-based development board with loads of features that can do fun stuff with USB as well. Like many dev boards, it uses a less powerful processor as an interface. Teensy designer [Paul Stoffregen] added a debug header to allow direct SWD JTAG access to the main chip, but the interface microcontroller has to be silenced for that to work, and the code to do so is still in progress.
Modifying the Teensy 3.5 and 3.6 for ARM SWD Debugging
https://mcuoneclipse.com/2017/04/29/modifying-the-teensy-3-5-and-3-6-for-arm-swd-debugging/
Looking for a small, inexpensive ($25-30) ARM development board (say 120-180 MHz ARM Cortex-M4 with FPU, 512kB-1MB of FLASH and 256 KByte of RAM? Then have a look at the Teensy 3.5 and Teensy 3.6 by PJRC/Paul Stoffregen
Tomi Engdahl says:
Teensy 3.6 Synth
This is a scratchpad project to store ideas about building a polyphonic synth around a teensy 3.6
https://hackaday.io/project/25109-teensy-36-synth
The aim is to build a Teensy 3.6 based polyphonic synth. Features include a 4×4 Trellis button pad, 4 slider potentiometers, a two octave keyboard, 4 rotary encoders, audio out, 5 pin din midi out/in, midi usb, 5 momentary pushbutton, 5 on-off pushbutton.
Tomi Engdahl says:
A Flame Diode Pilot Light Sensor For A Burning Man Installation
http://hackaday.com/2017/08/28/a-flame-diode-pilot-light-sensor-for-a-burning-man-installation/
A naked flame is a complex soup of ionised gases, that possesses an unexpected property. As you might expect with that much ionisation there is some level of electrical conductivity, but the unusual property comes in that a flame can be made to conduct in only one direction. In other words, it can become a diode of sorts, in a manner reminiscent of a vacuum tube diode.
[Paul Stoffregen] has made use of this phenomenon in a flame detector that he’s built to be installed on a Burning Man flame-based art installation. It forms part of a response to a problem with traditional pilot lights: when the wind blows a pilot light out, a cloud of unignited gas can accumulate. The sensor allows the pilot light to be automatically re-ignited if the flame is no longer present.
The circuit is a surprisingly simple one, with a PNP transistor being turned on by the flame diode being placed in its base circuit. This allows the intensity of the flame to be measured as well as whether or not it is present
A capacitor is charged by the transistor, and the charge time is measured by a Teensy that uses it to estimate flame intensity and trigger the pilot light if necessary.
Pilot Light Flame Sensor for Burning Man Art
https://www.pjrc.com/pilot-light-flame-sensor-for-burning-man-art/
Tomi Engdahl says:
A Passion for the Best is in Mechanical Keyboards
https://hackaday.com/2017/11/22/a-passion-for-the-best-is-in-mechanical-keyboards/
There is an entire subculture of people fascinated by computer keyboards. While the majority of the population is content with whatever keyboard came with their computer or is supplied by their employer — usually the bottom basement squishy membrane keyboards — there are a small group of keyboard enthusiasts diving into custom keycaps, switch mods, diode matrices, and full-blown ground-up creations.
Ariane Nazemi is one of these mechanical keyboard enthusiasts. At the 2017 Hackaday Superconference, he quite literally lugged out a Compaq with its beautiful brominated keycaps, and brought out the IBM Model M buckling spring keyboard.
Tomi Engdahl says:
Download Teensyduino, Version 1.41
https://www.pjrc.com/teensy/td_download.html
Teensyduino is a software add-on for the Arduino software.
Teensyduino 1.41 supports Arduino versions 1.0.6 and 1.6.5-r5 and 1.8.1 and 1.8.2 and 1.8.3 and 1.8.4 and 1.8.5.
Tomi Engdahl says:
Holst Show Controller
https://hackaday.io/project/16664-holst-show-controller
A Teensy based controller board to control a number of motors, plus DMX, RS232 and GPIO.
A combined, embedded solution to control and power a number of 12V motors, send DMX cues (for lighting integration) and isolated GPIO (for other equipment, e.g. haze machines, fans etc) based on a predefined repeating schedule running over a long period of time (several weeks). There was a focus on making the system robust and flexible, as the installation would be mostly inaccessible once installed.
The brains of the project is a Teensy 3.1, which has a microSD card slot, RTC battery, isolated DMX transceiver and two RS232 ports (one fully isolated, one not), as well as several PC8574 I2C GPIO port expanders for GPIO.
The motors are controlled by an RS232 to TTL adaptor board which plugs into a Pololu 18v7 Simple Motor Controller, configured to operate on TTL serial at 9600bps, and a Device ID set. The daisy chaining ability of the SMC boards allows several motor controller to be connected together on a single bus.
Tomi Engdahl says:
This DIY Controller Lets You Play Games with Just Head Movements
https://blog.hackster.io/this-diy-controller-lets-you-play-games-with-just-head-movements-9d563238531a
Kompon’s controller can be placed on a hat, and uses an accelerometer to track head movement — similar to a virtual reality headset.
https://youtu.be/nT4XKmwGZDc