


Powering microphones
Copyright Tomi Engdahl 1997-2012
This document is a collection of information and circuits for powering electret microphone capsules. This document is written for people who understand the basics of microhone circuits.
Index
- Introduction
- Introduction to electret microphones
- Basic electret microphone powering circuits
- Soundcards and electret microphones
- Plug-in power
- Phantom powering in professional audio
- T-powering
- Other related microphone wiring information
Introduction
Many types of microphones require power to operate, as a general rule these types are described as condenser microphones. The power is used for internal pre-amplifiers and polarizing microphone capsules. If internal batteries are to be avoided then the only solution is to supply the power via the microphone signal cable.
In some cases microphones might be claimed to be "dead" not realising that they require a battery or in other cases phantom power.
Introduction to electret microphones
An electret MIC is the best value for money omnidirectional microphone you can buy. Electret microphone can be very sensitive, very durable, extremely compact in size and has low power requirements. Electret microhones are used in very many applications where small and inexpesive microphones with good performance characteristics are used. Electret microphone occupies (at a rough guess) the lower 90% of applications, quality wise. Most lavalier (tie-clip) microphones, consumer video camera microphones and microphones used with computer soundcards are electret microphones.
The electret is a modified version of the classic capacitor (or condensor) microphone, which exploits changes in capacitance due to mechanical vibrations to produce voltage variations proportional to sound waves. Whereas the condensor MIC needs an applied (phantom) voltage, the electret has a built in charge, and the few volts needed are to power the built-in FET buffer, not to create an electric field.
Typical electret condenser microphone capsule is a 2 terminal device (there are also 3 pin capsules) which approximates to a current source when biassed with around 1-9 volt and routinely consumes less than half a milliamp. This power is consumed by a very small preamplifier built into the microphone capsule which makes the conversion of very high impedance source of the electret element itself and the cable which needs to be driven. Be aware that this impedance is swamped at signal frequencies by cable capacitance so that at 1kHz the assembly will exhibit an impedance of a few 10's of K.
The load resistor defines the impedance and can be matched to the low noise amplifier intended. This is usually 1-10kOhm. The lower limit is defined by amplifier voltage noise and the upper limit by interference pickup (and amplifier current noise). Suitable resistsnce values are typically in the range of 1-10 kohm. In many cases the microphone is powered from 1.5V-5V power source through a resistor which has reistance of few kilo-ohms.
Because the electret itself contains a small buffer amplifier which adds noise, it is common to specify a signal to noise ratio (usually at 94dB SPL) or self noise figure, which is the equivalent acoustic noise level, commonly around 20-30dB SPL.
Electrets need biassing because of the built-in FET amplifier inside the microphone capsule. Bias voltages should be kept clean, because the noise in thiss will get to the microphone output.
Basic electret microphone powering circuits
Basic circuit
        +---------------------------- battery +ve (3 to 12 Volts)
        |
       2k2 R1
        |
        o---------- 10uF ------o----- output
        |+                     |
     CAPSULE                  10k R2
        |-                     |
        +----------------------o----- GND, and battery -ve
This is the basic electret microphone powering circuit which you
can use as generic reference when receivign circuits which use
electret microphones. The putput impedance is determined by
R1 and R2. If you leave out R2 the output impedance is roughly
the resistance of R2.
Here is another drawing of the same circuit:
       vcc
        O
        |
        /
        \
        /
        \  EQUAL TO REQUIRED IMPEANCE
        /  EX.= 1000 Ohm
        \
        |
        |     CAPACITOR MOST ANY VALUE 10uF 16v
|---|   |  + | /
|   |---0----| |-------   AUDIO OUT
|   |        | \
|   |----O--------------
|---|    |
         |
       -----
        ---
         -
Battery powered electret microphone
This circuit can be used with normal tape recorders and sound cards which usually are designed for dynamic microphones. When you build this circuit inside the microphone case (or to small external box) you can make yourself an universal microphone out of an electret capsule.
                                  10 uF
                                 + | |
    +---------------------+--------| |--------------> to amplifier
    |                     |        | |
    | (positive lead)     |
    |                     +----------/\/\/\---------+
   MIC                              2.2 kohm        |
    |                                               | +
    | (ground lead) (-)                          -------
    |                          (battery 9v or so)  ---
    |                                               |
    |                                               |
    +-----------------------------------------------+----> ground
If you are building this circuit it would be a good idea to add
a switch to switch off the battery when you do not use the microphone.
You should note that the output signal level of this microphone
is noticable higher than the signal available form typical dynamic microphones
so you have to turn down the gain in your microphone input
(if there are no suitable adjustments then this higher level can cause
distortion in microphone preamplifier more easily).
The output impednace of this circuit is aroun 2 kohm so I don't recommend
very long microphone cables to be used or you will loose some high frequency
definition (few meters are o problem).
Super-simple powering circuit
In many cases it is possible to use one or two 1.5 V batteries (depends on microphone type) as a power supply for the mic. Battery is directly in series with the microphone.
----------- [ Battery ] ----------------------
                                             I
                                             ----
Amplifier in                                    Mic
                                             ----
                                             I
----------------------------------------------
This circuit works if the microphone preamplifier passes though some
small CD current and is not bothered by it. This quite often the case
but not always.
Normally direct current from the battery has no influence on the preamp, as
the preamp is only amplifying alternating currents.
If you do not know the right polarity of the battery, try it in both ways. In most cases wrong polarity at those low voltage should not cause any damage to microphone element.
Soundcards and electret microphones
Different powering methods used in soundcards
Sound Blaster way
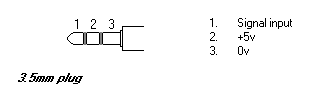
Sound Blaster soundcards (SB16,AWE32,SB32,AWE64) from
Creative Labs use 3.5 mm stereo
jack for the electret microphones. The micrphone connector uses he following
wiring pinout:
        / \
       |   |   Audio signal
        \ /
       +===+
       |   |   Bias voltage for microphone (+5V through 2.2 kohm resistor)
       |===|
       |   |
       |   |   Ground
       |   |
     +=======+
     |       |
Creative Labs has given the following specs for the Sound Blaster microphone input in their web site:
     Input Type: Unbalanced Low Impedance
     Input Sensitivity: Approx. -20dBV (100mV or 0.1Volt)
     Input Impedance: 600 to 1500. (Ohms)
     Input Connector: 3.5mm Miniplug (Stereo Jack)
     Input Wiring: Audio on Tip, Ground on Sleeve, 5Volts DC Bias on Ring
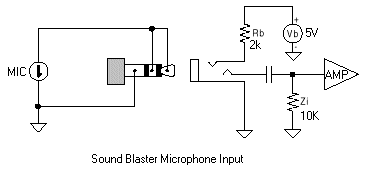
The picture below shows an approximate schematic of Sound Blaster Microphone input circuitry. It shows my quess on the electronics inside the soundcard and one typical wiring for a typical Sound Blaster microphone.
Other wirings
Some other soundcards might use the same method or a different one. The soundcards which use 3.5 mm mono jack for microphones have typically a jumper which enable selecting if power for electret microphone is sent to the microphone connector. If the jumper is put on the bias voltage (usually +5V through 2..10 kohm resistor) is wired to the audio wire. The connector has then the following pinout:
        / \
       |   |   Audio and bias voltage
        \ /
       +===+
       |   |   Not connected or ground
       +===+
       |   |
       |   |   Ground
       |   |
     +=======+
     |       |
The sound card wires in this way are typically designed to have input
sensitivity of around 10 millivolts.
This same microphone wiring seems to be used also in Compaq PCs equipped with Compaq Business Audio sound system (I tested this on Compaq Deskpro XE 560 and it worked nicely with Sound Blaster microphone). My measurements revelaled the the bias voltage that the Compaq put out was 2.43 V and the short circuit current was 0.34 mA. This will indicate that the bias voltage is fed through arount 7 kohm resistor. The ring of the 3.5 mm jack was not connected anywhere. The Compaq manual tells that this microphone input is wired to work only with a phantom-powered electret microphone, such as supplied COMPAQ microphone. COMPAQ manual calls the microphone powering method to be phantom powering, but as the measurements revelal the powerin method is not phantom powering in the the sense as understood by audio professionals. COMPAQ manuals tells that the microphone input has 1 kohm nominal impedance and can accept 0.013 volts maximum input level.
Powering three wire electret capsule from soundcard bias voltage output
This circuit is suitable for interfacing three wire electret microphone capsules to Sound Blaster soundcards which supply bias voltage for powering electret microphones.
     +------+                                                / \
     |      |-------------- output--------------------------|   |
     |      |audio out                                       \ /
     | mike |                                               +===+
     |      |--------------- bias +5V ----------------------|   | 3.5mm plug
     |      |power in                                       |===| to soundcard
     |      |                                               |   |
     |      |---------------- ground -----------------------|   |
     +------+ground                                         |   |
                                                          +=======+
                                                          |       |
Powering two wire electret capsule from soundcard bias voltage output
This circuit is suitable for interfacing two wire electret microphone capsules to soundcards (Sound Blaster soundcards) which supply bias voltage for powering electret microphones.
                                       10 uF
     +------+                          +||                   / \
     |      |---------------+-----------||--- audio --------|   |
     |      |               |           ||                   \ /
     | mike |               |                               +===+
     |      |               +--RESISTOR---- bias +5V -------|   | 3.5mm plug
     |      |                  2.2 kohm                     |===| to soundcard
     |      |                                               |   |
     |      |---------------- ground -----------------------|   |
     +------+                                               |   |
                                                          +=======+
                                                          |       |
Super simple modification which works at lest in SB16:
     +------+                                                / \
     |      |---------------+---------------- audio --------|   |
     |      |mic+           |                                \ /
     | mike |               |                               +===+
     |      |               +-------------- bias +5V -------|   | 3.5mm plug
     |      |                                               |===| to soundcard
     |      |mic-                                           |   |
     |      |---------------- ground -----------------------|   |
     +------+                                               |   |
                                                          +=======+
                                                          |       |
This simple circuit works because the +5V power is fed to microphone
connector through 2.2 kohm resistor inside the card. This 2.2kohm
resistor works nicely as current limiter and 2.2 kohm impedance.
This wiring is used in Fico CMP-202 Computer Microphone.
Powering electret microphones with 3.5 mm mono jack form SB16
The following powering circuit can be used for powering electret
microphones which want the bias voltage through where they output
the audio signal.
      Microphone                                          Soundcard

        / \                                                  / \
       |   |-----------------------------+------------------|   |
        \ /                              |                   \ /
       +===+                             |                  +===+
       |   |                             +------------------|   | 3.5mm plug
       |   |                                                |===| to microphone
       |   |                                                |   |
       |   |------------------------------------------------|   |
       |   |                                                |   |
     +=======+                                            +=======+
     |       |                                            |       |
Connecting telephone handset microphone to sound card
According some news articles in comp.sys.ibm.pc.soundcard.tech newsgroup this same cirrcuit can be used with Sound Blaster and the electret capsule in the telephone handset. First check that the microphone is electret microphone. Then carefully split a shielded cable for the mic, open your phone handset and confirm the positive side of the condenser mic cartridge. Then wire the cartridge like in the picture above (if you want to use the RJ11 connector in the handset then the microphone is connected to the wires in the outside pair). Differend handsets generate different output levels and levels from some handsets might not be enough for Sound Blaster.
If you want to also make the speaker to work then just wire it to the tip and shield of the sound card plug. Confirm that it has a greater resistance than 8ohms, or you might blow the soundcard output amplifier.
Powering multimedia microphones using external power supply
Here is the generic idea of powering multimedia microhones:
     +------+
     |      |--------------- +5V power supply through about 2.2 kohm resistor
     |      |power in
     | mike |
     |      |--------------- audio output
     |      |audio out
     |      |
     |      |--------------- ground
     +------+ground
General powering circuit for computer microphones
designed originally to work with Sound Blaster and similar souncards:
   Soundcard
   Microphone

        / \
       |   |--------------------------------- Audio signal out
        \ /
       +===+      ____
       |   |-----|____|--------+
       |===|    2.2 kohm       | +
       |   |              Battery (3--9V)
       |   |                   | -
       |   |-------------------+------------- Ground
     +=======+
     |       |
NOTE: the output of this circuit has few volts of DC bias in it.
If that is a problem in your application you need to add a suitable
capacitor in series with the audio output wire to get rid of DC bias.
NOTE 2: The typical nominal powering voltage for soundcard microphones is +5V rhrough 2.2 kohm resistor. The microphone capsules are not usually too picky of the actual votlage, so generally anything in the range of 3V to 9V will work (although the voltage can sometime affect the microphone output voltage level somewhat).
Multimedia microphones to normal microphone input
                                                        Soundcar microphone
    Normal mic in                                         Microphone
                           10 uF
        / \                 ||+                              / \
       |   |----------------||------------------------------|   |
        \ /                 ||                               \ /
       +===+                                                +===+
       |   |         +5V ----------------Resistor-----------|   | 3.5mm plug
       |   |         power               2.2 kohm           |===| to microphone
       |   |          |                                     |   |
       |   |----------+------ ground -----------------------|   |
       |   |                                                |   |
     +=======+                                            +=======+
     |       |                                            |       |
Suitable +5V power supply can be made from higher voltage using 7805 regulator
IC. Another way to do auitable power supply is to put three 1.5V batteries in series
or by using one 4.5V lantern battery. The battery is connected between the ground
wire and the point marked with +5V in the circuit.
Plug-in power
Many small video cameras and Minidisc recoders use 3.5 mm stereo microphone connector for attaching stereo microphone to the system. Some devices are designed for microphones with external power supply and some other supply the necessary power for electret microphone thrpugh the same connector as audio goes. The ones which supply power though the connector are usually called to have "plug-in power".
For the devices which use "plug-in power" the electret capsules
are wired in the following way to the microphone connector:
                              3.5mm plug

     +------+                   / \                   +-------+
     |      |------------------|   |          +-------|       |
     |      |mic+               \ /           |   mic+|       |
     | mike |                  +===+          |       | mike  |
     | left |                  |   |----------+       | right |
     |      |                  |===|                  |       |
     |      |mic-              |   |              mic-|       |
     |      |------------------|   |------------------|       |
     +------+                  |   |                  +-------+
                             +=======+
                             |       |
The idea of the wiring inside the video camera or Minidisc recoder has the following idea:
                 ____
     Mic power--|____|-+      3.5mm plug
                  R    |     to microphone
                       |                     ____
    to left   ||       |        / \      +--|____|--Mic power
     sound----||-------+-------|   |     |     R
   amplifier  ||                \ /      |
                               +===+     |        ||    to right
                               |   |-----+--------||-----sound
                               |===|              ||    amplifier
                               |   |
         Ground-+--------------|   |
                |              |   |
               ---           +=======+
                             |       |
In the circuit above the component values can vary somewhat from
equipment to equipment. I don't have any very accurate of the
exact component values the industry is using in tjeir equipments.
My quesses are that the values of Mic power is few volts and
the value of current limiting resistor R is few kilo-ohms.
Phantom powering in professional audio
There's only one type of Phantom powering, and that's Phantom powering. Phantom powering deltais are covered by DIN spec 45596. Initially, it was specificed as 48 volts (P48) provided thru 6.8k resistors. The precise value of the resistors is not too critical, but the two resistors must be matched within 0.4% for good performance. There are now defined systems at 24 and 12 volts (P24 and P12), but those are more rare than traditional 48V feed. Those lower voltage systems use lower resistance values for phantom powering. Most modern condensor microphones will work off a wide range of phantom power voltages. The 48V (+10%..-20%) phantom power is the de-facto microphone powering method supported by practically all marjor sound mixers. There are some audio equipment that use lower phantom power voltages. The most commonly used lower voltage is 15V through 680 ohm resistors (used for example on portable sound systems). Some wireless microphone systems can use even lower voltages, for example low power 5V or 9V supply.
Phantom powering is now the most common microphone powering methid due to it being safe if a dynamic (moving coil or ribbon) microphone is accidently or purposefully plugged into a powered microphone channel. The only hazard is that in case of a shorted microphone cable, or certain old microphones having a grounded center tap output, current can flow through the microphone, damaging it. It's a good idea anway to check cables regularly to see that there are no shorts between any of the pins, and the few ribbon or dynamic microphones with any circuit connection to ground can be identified and not used with phantom power.
The name for phantom power comes from telecommunications: A phantom line is a configuration where a telegraph signal is imposed on a balanced voice pair by using the ground return. This same method was also suitable for powering microphones in studios so it was used also there.
Phantom Power Types P48, P24 and P12
There is often a lot of confusion over the differences and indeed similarities of the various types. DIN 45 596 defines that phantom powering may be achieved using either of three standard operating voltages; 12V,24V or 48V. The way that these voltages are presented to the microphone may vary depending upon the type of powering used. The voltage does not usually definitively indicate the way that the power is delivered to the microphone, although 48V is almost certainly P48 powering when it is encountered.
Creating a clean 48V DC supply is difficult and expensive when on location with only 9V PP3 battery is available, partly because of this it should be noted that most modern microphones will work with voltages anywhere in the range 9-54V.
Phantom powering electret microphone from phantom power
Simplest circuit
This circuit is a very simple method of connecting an electret microphone capsule to the a balanced phantom powered (48V) mixer XLR input.
                     _____
   HOT (2) ---------|_____|------+
                    47 kohm      |+
                                MIC
  COLD (3) ----+              CAPSULE
               |                 |-
GROUND (1) ----+-----------------+
Note that this is a very simple "hack" to interface an electret microphone capsule to a mixer. This circuit works but has it's downsides like sensitivity to noise in phantom power, unblanced signal transmission (prone to interference) and high output impedance (can't properly drive long cables). This circuit can be used to test electret capsules connected to mixer using very short cable. This circuit makes very high level popping noise when it is connected/disconnected from the mixer or when the phantom power is turned or disconnected. Other downside is that this circuit loads the phantom power in very unbalanced way which can disturb some older mixers (in some mixers input transformer can saturate if such exists, in that case try adding 47 ohom resistor between pins 1 and 3).
In practice this circuit seems at least to work on modern mixers, but I don't recommend this circuit for any real recording or PA application For any real use you are much happier with a better quality balanced circuit. They are more complicated but perform much better.
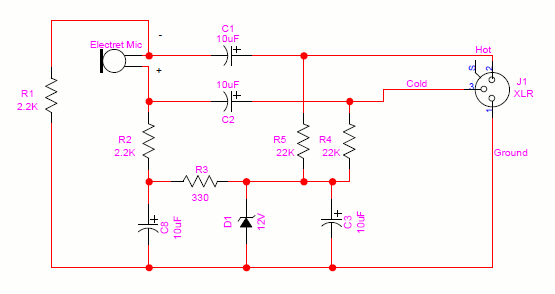
Balanced electret microphone circuit
This circuit gives out balanced signals and has around 2 kohms output impedance which enables it to be used successfully with mic cables of several meters or tens of meters.
                           10u
    +---------o-------------||------o-----------------  HOT    (2)
    |         |                     |
    |         |-                    |
    |      CAPSULE                 22k
    |         |+                    |
    |         |            10u      |
    |         o-------------||------|------o----------  COLD   (3)
   2k2        |                     |      |
    |        2k2                    |     22k
    |         |                     |      |
    |         o--330R---o----o------o------+
    |        +|        +|    |+
    |        10u       12V  10u
    |        -|        -|    |-
  --o---------o---------o----o------------------------  GROUND (1)
The component "12V" is a 12 Volt zener diode
The 10u capacitors in the HOT and COLD signal leads should be high-quality plastic film types. The values of these may be reduced to 2u2 if the preamp input impedance is 10k or greater. If you for some reason use electrolytics for the capacitors which couple the audio signal then those these mutst have >50V working woltage and you must bypass them with 100n plastic film caps. The 10u capacitor in parallel with the zener should be a tantalum type, and can have a 10n plastic film cap in parallel if you wish.
The cable to the capsule should be twin+shield. The shield should be connected to ground near the zener diode, and left unconnected at the capsule. The pinout given is the standard for XLR3 mic connectors.
Source: PZM Modifications web page by Christopher Hicks.
Here is a easier to read circuit diagram for the circuit shown above:
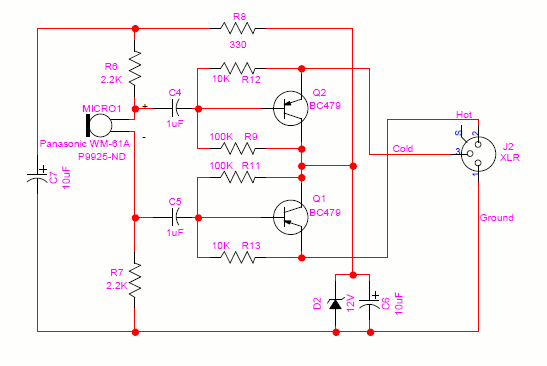
Better electret microphone phantom powering circuit
This circuit provides lower impedance output than the circuit above:
      +-----o---------------------330R--------+
      |     |                                 |
      |    2k2                 +---10k----+   |
      |     |                  |          |   |
      |     |                  |       E--o---|--------------- COLD
      |     o---------||----o--o-------B      |
      |     |         1u0   |          C      |
      |     |+              +-100k-+   |      |
      |  CAPSULE                   |---o------o
      |     |-              +-100k-+   |      |
      |     |               |          C      |
      |+    o---------||----o--o-------B      |
     10u    |         1u0      |       E--o---|--------------- HOT
      |-    |                  |          |   |
      |     |                  +---10k----+   |
      |     |                                 o----+
      |    2k2                               +|    |+
      |     |                                12V  10u
      |     |                                -|    |-
    --o-----o---------------------------------o----o---------- GROUND
Component EBC is a PNP bipolar transistor (for example BC479).
Ideally these should be hand-picked for low noise and
matched gain. Bear in mind that VCE can be up to about 36V.
The 1u0 capacitors should be high quality plastic film types.
The circuit may benefit from the addition of 22pF capacitors in
parallel with the two 100k resistors. For minimum hum pickup the
two 2k2 capsule bias resistors should be accurately matched.
Source: PZM Modifications web page by Christopher Hicks.
Here is a easier to read circuit diagram for the circuit shown above:
Phantom power feeding unit for microphone
This is a schematic of external phantom power feeding circuit for
those who don't have mixer with phantom power output.
Microphone                                     Mixer
                            47 uF
 HOT (2)  ---------+---------||--------------- HOT (2)
                   |
                  6k8
                   |
                   +--------+------100 ohm---- +48V feed
                   |        |
                   |       === 100 uF
                  6k8       |
                   |      GROUND (pin 1)
                   |
COLD (2)  ---------+---------||--------------- COLD (2)
                            47 uF

GROUND (1) ----------------------------------- GROUND (1)
The +48V phantom power feed is grounded to signal ground (pin 1).
+48V voltage can be generated using transformer+regulator, using
batteries (5x9V=45V which is enough), or using a DC/DC converter circuit
which makes well regulated +48V voltage from batteries.
There should be two 12V zener diodes (wired back to back) between audio wires (HOT and COLD) and the ground to prevent 48V voltage pulse passing through the capacitors going to the mixer microphone input.
Use 1% accurate resistors for those 6.8 kohm resistors for best hum and noise elimination.
Obtaining the +48V power supply for phantom power
In mixing consoles the phantom power voltage is usually made using a separate transformer output or using a DC/DC converter. One example of such DC/DC-converter circuit can be found at http://www.paia.com/phantsch.gif (circui diagram of one microphone preamplifier kit from PAiA Electronics).
If you are operating using batteries then it might be useful to know that many phantom powered micks will work fine on less than 48v, try 9v and work up till you get good results, 27v would be 3 9v batterys and a lot simpler than a DC to DC converter. Remeber that some microphones do not work properly or sound different when run on too low voltage. Five 9v batteries in series is 45 volts which should be enough for any phantom power microphone.
If you do use batteries, put a capacitor around them because batteries do make noise. Filtering of battery noise can be done for exammple by using 10 uF and a .1 uF in parallel with the batteries. Another option is to decouple batteries with a 100 ohm resistor and 100uF 63V capacitor.
Does turning on the phantom power could do any damage to dynamic mics ?
Providing dynamic microphones are balanced types and wired with twin screened all the way through the phantom power will do no physical harm. So there should be no problem with most popular dynamics with correct balanced wiring. Modern dynamic microphones with balanced connectors are constructed so that the microphone element is completely floating so adding phantom power voltages does not affect it when you are using proper balanced cabling.
Many older dynamic mics have a center tap of the transformer in the mic grounded to the body of the mic, and to the shield of the cable. This could short the phantom voltage to ground, and could fry the transformer. It is easy to tell if this is the case with your mics. An ohmmeter or continuity checker will tell you if there is a DC circuit between either pin #2 or #3 and the cable shield (pin #1) or the mic housing. If so, don't use that mic with the phantom turned on. Good luck.
Do not try to connect microphones with unbalanced conenctor to a microphone input with phantom power on, because the current from the pahntom power supply will flow though your microphone and can damage it.
Can phantom power damage other audio equipments ?
The 48V phantom power is very high voltage compared to the voltages normal audio equipments are designed to handle. You should be very careful to check that you do not supply phantom power to the inputs where you have anything else than balanced microphones or other equipments designed to handle 48V phantom power properly. Applying phantom power to equipment not designed to hand it migh result a damage caused to that equipment. Especially consumer equipments which are connected to the XLR input through some kind of converter adapter or special cable are in danger. The safest bet when interfacing to XLR input which cna have 48V phantom power the safest choice is to use an audio balancing/isolation transformer between your signal source and XLR input.
Interfacing professional microphones to computers
Typical computer sound interfaces which supply power to microphone supply only +5V voltage (PC soundcards, SUN workstations, Apple Macintosh). Those computer sometimes call this +5V voltage feed to microphone "phantom power", but that power feeding is not real phantom power as used in professional microphones (more details in text above). Professional microphones typically need real phantom power feed which is typically +48V, but many microphones work down to +12..15V. This means that you can't use professional microphones which need phantom power feed directly with the computer soundcard.
Depending on budget and degree of technical skill, you could either go to cheaper consumer grade mics, professional micrphones with option for using battery power or build a real phantom power interface for those microphones microhones. If you plan to build a phantom power adapter then you can use an external power supply for it or plan to take the power for it from inside computer. Many computer have +12V in them and this might be enough for many microphones if wire to them in the right way.
T-powering and A-B powering
These are the same thing, A-B being the old term for what is now referred to as T powering. T-power (short for Tonaderspeisung, also called AB or parallel power, and covered by DIN spec 45595) was developed for portable applications, and is still common in film sound equipment. It would seem that 'T' power is mainly now only used by location recordists and specialists for specific applications, usually over long microphone cable lengths.
T-power is usually 12 volts, and the power is connected across the balanced pair through 180 ohm resistors. Due to the potential difference between the A and B conductors, a current will flow through a dynamic (moving coil) microphone if it is connected to this sort of phantom power. This is not good and will probably cause distortion to the sound and perhaps longer term damage to the microphone. Only T-power mics may be connected to T-power inputs; dynamic or ribbon mics may be damaged and phantom powered mics will not operate properly.
T-powered microphones behave like capacitors and hence block D.C. current flow. The advantage of T-power is that the shield of the microphone cable need not be connected at both ends, thus this allows the common practice of disconnecting one end of the shield to a microphone in order to prevent hum (earth loops).
Here is my idea for powering T-powered microphones from an external
power supply to be able to connect them to a mixer with balanced microphone
input and no T-powering option:
      +-----o--------------- + power (12V)
      |     |
      |   180ohm
      |     |
      |     |
      |     o---------||----o
      |     |         1u0
      |     |+
      |  CAPSULE            To mixer
      |     |-
      |     |
      |+    o---------||----o
     10u    |         1u0
      |-    |
      |     |
      |     |
      |    180hm
      |     |
      |     |
      o-----o----------------- GROUND
Note: This circuit idea is based on the information I have read about T-powering. I have not tested this circuit idea.
Other related microphone wiring information
A balanced mics can often be connected unbalanced connector by just making a proper wiring (this is often used practice).
Unbalanced microphones can be connected to balanced microphone inputs but this does not give any benefits of balanced inputs compared to unbalanced input. An unbalanced (single-ended) mic can be converted to balanced by going through a proper DI box.
Related resources
Tomi Engdahl <[email protected]>