


12V stroboscope

Summary of circuit features
- Brief description of operation: Flashing light at adjustable speed, needs external trigger signal
- Circuit protection: No special protection circuits used
- Circuit complexity: Simple DC/AC converter and modified camera flashlight unit
- Circuit performance: Works quite well
- Availability of components: The problem is to find a suitable camera flas unit to modify, pulse transformer might be hard to find
- Design testing: The orginal flash unit was modified until it worked as I want
- Applications: Stroboscope effects, fast charging flash for camera
- Power supply: 12V DC 1A power supply
- Estimated component cost: No estimation made, I built my circuit from used components I had
- Special notes: The stroboscope flash tube will overheat if used at high power settings for long time
- Safety considerations: Electrical shock hazard, main capacitor has 500V charge and the trigger pulse is 4 kV, capacitors keep charge long time after the circuit is shut off, circuit should be built to a well insulating case
General information
This is one of my stroboscope designs. Usually many stoboscope circuit work directly from mains voltage, but this circuit uses 12V DC intead od mains AC. This is very good idea if you don't want to mess with direct mains voltage connected circuit or you want to run the stroboscope from batteries.
The circuit has some special functions compared to other stroboscope circuits found electronics books. First the there is a switch for selecting the flash power: with C3 you can get very fast flash rates (over 50 Hz), C2 is most suitable for normal operation and using C1 directly you get very bright single flashes.
The stroboscope circuit does not include any timing circuit of it's own. The strobocope will flash when a suitable voltage pulse is applied to the strigger input. This trigger source can be a small variable frequency oscillator, music source or a special strobo controller
How the circuit works
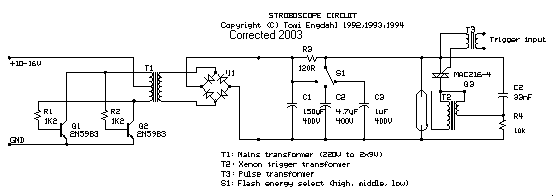
The stoboscope tube needs about 250-400V DC to operate. This high voltage is generated using simple voltage step up circuit built from transistors Q1,Q2 and transformer T1. This circuit gives out about 230V AC voltage which is then rectified with rectifying bridge U1 (must have at least 400V voltage rating) and stored to the main capacitor C1.
I built my stroboscope from parts taken from old camera flash unit. This approach gave me nice flash tube with reflector, trigger transformer and some of the capacitors (for example C1). Other parts were the one luying around. I used some strange triac I found in my for the triggering circuit, but any triac which can handle at least 1A and 400V should do the job well.
CAUTION - high voltage of strobes can cause a nasty and possibly fatal shock. The energy storage capacitor can retain dangerous high voltage after power is removed from the board.
What is the available flash energy ?
The power available from the circuit depends on the capacitor selected. The capacitors are fully loaded when they reach 350V, so the different capacitors give the following power ratings:
Capacitor  Flash energy       Max. speed    Max. power to tube
C1         9 Ws               2 Hz          20 W
C2         0.3 Ws             40 Hz         12 W
C3         0.06 Ws            80 Hz          5 W
Warnings !
Read the following warnings carefully before even thinking of building this circuit:
When the circuit operates there are dangerously high voltages in the circuit. Do not in any case get in contact with live circuit. The charge in the main capacitor can give you very nasty electric shock and are even capable of killing.
And remeber that thew main capacitors will keep their high voltage charges long time after you have switched off the circuit because there is no bleeding resistors (you can add your own if you wish, just wire 1Mohm resistors in parallel with C1, C2 and C3).
Make sure that you have some plastic shield (transparent plastic) in front of the flash tube all the time. If the power rating of the flash tube is exceeded or the flash tube is damaged the flash tube can explode. A plastic shield in front of the flash tube will make sure that the flying pieces of glass will not damagen anybody.
Because the capacitor charging circuitry is more powerful than in the original flash unit the flash tube might get more average power than it is designed to handle. It is possible that the flash tube can overheat because of this.
Do not connect the power supply in the wrong way because this can damage the power transistors and/or the transformer T1. It might be a good idea to add a diode to the power input to make sure that you can't connect the power in the wrong way to the circuit.
Do not look directly to the flash tube at short distances. The flashes generated by this circuit are very bright (as bright as the original camera flash in high power mode). Those flashes can temporarily blind you if you are too near to the circuit.
Component list
R1   1.2 kohm 1/2W
R2   1.2 kohm 1/2W
R3   120 ohm 2W
R4   10 kohm 1/2W
C1   100..150 uF 400V flash capacitor (from camera flash unit)
C2   4.7 uF 400V
C3   1 uF 400V
CZ   33 nF 400V
Q1   2N5983 NPN power transistors
Q2   2N5983 NPN power transistors
Q3   MAC216-4 Triac
TUBE Xenon flash tube (taken from camera flash unit)
T1   220V to 2x9V transformer, at least 10W power rating
T2   Xenon flash tube trigger transformer (from camera flash unit)
T3   Thyristor trigger transformer with good isolation
U1   Rectifier 1A 400V (can be build from four 1N4007 diodes)
S1   Switch one of three, at least 2A 400V rating
Tomi Engdahl <[email protected]>