A soldering iron is a hand tool used in soldering. It supplies heat to melt solder so that it can flow into the joint between two workpieces. For well over 4000 years mankind has known how to join metals together by soldering. In the 1800s and early 1900s soldering irons were still heated by flame. Nowadays they are typically heated with electrical power and sometimes with burning gas.
Electrically powered soldering iron is composed of a heated metal tip and an insulated handle. Heating is achieved electrically, by passing an electric current through the resistive material of a heating element.For electrical and electronics work, a low-power electrically heated soldering iron, a power rating between 15 and 35 watts, is typically used. Professional typically use temperature controlled (thermostat) soldering irons that have somewhat higher ratings (often 40-80W).
The soldering iron temperatures used for electronics soldering are typically between 260 and 350 degrees celsius. Your iron will not melt metal if it is too cold and you will have a hard time soldering if the iron is too hot. If you use too hot iron, you risk damaging the circuit board and electroncs components. For electronics work a temprature controlled soldering station is preferred. There are variety of means are used to control temperature. The simplest of these is a variable power control, much like a light dimmer. Better soldering irons use thermostat control.
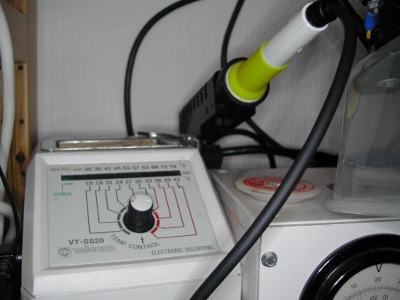
Here is thermostat controlled Velleman soldering station I use:
Soldering irons are easy to use but you will need a little bit of practice before you can do some precision work. For tips how to work with soldering irons, watch this Soldering basics and choosing a cheap soldering iron video.
There are some true classics in soldering iron market. There are a handful of manufacturers who make products that are legendary for lasting forever, and who still support their products made a lifetime ago. These are usually those who set the standards in their field.Weller is one of those companies. Long-Term Review: Weller Magnastat Soldering Iron article gives a review of one truly classic soldering iron model.
On the other side od the market are the very cheap soldering irons. To get idea how they are watch this Inside the cheapest soldering iron on ebay andEEVblog #596 – World’s Cheapest Soldering Station – Yihua 936 videos:
Here are some quick tips for safe soldering and desoldering when necessary:
Selecting Your Solder: For electronics works there are two main types of solder – leaded and lead free. Treaditionally soldering for electronics has been done with tin+lead solder (typically in 63/37 and 60/40 moxes). Leaded solder is easy to work with, but contains poisonous lead (make sure to wash your hands regularly to avoid absorbing it). Another option is lead-free solder. It does not contain lead, but the flux in lead-free solder is much more active than the rosin (literally pine sap) flux in leaded solder (typically much more irritating to your eyes and respiratory tract). To solder with lead free solder, you typically need to use higher temperature and soldering iron with better temperature control. A “good” lead-free solder joint is grainy and rough. If you do repair work, use the same solder type (leaded or lead free) that was originally used, because mixing leaded and lead-free solder can lead to unexpected results.
Catching Your Breath: Soldering produces fumes, and you don’t want to breathe them in. Ensure that your workspace is well ventilated (exhaust fan is a good idea).
Protecting Your Eyes: Safety goggles are an important part of any safe workspace. Spatter may be rare, but it’s always better to be safe than sorry.
Never forget that your soldering iron is hot! Make sure that you only hold it by the insulated grip, and always return it to its stand after you’ve used it.
A clean iron tip means better heat conduction. Use a damp sponge to wipe the still-hot soldering iron between uses. An alternative is to use solering iron cleaner with Brass wire sponge. How Is a Wet Sponge Used?

34 Comments
Tomi Engdahl says:
Roll Your Own JBC Soldering Station
https://hackaday.com/2017/11/06/roll-your-own-jbc-soldering-station/
How can you build your own soldering station and still claim it is a JBC? [Marco] noticed that the real performance of the iron came from the tip — what JBC calls a cartridge. In addition, the handle provides good ergonomics. You can buy the tips and handles from JBC for considerably less than a complete station. You just have to add the electronics to make it all work.
Tomi Engdahl says:
DIY Hakko Soldering Station
https://hackaday.com/2016/01/05/diy-hakko-soldering-station/
[Julez] wanted another soldering station, so he decided to build one himself using a Hakko 907 soldering iron (or a clone). Of course, he could have bought a station, but anyone who reads Hackaday doesn’t require an explanation for why you would build something you could buy.
http://www.eevblog.com/forum/projects/simple-diy-soldering-station-for-hakko-907-iron/
Tomi Engdahl says:
Simple Arduino Soldering Station © GPL3+
https://create.arduino.cc/projecthub/lazyvlad/simple-arduino-soldering-station-323e6b
Simple, easy to assemble, programming and use with block structure, Arduino-based soldering station.
Tomi Engdahl says:
Hakko FX-951 Ripoff First Look, Rant & Use
https://www.youtube.com/watch?v=mV0-pV1C6Yk
A quick look, first use and rant about the Hakko FX-951 Clone ripoff
Tomi Engdahl says:
DIY Arduino Soldering Iron Hits Version 2.0
https://hackaday.com/2018/09/22/diy-arduino-soldering-iron-hits-version-2-0/
A few months ago we brought word that [Electronoobs] was working on his own open source alternative to pocket-sized temperature controlled soldering irons like the TS100. Powered by the ATMega328p microcontroller and utilizing a 3D printed enclosure, his version could be built for as little as $15 USD depending on where you sourced your parts from. But by his own admission, the design was held back by the quality of the $5 replacement soldering iron tips he designed it around. As the saying goes, you get what you pay for.
But [Electronoobs] is back with the second version of his DIY portable soldering iron, and this time it’s using the vastly superior HAKKO T12 style tip.
Portable soldering iron V2.0
http://www.electronoobs.com/eng_arduino_tut42.php
Tomi Engdahl says:
EEVblog #1064 – Soldering Irons OLD vs NEW
https://www.youtube.com/watch?v=scvS2yeUH00
What are the differences between the “old” style soldering iron tips like used on the low cost Hakko and Weller et.al low cost irons, and the more expensive integrated tip type?
An apples to oranges comparison of the Hakko FX-888D and the JBC CD-2B stations.
Tomi Engdahl says:
EEVblog #1114 – NEW TS80 USB Soldering Iron Review
https://www.youtube.com/watch?v=_Z9es-D9_8g
Review of the new 18W USB-C TS80 temperature controlled portable soldering iron.
TLDR; Highly recommended, money well spent if you need a portable iron solution, but you need a QC3 battery pack.
Tomi Engdahl says:
The Modern Analog Soldering Station
https://hackaday.com/2018/10/31/the-modern-analog-soldering-station/
There is a certain sense of accomplishment one gets when building their own tools. This is what [Alejandro Velazquez] was going for when he built his own soldering station. Sure you can get a decent station for a pittance on Amazon, or eBay. You can even build your own microprocessor controlled station. [Alejandro] is currently interested in analog electronics, so he went that route to build his own closed-loop station.
The handle is a 50 watt, 24-volt affair with a thermocouple. You can find this handle on many Hakko 907 clone soldering stations, often referred to as the 907A.
http://electronics.vlzqz.com/analog-closed-loop-controlled-soldering-station.html
Tomi Engdahl says:
The art of soldering from a design engineer’s perspective
https://www.electronicproducts.com/Education/Career/The_art_of_soldering_from_a_design_engineer_s_perspective.aspx?utm_source=newsletter&utm_campaign=ad&utm_medium=EDNPCBDesign-20181008
Silicon Labs design engineer Asem Elshimi shares his first foray into the world of PCB soldering with some surprising insights
Long story short, as part of my training as a new hire at Silicon Labs, my project lead encouraged me to learn how to solder. Thus started, without exaggeration, a life-changing engineering experience. Soldering turns out to be an art. Or as the lab technician, who generously guided me through a starter project of soldering a tiny 0201 part to a reused PCB, told me the first time that I walked into his lab, “Soldering takes as much effort and passion as learning how to play the guitar.”
From there, I started my first soldering project. My soldering mentor gave me a practice PCB, an iron, tweezers (which need to be chosen depending on the size of the elements you plan to solder), solder wire, solder wick, and soldering flux — and, of course, some electrical elements to play with. Then he gave me the green light to use a bench equipped with a microscope.
Starting with zero experience, I spent the first half hour staring at the elements under the microscope. “So these are the matching elements that I have been simulating and measuring,” I said to myself. It was a moment of connection and a moment of reverse-alienation. The concepts, ideas, and theories that I had in mind about circuit elements were suddenly cast into a tiny spec of metallic packaging. An 0201 capacitor that is difficult to see even under the microscope is the material expression of our engineering knowledge and practices about capacitors.
My first two trials of soldering elements to the board were disastrous.
Fortunately, in soldering (as in RF layout and pretty much every practice dealing with electromagnetic signal flow), beautiful work always wins. Symmetry and neatness can be easily backed by theoretical and experimental evidence that proves their necessity.
It takes long hours of practice to reach a point of being able to confidently and neatly place a part on a board without damaging it. As you start the process, it is very helpful to keep your goal in mind. Pick your practice board. Put it under the microscope and examine the pad areas where you are planning to solder your part.
To put it another way, as an electrical engineer, it will help you immensely to learn the art of soldering. This essential skill will not only make it faster for you to pinpoint an open solder the next time that you suspect one, it will also make your communication with the soldering specialist a lot easier. You now speak their language, and you understand their unworldly capabilities.
Tomi Engdahl says:
Arduino portable soldering iron board V3
https://www.youtube.com/watch?v=j-UKvBpGUdw
Finally, this board is complete and I have a finished product. I’m so happy with this last version of the portable soldering iron board V3.0. It also has a 3D case now, with great design. I hope you like it too!
Tomi Engdahl says:
Solderdoodle Plus Is the Swiss Army Knife for Soldering, Wood Burning, and More
https://blog.hackster.io/solderdoodle-plus-is-the-swiss-army-knife-for-soldering-wood-burning-and-more-6b018c6bb73c
Tomi Engdahl says:
https://hackaday.com/2019/07/15/review-shi-yi-tool-sy365-8-desoldering-iron-second-cheapest-you-can-find/
Tomi Engdahl says:
A Homebrew Weller RT Soldering Station
https://hackaday.com/2020/01/06/a-homebrew-weller-rt-soldering-station/
Tomi Engdahl says:
Otter-Iron – TS100 USB-PD hardware mod
Replacement PCB for TS100, adds USB-C PD to every hackers favourite tool!
https://hackaday.io/project/169248-otter-iron-ts100-usb-pd-hardware-mod
Tomi Engdahl says:
A Soldering LightSaber For The Speedy Worker
https://hackaday.com/2020/03/28/a-soldering-lightsaber-for-the-speedy-worker/
Tomi Engdahl says:
Dual T-12 station
Notes about making a dual T-12 soldering station.
https://hackaday.io/project/162676-dual-t-12-station
Tomi Engdahl says:
Choosing the right Soldering Iron | Ceramic or Coiled?
https://m.youtube.com/watch?v=g7RUmXH5Q04&t=9s
In this video, I will compare the two most common type of soldering irons, and experiment to find out which of them is better.
Tomi Engdahl says:
What are the dangers of using a soldering iron?
Lead on your skin can be ingested and lead fumes can be given off during soldering. Other metal fumes can also be hazardous. Lead can have serious chronic health effects, such as reproductive problems, digestive problems, nerve disorders, memory and concentration problems, muscle and joint pain.
https://ehs.stonybrook.edu/programs/laboratory-safety/laboratory-equipment/soldering
Tomi Engdahl says:
DiY hakko
https://youtu.be/gd2W-boIRPo
Tomi Engdahl says:
Build A DIY Digital Soldering Station (Homebrew Hakko 907). Enjoy the variable and constant temperatures and quick warm-up times up to 25s. (Schematic, PCB Layout, Code & STLs Included)
https://youtu.be/gd2W-boIRPo
Henchman Products says:
Henchman offer a wide range of Fluke leak detector and measurement tools, digital multimeters, electrical testers, thermometers, analysers, meters as well as accessories like leads, probes and carry cases.
toolkits for sale
tool board cutting
electrician tools kit
Tomi Engdahl says:
Adam Savage’s One Day Builds: Portable Soldering Station!
https://www.youtube.com/watch?v=8uGS11yuVyo
Adam adds to his shop infrastructure with a build for one of his new favorite tools: a USB-powered soldering iron. This compact mobile soldering station carries everything Adam needs for simple wire soldering work, and is designed around his own usage patterns and procedures!
Tomi Engdahl says:
How To Make 12v Soldering Iron At Home.
https://www.youtube.com/watch?v=iYKCqYJyrkQ
1. nichrome wire
2. Soldering tip
3. 12v battery
4. Fiberglass Sleeving
Warning! anything you do is at your own risk be safe
Tomi Engdahl says:
Cómo hacer un soldador de 12V – Soldador de estaño casero
https://www.youtube.com/watch?v=B_NYepCDjf8
Tomi Engdahl says:
Ryobi has GOT to be joking with this soldering iron
https://www.youtube.com/watch?v=0xUqBB4FiOQ
I have opened up a fair number of Objects before and almost never found another Whole Object inside like this. Ryobi! What are you doing!
The title of this video describes the primary punchline, but it’s also just an overview of the whole tool’s build quality, which I think is worth your time! Ryobi did some wild stuff here!
I’ve also learned that Hakko irons have exposed ceramic elements, and it sure looks like they use PVC cords. To which I respond: that’s why I bought a Weller.
Chapters:
00:00 The problem
01:46 Existing solutions
05:57 Ryobi options
10:20 Station overview
21:21 The first issue
26:13 Taking it apart
29:17 The insides (The Big Reveal)
34:36 Other quality issues
39:33 Chassis quality
41:34 Conclusions
42:28 Second Ryobi product
46:05 Outro
Tomi Engdahl says:
weller irons use that dank insulation
https://www.youtube.com/watch?v=Jmj94rFdFUQ
Yes, I know it’s silicone – but the majority of silicone insulation isn’t rated for anything over 200C, and much of it is 100C or less. The 200+ stuff is also virtually impossible to buy online.
Checked with people who have Hakko irons, same thing – the FX888 handpiece cable can take 850F no problem.
Tomi Engdahl says:
Pinecil V2 Review: Smart Soldering Iron, Powered by RISC-V CPU
Low cost soldering iron, with high end features.
https://www.tomshardware.com/reviews/pinecil-v2
Tomi Engdahl says:
SDG #268 New MiniWare TS101 – Upgraded from TS100 USB Soldering Iron
https://www.youtube.com/watch?v=VFFe0ZQoXz4
https://www.miniware.com.cn/product/ts101-smart-soldering-iron/
Tomi Engdahl says:
Parkside cordless soldering iron teardown and hack (with schematic)
https://www.youtube.com/watch?v=KPJJBa6-TVQ
Slightly weird circuitry. This took longer to reverse engineer than expected, but yielded new information on the thermal sensing of Hakko-style soldering irons.
The default temperature of 500C (932F) is quite dramatic for a soldering iron, but there is a way to hack it to a lower temperature if desired.
The circuitry is a bit weird, in that the main control chip may have a stand-alone comparator section, but also monitor its activity externally and override it to shut the iron down. At least, that’s my first guess at what’s happening. Alternatively it could be ensuring the MOSFET is forced off in sleep mode, although the sleep current draw is very low at about 1uA.
Tomi Engdahl says:
A look inside a “Hakko” soldering iron tip temperature tester.
https://www.youtube.com/watch?v=iqxEMFCvGtc
I got this tester to check the temperature of various soldering irons. Having tried testing tip temperature with a normal thermocouple with very random results, I thought it would be quite interesting to see what was special about the thermocouple used specifically to test iron tips.
Although labelled Hakko, I don’t know if it’s a genuine Hakko brand unit.
Tomi Engdahl says:
Clive, it’s about 50 measurements or 50 contacts before the sensor wire needs to be replaced. this is from Official Hakko instructions for their other device using the same exact wire: https://www.youtube.com/watch?v=1OmH7QxlXxQ
you can make it last longer than 50 uses if you wipe center sensor part of the wire clean with Isopropyl alcohol and don’t let the flux solder burn black on it.
Tomi Engdahl says:
SDG #275 Pinecil V2 PINE64 Open Source Soldering Iron – Test with PCBs from JLCPCB
https://www.youtube.com/watch?v=-TosWhPsru4
Tomi Engdahl says:
SDG #276 Junk JBC Equipment
https://www.youtube.com/watch?v=TNLXSFTBorg
0:00 Introduction
3:01 ALLPCB
3:46 Details of the Handpiece
7:13 JBC Base Unit
11:21 Teardown
16:21 User Interface and Options
19:38 Loading solder
22:46 Testing some soldering
24:53 An upset Steve
Tomi Engdahl says:
https://hackaday.com/2025/02/04/understanding-the-t12-style-soldering-iron-tip/
Soldering irons and their tips come in a wide range of formats and styles, with the (originally Hakko) T12 being one of the more interesting offerings. This is because of how it integrates not only the tip and heating element, but also a thermocouple and everything else in a self-contained package. In a recent video [Big Clive] decided to not only poke at one of these T12 tips, but also do a teardown.
With a simple diagram [Clive] explains how these T12 elements are then used to regulate the temperature, which isn’t too distinct from the average soldering iron with ceramic heating element, but it’s still nice to have it all integrated rather than having to try to carefully not damage the ceramic heater while swapping tips with the average soldering iron.
Inside a modern T12 style soldering iron element/bit
https://www.youtube.com/watch?v=CdF3tjVUvXo