When you have a great service like IFTTT that you can interface with many ready available cloud services or commercial hardware, the next idea is how to connect your own device (Arduino, Raspeberry Pi, etc..) to this service. Here are some pointers to ideas how to interface your own hardware to IFTTT:
Pushbullet’s IFTTT Channel Turns Any Trigger Into a Notification article says that Pushbullet is a great way to get push notifications in your browser and on your phone. Now Pushbullet has an If This Than That channel so you can push customized info right to your Android or iOS device. Pushbullet is essentially a way to easily send information between your computer and phone. The IFTTT integration means you can automate that process and set up custom notifications for anything that works with IFTTT. For example, you can set up a notification to alert you when a friend checks in nearby on Foursquare, someone on your calendar has a birthday, when a specific user posts to Instagram, and much more.
blink(1) advertises to be the world’s best indicator light, designed in the spirit of our favorite old school Unix tools: simple, flexible, and robust (and cross-platform). It fits into the USB 1.0/2.0 port on nearly every device so you can connect cloud data sources or events on your computer to a full-color LED and know what’s happening. blink(1) is a channel on IFTTT.
Triggering IFTTT from Arduino IFTTT recipe can be used for triggering IFTTT events from DIY devices. The device needs to send specifically formatted mail to IFTTT, and it acts as trigger for operation you want. You can use Lithouse or any other suitable service to do this.
Triggering IFTTT from Arduino using Lithouse instructable shows how to build a motion detector and trigger IFTTT events from that device. As the motion detector cannot directly contact IFTTT, this example uses Lithouse as the broker. This idea was also mentioned in Arduino discussion forum and Home Automation with DIY IFTTT Trigger article.
You Can’t Touch This! – An Evil Arduino Based Alarm System article shows how to connect movement sensor (PIR) plus a camera and a wifi connected device (Arduino Yún in example, but it can be easily substitued with a RaspberryPi) it Internet. You hide the device into the cupboard/fridge/locket, and when the device detects some movement, it will take a picture and post it right to your email! And if you use IFTTT, then you can automatically post the picture of the thief to Facebook, Twitter and show the thief’s face to the entire world! The project is very simple.
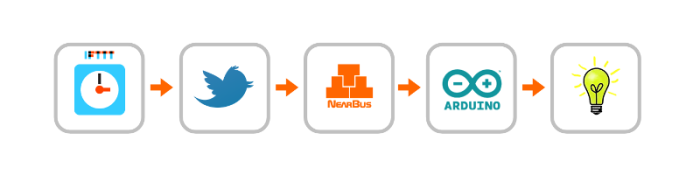
App Note #1238 – Cloud Presence Simulator App Note describes how to implement a presence simulator controlled from the Cloud. The system consists in a combination of different internet free services as Twitter and IFTTT. An Arduino Ethernet board is used to control a power switch to turn on and turn off a light. This design is intended to show you how the NearBus Connector simplifies the way in which these kind of Internet-based projects can be implemented. The system consists of an Internet configurable clock that sends ON / OFF messages through Twitter to the NearBus connector. The NearBus connector forwards these messages to the Arduino Ethernet board (through Internet) who Turns On and Turns Off a power switch allowing in this way to control the light sequence form any place with a simple browser. Here Twitter is used as a “text transport channel” to carry the pseudo RESTful string.
Temboo, Connected Devices and Web Services article article tells that the number of people who are tinkering with Arduino, various sensors and wearable devices is growing rapidly. Temboo has announced that its technologies are now embedded on the latest Arduino Yun. Temboo means that tinkerers can now create Arduino devices that connect with the 100 or so different APIs in the Temboo library – direct integrations to services like Facebook, Dropbox and Twitter for example. From those platforms you can get easily the trigger to IFTTT.
Arduino’s Yún powers this Gmail (alert) lamp article shows how to build built a Gmail (alert) lamp programmed to ping him in real-time about incoming emails labelled “important” using Arduino Yun. IFTTT can send you e-mails, so this could maybe be adopted to some other uses as well.
Using a Raspberry Pi LEDborg as an IFTTT.com blinky LED notifier shows how to build a very simple web-controlled multicoloured LED indicator with your Raspberry Pi and the PiBorg LEDBorg board. The controlling from IFTTT is done though e-mail messages: To do this I’m going to be using a specially created email account. Next we need a bit of code on the Pi to check the gmail account, and fetch the subject of the latest email sent to it.
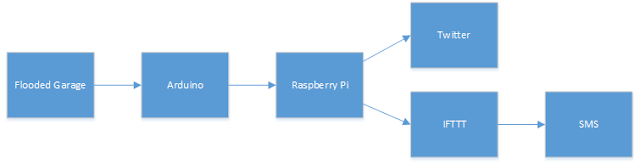
Pi + arduino + ifttt shows using @Raspberry_Pi @Arduino and @ifttt to monitor the flood in the garage. Arduino is used as a water sensor and hooked that up to the Raspberry Pi to provide the notifications. At a high level, the Arduino senses the flood and the raspberry pi sends me a tweet and IFTTT sends out SMS .
Run bash commands on Raspberry Pi by e-mail Recipe will create text files from delivered e-mails in folder Raspi_Commands on Dropbox. For running commands, you have to setup Raspi Runner on your Raspberry Pi. Raspi Runner is a BASH script which will run all your scripts delivered by e-mail. This script can be of course used by any Unix based system with bash shell.
Temperature tweet your Raspberry Pi using IFTTT posting tells that In the blog “Average Man” have written about the use of the service “If This Then That” to receive email from your Raspberry Pi and convert it into a tweet. You’ll need a Raspberry Pi, running Raspbian Wheezy (might work on other OS options), a Gmail email account (might work with other email providers) and a Twitter account. You’ll also need a free account with IFTTT.
Easily connect Raspberry Pi to Gmail, Facebook, Twitter & more! #piday #raspberrypi @Raspberry_Pi article shows how easily connect your Raspberry Pi to web services and social networks! This tutorial demonstrates how to painlessly send and receive Gmail on the Raspberry Pi from Python, which in turn, allows you to easily connect it to web services and social networks like Facebook, Twitter, and more! This would normally be well beyond the abilities of most users due to the inherent complexities of programming through social media APis, client/server authentication, etc. However, with the easy-to-use web service Swiss Army knife ifttt (if this then that) anyone with even the most basic programming skills can dramatically expand the capabilities of their Raspberry Pi.
9 Comments
Tomi Engdahl says:
One potential control idea:
Remote control with Dropbox
http://www.epanorama.net/newepa/2013/05/20/remote-control-with-dropbox/
Tomi Engdahl says:
Audio-coupled Smoke Alarm Interface Sends Texts, Emails
http://hackaday.com/2015/11/16/audio-coupled-smoke-alarm-interface-sends-texts-emails/
The Internet of Things is getting to be a big business. Google’s Nest brand is part of the trend, and they’re building a product line that fills niches and looks good doing it, including the Nest Protect smoke and CO detector. It’s nice to get texts and emails if your smoke alarm goes off, but if you’d rather not spend $99USD for the privilege, take a look at this $10 DIY smoke alarm interface.
The secret to keeping the cost of [Team SimpleIOThings’] interface at a minimum is leveraging both the dirt-cheap ESP8266 platform and the functionality available on If This Then That. And to keep the circuit as simple and universal as possible, the ESP2866 dev board is interfaced to an existing smoke detector with a simple microphone sensor.
$10 DIY Wifi Smoke Alarm Notifier (Roost & Nest Alternative) (Full Tutorial)
http://www.simpleiothings.com/10-diy-wifi-smoke-alarm-notifier-roost-nest-alternative-full-tutorial/
However with the emergence of IoT devices, now there are some cool products on the market right now that will send you a smartphone notification when your smoke detector goes off.
Nest Smoke Alarm + Carbon Monoxide Monitor ($99, Nov 2015) – A replacement for the traditional smoke alarm that sends an alert to your phone when it detects smoke.
Roost Smoke Detector Smart Battery ($40, Nov 2015) – 9V Battery you can install in any traditional smoke detector, which will notify you via a smartphone app if your alarm is going off. Battery lasts for 5 years, at which point the non-smart portion of the device needs replacement.
These look like great devices, but for some consumers they will be too expensive. Especially if you need multiple devices, it starts to get very expensive very fast. What if I told you you could build yourself a simple sound sensor that sends you a smartphone notification, SMS, and even call your phone when your current smoke detector rings. You could also build this for about $10 bucks. If that sounds interesting to you, read on!
I know you’ve seen these types of tutorials on the internet before, and usually they say something like, just buy a breadboard, soldering iron, breakout board, serial adapter, etc. etc. and after you’ve spent about $50 dollars you can build a cheap Internet of Things (IoT) device. Well, sorry internet. We nerds sometimes forget that most people don’t really have these things lying around. That’s why I built this website around the idea that IoT devices can be built without coding knowledge, soldering, or complicated prototyping.
One of the reasons why IoT devices can be built so easily now is because of the ESP8266 development board. IoT enthusiasts have been excited about the ESP8266 because its a full system on a chip (SoC) that has onboard wifi connectivity that can cost as low as 3 dollars. The IoT community has been building with Raspberry Pi and Arduino microcomputers for a while now, and while capable these computers cost up to $35 dollars, don’t have onboard wifi, and aren’t easily powered with common ports like microusb. The standalone ESP8266 chip is great, but doesn’t have an easy to use power supply and it’s hard to configure without special cables.
To make building IoT devices both easy and cheap, I recommend using the ESP8266 development board.
The Wifi Smoke Alarm Notifier, and all of the projects on SimpleIOThings use an internet service called If This Then That (IFTTT). IFTTT executes an action, like sending an SMS or posting a Tweet, when an event takes place.
Using the Maker Channel
For SimpleIOThings projects we’re going to use IFTTT recipes that use the Maker Channel. The Maker Channel allows people to create recipes that interact with DIY devices. The DIY devices you can build using tutorials from SimpleIOThings will send messages over the internet to the IFTTT Maker Channel, which then triggers actions like phone calls and SMS messages. The Maker Channel can also send messages to DIY devices to trigger actions on the device as well.
Once you connect to the Maker Channel, take note of your “Maker Key,” which is an alphanumeric code that identifies you and your DIY devices when they send web messages. You can jot it down somewhere, or you can always go back to https://ifttt.com/maker to find it.
Tomi Engdahl says:
Community-built projects, powered by IFTTT
https://www.hackster.io/ifttt/projects
Tomi Engdahl says:
IFTTT Smart Button © GPL3+
This is a V2 of my original Staples Easy Button project. It is WAY more energy efficient, plus it has a first-time OTA wifi configuration.
https://www.hackster.io/noelportugal/ifttt-smart-button-e11841?ref=platform&ref_id=5755_trending___&offset=4
Tomi Engdahl says:
Introducing the Maker Channel
http://blog.ifttt.com/post/121786069098/introducing-the-maker-channel
For all the DIYers, tinkerers, and creative coders out there — we’re thrilled to introduce you to the Maker Channel.
The Maker Channel extends the power of IFTTT to any DIY project, big or small. You can now build and connect Recipes to any device or service that can make or receive a web request.
From creating browser extensions to connecting a Raspberry Pi or Arduino with Twitter — it is all possible with Maker.
https://ifttt.com/maker
The Maker Channel allows you to connect IFTTT to your personal DIY projects. With Maker, you can connect a Recipe to any device or service that can make or receive a web request (aka webhooks). See how others are using the Maker Channel, or share your own experience at hackster.io.
Tomi Engdahl says:
Audible notifications by a Grandfather’s clock
Eight chimes can sound in different patterns whenever I receive a notification through IFTTT
https://hackaday.io/project/10771-audible-notifications-by-a-grandfathers-clock
I fell in love with the sound of a grandfather’s clock. But it was too expensive for me. And that clock has no alarm and snooze option. And it knows nothing about my emails or text messages.
So I bought the mechanism of a used grandfather’s clock on. It has a simple structure: The chime rods tinkle, when the hammers hit, when the solenoids pull in, when the Raspberry Pi sets voltage on the GPIOs, when the IFTTT webpage calls the Raspberry Pi’s webserver, when I receive an important email.
Raspberry Pi 3
Tomi Engdahl says:
How to Send Text Message (SMS) using ESP8266
https://circuitdigest.com/microcontroller-projects/sending-sms-using-esp8266
This tutorial will help you to send SMS to any registered mobile number from ESP8266.
Concept behind the Tutorial:
We know that the ESP8266 module can be configured both as AP or STA. Here we have configured it to work as station and have connected it to our Wifi Router. Once the connection is establish we have to find out a way to send SMS online. This online must also be easily accessible by out ESP8266 module. This is where we leverage the power of IFTTT (If This Then That) website. Using this website we can send SMS, E-mail, Whatsapp messages, Facebook updates, Twitter tweets and what not. They have a heck a lot of tools that can be used with little knowledge, but in this tutorial we are going to use the send message feature and leave the rest for other future tutorials.
After few tweaks in the IFTTT website we will able to get a HTTPS URL which when triggered will send a predefined Text message to a specific mobile number. Now, this URL has to be called by our ESP8266 module when needed and your SMS will be fired to your mobile number. Sounds fairly simple right!!? Let us see the steps involved.
Replacement Windows says:
This is a topic that’s close to my heart… Best
wishes! Is it OK to post on Reddit? Keep up the really good work!
Tomi Engdahl says:
Speak to Arduino and Control It with Google Assistant © GPL3+
https://create.arduino.cc/projecthub/electropeak/speak-to-arduino-and-control-it-with-google-assistant-3791ee
How to make a connection between an internet service and Arduino boards.
In this project, we’ll Learn how to make a connection between an internet service and Arduino boards. At the end of this article, you will:
know how to get data from Google Assistant
know how to use IFTTT protocol
be familiar to webhooks and http requests
be able to speak to your Arduino