I got interested interested in ESP8266 WiFi module after reading New Chip Alert: The ESP8266 WiFi Module (It’s $5) article. Why is it cool? It’s a WiFi module with an SOC, making it somewhat similar to TI’s CC300. ESP8266 is an UART to WiFi module that you can pick for less than $5 USD.
ESP8266 is a really cheap and easy way to connect any small microcontroller platform (for example Arduino) wirelessly to Internet. The microcontroller on the module takes care of all the WiFi, TCP/IP stack, and the overhead found in an 802.11 network. It’s addressable over SPI and UART, making this an exceptionally easy choice for anyone wanting to build an Internet of Things thing. You can use AT commands to connecyt to WiFi networks and open TCP connections without need to have TCP/IP stack running in your own microcontroller: You can simply connect any microcontroller to this module and start pushing data up to the Internet. This might be why it seems that ESP8266 has pretty soon become every hacker’s favorite WiFi chip.
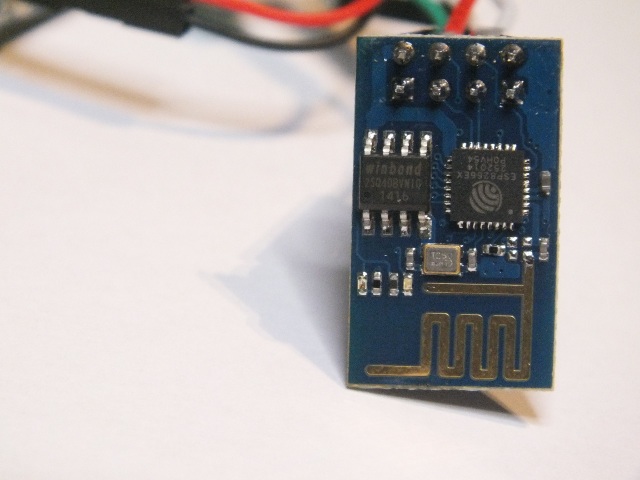
The ESP826 module I bought from Electrodragon is simple having only the ESP8266 IC and one other IC in it. The WiFi antenna is integrated to circuit board. The whole module is just size of post stamp.
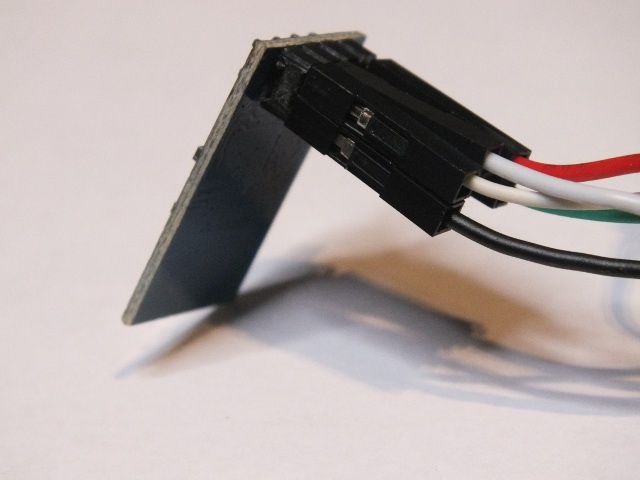
The other side of the he module des not have any components, just 8 pins I have attached wires to in this picture.
There’s a catch, right, there’s always a catch on the cheap products. One thing is that ESP8266 pretty much doesn’t exist outside China. Ordering from China is not a problem nowdays, but when all the documentation is in Chinese, that can be a problem. But fortunately there has been projects to get ESP8266 translated data sheet.
I had enough information, so I need to get one module to test. I ended up ordering ESP8266 module from Electrodragon (check module data). ESP8266 from Banggood.com would have been cheaper bit taken longer time to get because ESP8266 module was listed to out of stock at the time.
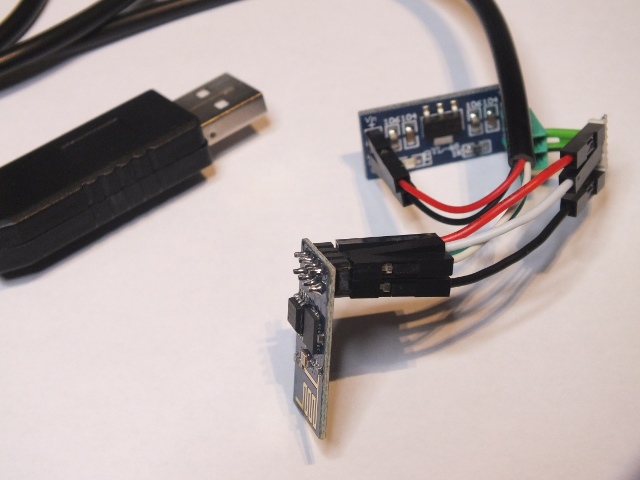
The module and IO pins run at 3.3V. For testing I used USB To RS232/TTL PL2303HX Cable Adapter and 5V to 3.3V regulator module to do the connection. I used separate 3,.3V regulator module because I wanted to guarantee that the module can get enough current (over 200 mA on peaks) (some other USB-serial adapter ICs have 3.3V regulators built in them but can’t give enough current out). Wi07c ESP8266 module data and different project examples got me started pretty well.
Test commands at 115200-N-8-1 serial port settings:
AT+RST
AT+CWMODE=1
AT+CWJAP=”SSID”,”PASS”
AT+CWJAP=”AndroidAP”,”XXXX”
AT+CIPSTART=”TCP”,”www.epanorama.net”,80
AT+CIPSEND=0,n: Where n is the length of the request string.
AT+CIPCLOSE
The results with those were promising. Wiring ESP8266 to your favorite microcontroller platform has pretty much everything you would need to do with an Internet of Things thing. That’s good enough, but things are even better.
It has turned out that it is possible to do run your own coode on the module itself: An SDK for the ESP8266 WiFi Chip turns the ESP8266 into something much better than a UART to WiFi module; now you can create a Internet of Things thing with just $5 in hardware. You can write the software using C programming language and GCC compiler to processor in the module (80MHz Tensilica). Included in the SDK are sources for an SSL, JSON, and lwIP library, making this a solution for pretty much everything you would need to do with an Internet of Things thing. Looks interesting, I just have to find time to test that out…
Review articles on ESP8266
First impression on the ESP8266 serial-to-WiFi module
The Current State of ESP8266 Development
Review on the new and cheap esp8266 WiFi module – video
The Current State of ESP8266 Development
Sites on ESP8266 information:
translation of the datasheet and AT command set
Project pages:
Using the ESP8266 module
A Development Board for the ESP8266
ESP8266 and PL2303HX-gpio adventures
Update Firmware ESP8266Cloud Update - also video
A Proof of Concept Project for the ESP8266
The ESP8266 Becomes a Terrible Browser
ESP8266 Retro Browser – Accessing a web site with an ESP8266 serial WiFi module and an Arduino Mega
Keep an Eye on Your Fermenting Beer with BrewMonitor
An ESP8266 Based Smartmeter
Checking Email With The ESP8266 – reads the subject and sender lines from the latest email and displays it on an LCD
ESP8266 Wifi Temperature Logger – using the ESP8266 and Arduino to update a remote Thingspeak server
Adding wifi to a desk lamp with the Wi07C (ESP8266)
Places to order:
ESP8266 module from Electrodragon
SDK:
An SDK for the ESP8266 WiFi Chip
The ESP8266 SDK is finally here – along with a VirtualBox image with Ubuntu that includes GCC for the LX106 core
Source code examples:
331 Comments
Tomi Engdahl says:
Send Data From Webpage to ESP8266 (Toggle Arduino Pins From Webpage)
https://www.youtube.com/watch?v=uwrWkiI6Hg8
Toggle the digital pins of an Arduino from a wepage using the esp8266 wifi module. Toggle LEDs connected to the Arduino from a webpage.
Tomi Engdahl says:
WIFI ESP8266 ESP-12 Serial Module Full IO Port Leads
http://www.banggood.com/WIFI-ESP8266-ESP-12-Serial-Module-Full-IO-Port-Leads-p-972891.html?p=27131452996820140438
Tomi Engdahl says:
Modded Microwave Sets Its Own Clock
http://hackaday.com/2015/04/09/modded-microwave-sets-its-own-clock/
Of all the appliances in your house, perhaps the most annoying is a microwave with a flashing unset clock. Even though a lot of devices auto-set their time these days, most appliances need to have their time set after being unplugged or after a power outage.
Thankfully [Tiago] wrote in with his solution to this problem: an add-on to his microwave that automatically sets the time over the network. [Tiago]’s project uses an ESP8266 running the Lua-based firmware
While [Tiago] didn’t post any detailed information on his build, it looks like a great idea that could easily be improved on (like adding NTP support).
Microwave clock auto set with esp8266
https://www.youtube.com/watch?v=aDWZkIIUHZk
The clock of the microwave is set automatically on power-on.
The esp8266 (esp-7 version) gets the time from my server then uses 3 GPIO to simulate the turn of the rotary encoder and to press the set time button. Works great!
Tomi Engdahl says:
Using the ESP8266 as a Web-enabled sensor
http://hackaday.com/2014/11/23/using-the-esp8266-as-a-web-enabled-sensor/
[Marc] and [Xavi] are using the Lua-based firmware that allows for access to a few GPIOs on the device and scripting support to make application development easy.
https://github.com/nodemcu/nodemcu-firmware
Tomi Engdahl says:
Need an ESP8266 connected to an Arduino. Arachnio has your back. Basically, it’s an Arduino Micro with an ESP8266 WiFi module. It also includes a Real Time Clock, a crypto module, and a solar battery charger. It’s available on Kickstarter, and we could think of a few sensor base station builds this would be useful for.
Arachnio
An Arduino Micro variant with onboard WiFi
https://hackaday.io/project/5192-arachnio
https://www.kickstarter.com/projects/logos-electro/arachnio
Tomi Engdahl says:
2.4GHz 4dBi IPEX Wi-Fi PCB Antenna for ESP8266 Series Modules – Black
SKU: 381994 (Added on 4/15/2015)
http://www.dx.com/p/2-4ghz-4dbi-ipex-wi-fi-pcb-antenna-for-esp8266-series-modules-black-381994?r=85273703
Tomi Engdahl says:
Switch Mains Power with an ESP8266
http://hackaday.com/2015/04/19/switch-mains-power-with-an-esp8266/
[TJ] has created an interesting dev board for controlling mains voltage over WiFi with the now-ubiquitous ESP8266 module. At only 50mm x 25mm, it is easily small enough to fit inside a junction box!
Called the MPSMv2, the core of the project is the ESP8266 module.
The device uses a triac to do the switching, and is optically isolated from mains.
Tomi Engdahl says:
Hoptech XGHF-Flash-4M ESP8266 Serial Port Wi-Fi Module
$1.99
http://www.amazon.com/Hoptech-XGHF-Flash-4M-ESP8266-Serial-Module/dp/B00UYO0886/ref=as_sl_pc_qf_sp_asin_til?tag=wwwesp8266pro-20&linkCode=w00&linkId=5GUZPCD2IFM7IQ3A&creativeASIN=B00UYO0886
crack says:
Appreciating the time and effort you put into your website and in depth information you
provide. It’s awesome to come across a blog every once in a while that isn’t the same unwanted rehashed material.
Excellent read! I’ve bookmarked your site and I’m adding your RSS feeds to my Google account.
Tomi Engdahl says:
Diymall®lua Nodemcu Wifi Network Development Board Based Esp8266
http://www.amazon.com/Diymall%C2%AElua-Nodemcu-Network-Development-Esp8266/dp/B00UY8C3N0/ref=as_sl_pc_qf_sp_asin_til?tag=wwwesp8266pro-20&linkCode=w00&linkId=O77UTES6ZOBSLNW5&creativeASIN=B00UY8C3N0
Tomi Engdahl says:
ESP8266 Serial Port Wi-Fi Stable Version Test Board + Wi-Fi Wireless Module
http://www.dx.com/p/esp8266-serial-port-wi-fi-stable-version-test-board-wi-fi-wireless-module-381839?r=85273703
Tomi Engdahl says:
Review: HUZZAH is the ESP8266 WiFi Setup You Need
http://hackaday.com/2015/05/01/review-huzzah-is-the-esp8266-wifi-setup-you-need/
A little board that adds WiFi to any project for a few hundreds of pennies has been all the rage for at least half a year. I am referring to the ESP8266 and this product is a marrige of one of those WiFi modules with the support hardware required to get it running. This week I’m reviewing the HUZZAH ESP8266 Breakout by Adafruit Industries.
Adafruit HUZZAH ESP8266 breakout
Adorable bite-sized WiFi microcontroller, at a price you like!
https://learn.adafruit.com/adafruit-huzzah-esp8266-breakout/overview
Most of the low cost modules are not breadboard friendly, don’t have an onboard 500mA 3.3V regulator or level shifting, and aren’t CE or FCC emitter certified….UNTIL NOW!
The HUZZAH ESP8266 breakout is what we designed to make working with this chip super easy and a lot of fun. We took a certified module with an onboard antenna, and plenty of pins, and soldered it onto our designed breakout PCBs. We added in:
Reset button,
User button that can also put the chip into bootloading mode,
Red LED you can blink
Level shifting on the UART and reset pin
3.3V out, 500mA regulator (you’ll want to assume the ESP8266 can draw up to 250mA so budget accordingly)
Two diode-protected power inputs (one for a USB cable, another for a battery)
Two parallel, breadboard-friendly breakouts on either side give you access to:
1 x Analog input (1.8V max)
9 x GPIO (3.3V logic), which can also be used for I2C or SPI
2 x UART pins
2 x 3-12V power inputs, reset, enable, LDO-disable, 3.3V output
One breakout at the end has an “FTDI” pinout so you can plug in an FTDI or console cable to upload software and read/write debugging information via the UART.
$9.95
Tomi Engdahl says:
ESP8266 WiFi Throwies
http://hackaday.com/2015/05/03/esp8266-wifi-throwies/
A few years ago, someone figured out you can take an LED, a coin cell battery, and a magnet, tape them together, and throw them on every conceivable metallic surface.
With the ESP-8266 WiFi module, we have a tiny, tiny device with a WiFi radio, and just enough processing power to do something interesting. What does that mean? WiFi throwies.
[Andreas Reischle] stuffed an ESP-8266 WiFi module and a lithium cell inside a weatherproof controller loaded up with magnets. On its own, these wouldn’t do much, but with the right combination of software, this little magnetic box can serve as an access point, serving up small JavaScript games to anyone who connects.
The software is based on the NodeMCU firmware and features a web server and a DNS server
CaptiveIntraweb – a WiFi throwie using the ESP8266 / ESP-01 module
https://www.youtube.com/watch?v=fQM-GHY6VJ8
Possibly the first WiFi throwie. Held in place by a magnet, this captive portal features its own local web- and dns server. Hence the name: CaptiveIntraweb. In its current form it serves Java script games to its visitors. But the possibilities are endless…
Based on the inexpensive ESP-01 module (ESP8266), it runs a slightly modifies NodeMCU firmware. The material costs about 10€. Updates will be published on my blog at: http://www.AReResearch.net
Tomi Engdahl says:
NodeMCU ESP8266 ESP-12 Deleopment Board Lua Wi-Fi Module w/ Built-in Antennas
http://www.dx.com/p/nodemcu-esp8266-esp-12-deleopment-board-lua-wi-fi-module-w-built-in-antennas-385190?r=85273703
The following are the few advantages for NodeMCU that is based on ESP-12 and that is 2.4GHz Wi-Fi development Board:
- Modern high level mature LUA based technology. It is an integrated unit with all available resources on board.
It is super simple to complement your existing Arduino projects or any development board that has I/O pins available.
- Modern Internet development tools such as Node.js can take advantage the NodeMCU with the built-in API to put your idea on the fast track immediately.
- NodeMCU is built based on the mature ESP8266 technology to take advantage the abundant resources available on the web.
- NodeMCU has ESP-12 based serial WiFi integrated on board to provide GPIO, PWM, ADC, I2C and 1-WIRE resources at your finger tips.
Applications: Home automation, sensor networks, industrial wireless control
Tomi Engdahl says:
Switch ESP8266
https://play.google.com/store/apps/details?id=es.geocoding.switch_esp8266
Tomi Engdahl says:
UDP TCP Server – Free
https://play.google.com/store/apps/details?id=com.aviramido.udpserver
Ever needed to send a UDP/TCP commands from your Android device to a UDP/TCP enabled device on your WiFi or Cellular network?
Now you can!
Tomi Engdahl says:
Some interesting ESP8266 project videos:
WiFi enable your car alarm using ESP8266
https://www.youtube.com/watch?v=oirG5XxPpk8
ESP8266 Hack #1: Web Enabled LED – WiFi Internet-of-Things IoT
https://www.youtube.com/watch?v=VvIoBFLj2Xo
Tomi Engdahl says:
ESP8266 Part1 WiFi Basics, AT Commands, Wiring & ‘TRAPS’
https://www.youtube.com/watch?v=trWT7VDBEyg
iPhone/Android App Code for ESP8266 Communication – Part 3 of Sprinkler Control Project
https://www.youtube.com/watch?v=RmTs_s-zWnU
Tomi Engdahl says:
Arduino Basics: Home Automation with an ESP8266
https://www.youtube.com/watch?v=bvlQzEPHjpU
Tomi Engdahl says:
NodeMcu Lua WIFI Development Board For ESP8266 Module
http://www.banggood.com/NodeMcu-Lua-WIFI-Development-Board-For-ESP8266-Module-p-976440.html?p=27131452996820140438
Open-source, Interactive, Programmable, Low cost, Simple, Smart, WI-FI enabled
The Development Kit based on ESP8266, integates GPIO, PWM, IIC, 1-Wire and ADC all in one board. Power your developement in the fastest way combinating with NodeMCU Firmware!
Tomi Engdahl says:
WiFi Serial Transceiver Module w/ ESP8266
http://store.hackaday.com/products/wifi-serial-module-esp8266
ESP8266 is a highly integrated chip designed for the needs of a new connected world.
ESP8266 has powerful on-board processing and storage capabilities that allow it to be integrated with the sensors and other application specific devices through its GPIOs with minimal development up-front and minimal loading during runtime.
WiFi Serial Transceiver Module Breakout Board w/ ESP8266
http://store.hackaday.com/products/wifi-serial-module-breakout-board
NOTE: Unlike the WiFi Serial Transceiver Module w/ ESP8266, this breakout board has no built-in antenna.
Tomi Engdahl says:
ESP8266 Dash Button
https://github.com/DeqingSun/ESP8266-Dash-Button
This is a small box with only one button. Every time you push the button. It will connect to WiFi and access an URL.
WiFi SSID and Password can be configured through ESP-TOUCH protocol and the URL can be changed by UDP packet. Two LEDs on it’s case shows status of module and circuit.
This button consists of following parts: Two AA batteries and battery holder, ESP8266 module and circuit, a big button for better experience, case, button cover.
There is an minimal Android app in this repo that can do configuration wirelessly.
Currently IFTTT can not be triggered with a HTTP request. So I created a App Engine app to send a Email to IFTTT. The app can print all email it received in log file so you can create account with App Engine Email Address.
Tomi Engdahl says:
Low cost WIFI temperature (DS18B20) data logger based on ESP8266 with connectivity to thingspeak.com
http://www.instructables.com/id/Low-cost-WIFI-temperature-data-logger-based-on-ESP/
Tomi Engdahl says:
How to use ESP8266 ESP-01 as a SENSOR web client
https://importhack.wordpress.com/2014/11/22/how-to-use-ep8266-esp-01-as-a-sensor-web-client/
Tomi Engdahl says:
IoT power strip using ESP8266
IoT power strip controlled by ESP8266 and SSR.
https://hackaday.io/project/5492-iot-power-strip-using-esp8266
The idea is to control the power strip using my smart phone over the internet.
The software on the module will be the nodeMCU with LUA scripts.
Tomi Engdahl says:
The Button – ESP8266 Wifi button
A simple button that connects to the nearest AP and sends a message somewhere to do something.
https://hackaday.io/project/4272-the-button-esp8266-wifi-button
Tomi Engdahl says:
ESP8266: Good enough for a battery powered sensor?
http://blog.hekkers.net/2015/04/06/esp8266-good-enough-for-a-battery-powered-sensor/
A report interval of 4 samples per hour will lead to a battery life of roughly 1 year. Increasing the report interval to 60 times an hour (once per minute) will lead to a much shorter battery life: less than 3 weeks.
The biggest problem lies in Wifi. It takes my ESP-12 about 1 … 3,5 seconds to get a Wifi connection after waking up from deep sleep. And this is by far the largest contributor to the total time needed to get a sensor value out the door.
So that’s it, ESP8266 is a no-go? No way! The ESP8266 can still be very helpful in a lot of ways, I’ve had a lot of fun while exploring the ESP8266 and will definitely use them whenever I need always-on Wifi for so,me future project.
Is there an alternative for the ESP8266? Lots of ’em, mine is called Zigbee.
I have some unused 3.3V Arduino Pro Mini’s and some XBee’s and will make some similar power usage charts of those; an XBee is ready to send in 35 milliseconds after power-up, so here the numbers will be quite different …
Tomi Engdahl says:
ESP8266 power analysis
http://blog.hekkers.net/2015/03/11/esp8266-power-analysis/
ESP8266 current / power usage charts
http://blog.hekkers.net/2015/03/20/esp8266-current-power-usage-charts/
What do we see here? A detailed analysis of what’s going on inside the ESP8266 in terms of current draw.
Tomi Engdahl says:
ESP8266-01 Breakout
Cool little ESP8266 Breakout Board / Flasher for NodeMCU
Simple breakout that deals with level adjustments and such for programming the ESP8266 using a USB-Serial interface. More details to come.
This project was designed for the Hackaday Worldwide LA Event and is used to interface a standard USB cable to the ESP8266-01 module.
a few pushbuttons as the ESP8266 requires the GPIO0 is pulled low on startup (or low after a RESET) to put it into programming mode. The buttons on both RESET and GPIO0 provide this.
Eagle Files in Github
The root repo is avail at: https://github.com/sfgit/ESP8266-01-BREAKOUT
Tomi Engdahl says:
ESP8266 Hack #4: Web Enabled LED – WiFi Internet-of-Things IoT
https://www.youtube.com/watch?v=5UB4AyN6LXE
Tomi Engdahl says:
WiFi Serial Transceiver Module Breakout Board w/ ESP8266
http://store.hackaday.com/products/wifi-serial-module-breakout-board
Tomi Engdahl says:
Ignore this ESP8266 board
https://hackaday.io/project/5841-ignore-this-esp8266-board
I stole from every one. The huzza from Adafruit. Matts breakout board from hackaday. Al1′s from here. NodeMCUs.
ESP8266 (ESP-07/12) Dev Board
https://hackaday.io/project/5231-esp8266-esp-0712-dev-board
PCB for fast development with ESP-07 / ESP-12 with on board USB to Serial converter and on board lipo charge / protection circuit
Tomi Engdahl says:
ESP8266 Adapter and Breakout Board Kit (Includes ESP8266-01) – DIY
http://store.hackaday.com/products/esp8266-adapter-and-breakout-board-kit-includes-esp8266-01
Adapter PCB
ESP8266-01 Module
Resistors, capacitors, low-dropout regulator
LEDs (red, green)
Headers, jumpers, etc.
Pushbuttons
Tomi Engdahl says:
ESP-01 & ESP-03 Programmer
Breakout board for ESP8266 ESP-01 & 03 modules
https://hackaday.io/project/5936-esp-01-esp-03-programmer
This schematic was created using NI MultiSim. It was modeled on Adafruit’s Huzzah ESP8266 board
Here you have your choice of ESP-01 or ESP-03 module. If you have an ESP-03 module to mate with this board, you can simply solder its castellated pads onto the provided solder pads in the provided U1 section. If you have an ESP-01, you solder a 2×4 female header onto the provided pins in the center of the board, and then plug the ESP-01 into it in the orientation denoted on the board.
Tomi Engdahl says:
Playing with ESP8266
What I’ve learned about the very exciting $3 WiFi module.
https://hackaday.io/project/3465-playing-with-esp8266
Tomi Engdahl says:
ESP8266 Keeps An Eye On Your Batteries
http://hackaday.com/2015/05/24/esp8266-keeps-and-eye-on-your-batteries/
There are many more things to know about a battery than its voltage and current output at any given moment, and most of them can’t be measured with a standard multimeter unless you also stand there for a long time with an Excel spreadsheet. The most useful information is battery capacity, which can tell you how much time is left until the battery is fully charged or fully discharged. [TJ] set out to create a battery data harvester, and used the ubiquitous ESP8266 to make a fully-featured battery monitor.
Measuring battery capacity is pretty straightforward but it does take time. A battery is first benchmarked to find its ideal capacity, and then future voltage and current readings can be taken and compared to the benchmark test to determine the present capacity of the battery. The ESP8266 is a relatively good choice for this kind of work. Its WiFi connection allows it to report its information to a server which will store the data and make it available for the user to see.
http://www.esp8266-projects.com/2015/05/battery-live-monitor-system-esp8266.html
Tomi Engdahl says:
MQTT client library for ESP8266 Soc
http://tuanpm.net/post/esp_mqtt/
MQTT client library for ESP8266
http://beta.icviet.com/mqtt-client-library-for-esp8266/
Tomi Engdahl says:
Arduino esp8266 NodeMCU MQTT client
https://www.youtube.com/watch?v=pdfYaueIfao
Arduino MQTT client with ESP8266 running NodeMCU.
Thanks to Suxsem for the Library.
https://github.com/Suxsem/Mqttduino
Tomi Engdahl says:
An inexpensive IoT enabler using ESP8266
http://www.instructables.com/id/An-inexpensive-IoT-enabler-using-ESP8266/
This project, which can be built for less than 10 or 15 US$ does the following:
- Send temperature/humidity readings from a DHT11 sensor to a MQTT broker and a Thingspeak channel.
- Listen for MQTT messages and turn on or off a relay connected to ESP8266.
- Check a Thingspeak channel periodically and turn on/off a relay if the field has been updated.
In simple terms, this is a internet enabled temperature/humidity sensor and relay.
https://thingspeak.com/
Tomi Engdahl says:
ESP-201 ESP8266 Serial Wi-Fi Sending / Receiving Module
http://www.dx.com/p/esp-201-esp8266-serial-wi-fi-sending-receiving-module-387632?r=85273703
Tomi Engdahl says:
Ignore this ESP8266 board
https://hackaday.io/project/5841-ignore-this-esp8266-board
I stole from every one. The huzza from Adafruit. Matts breakout board. Al1s board from here. NodeMCUs DevKit.
Tomi Engdahl says:
ESP8266 webserver based CRO
https://hackaday.io/project/3323-esp8266-webserver-based-cro
This project adds to Sprite_tm’s webserver, and hosts a web page that among other things, plots data from a uart-DAQ using jquery.flot.
Making the ESP host web pages for carrying out specific tasks such as capturing and plotting a trace from the ADC, or setting the channel gains,DAC values etc, makes it very simple for the user. A connected device with a web browser will suffice.
Python Powered Scientific Instrumentation tool
https://hackaday.io/project/5971-python-powered-scientific-instrumentation-tool
A multi purpose lab tool accessible by simple Python functions, and capable of studying a wide range of physical phenomena.
Tomi Engdahl says:
More GPIOs For The ESP8266
http://hackaday.com/2015/05/31/more-gpios-for-the-esp8266/
The ESP8266 is an incredible piece of hardware; it’s a WiFi module controllable over a serial port, it’s five freaking dollars, and if that’s not enough, there’s a microcontroller on board. Until there’s a new radio standard, this is the Internet Of Things module.
The most common version of the ESP, the -01 version, only has a 2×4 row of pins for serial, power, configuration, and two lines of GPIO.
It’s a shame that module only has two GPIOs, but if you’re good enough with a soldering iron you can get a few more. It took a lot of careful soldering
How to add more GPIOs to ESP8266 (ESP-01)
https://www.youtube.com/watch?v=9RVyWZCSMtA&feature=youtu.be
Tomi Engdahl says:
ESP8266 Webserver Tutorial – The Commands You Need To Send
https://www.youtube.com/watch?v=kYmS-gf88Kk
A simple ESP8266 wifi web server using arduino.
https://www.youtube.com/watch?v=AGn6Ksf3OEw
Tomi Engdahl says:
ESP8266 Send Data To a Website (ESP-01/ESP-12)
https://www.youtube.com/watch?v=q02f4sPghSo
Tomi Engdahl says:
IoT Enabled Thomas The Tank Engine
http://hackaday.com/2015/06/02/iot-enabled-thomas-the-tank-engine/
This month the popular “Thomas the Tank Engine” toy celebrated its 70 anniversary. As a fun project, [tinkermax] wanted to bring this traditional toy into the age of IoT, while preserving its physical appearance and simple charm.
He used a model called the “Diesel” which seemed big enough to house the electronics, but proved otherwise once he inspected the innards. He needed to fit in an ESP8266 module, an accelerometer breakout, some discrete parts, a nifty analog multiplexer, and a 14500 3.7V LiPo.
A “THOMAS” TOY TRAIN JOINS THE INTERNET-OF-THINGS
http://tinker.yeoman.com.au/train/
I already had an ADXL345 accelerometer module, so used that
The device uses serial communication (i2C or SPI). Because of the SPI clock polarity required, I ended up writing my own spi “lite” library.
I placed a 1Ω resistor in series with the motor to be able to measure current (i.e. motor load)
Probably the least complex but immediately useful enhancement to the train is speed control. This is accomplished quite simply using the PWM functionality built into the ESP8266 – i.e. I send an MQTT message containing a value that represents the desired pwm duty cycle. An external transistor is used to drive the motor.
The ESP8266 code is simple enough
WEB PAGE MONITOR
Sensor_scrnReal time sensor updates are streamed 5 times per second via the MQTT protocol to a Raspberry Pi MQTT broker under the train table. I developed a webpage containing javascript to receive the MQTT messages from the Raspberry Pi (over websockets) to display the sensor data.
Tomi Engdahl says:
ESP8266 As A Networked MP3 Decoder
http://hackaday.com/2015/06/06/esp8266-as-a-networked-mp3-decoder/
Support libraries, good application notes, and worked examples from a manufacturer can really help speed us on our way in making cool stuff with new parts. Espressif Systems has been doing a good job with their ESP8266 product (of course, it doesn’t hurt that the thing makes a sub-$5 IOT device a reality). Only recently, though, have they started publishing completed, complex application examples. This demo, a networked MP3 webradio player, just popped up in Github, written by the man better known to us as Sprite_tm. We can’t wait to see more.
What external parts, you ask? First is something to do the digital-to-analog conversion. The application, as written, is build for an ES9023 DAC, but basically anything that speaks I2S should be workable with only a little bit of datasheet-poking and head-scratching. Of course, you could get rid of the nice-sounding DAC chip and output 5-bit PWM directly from the ESP8266, but aside from being a nice quick demo, it’s going to sound like crap.
The other suggested external IC is an SPI RAM chip to allow for buffering of the incoming MP3 file
In sum, an ESP8266 chip, a cheap I2S DAC, and some external RAM and you’ve got a webradio player. OK, maybe we’d also add an amplifier chip, power supply, and a speaker. Hmmm…. and a display?
https://github.com/espressif/esp8266_mp3_decoder
Tomi Engdahl says:
DIY ESP8266 Development Board
http://hackaday.com/2015/06/12/diy-esp8266-development-board/
Those small, super-cheap, ESP8266 modules are being installed everywhere, creating all sorts of frivolous internet connected thingamajigs. But consider this period as a training ground of sorts, as hackers smarten their chops on figuring out how to get the best out of this IoT gravy train. Right now, getting the ESP8266 to work requires a fair amount of work and to make things easier, [Abdulgafur] built a ESP8266 development board.
The dev board lets the user connect the ESP8266 to a PIC micro controller as well as to a host PC. In addition, it hosts several peripherals such as a 2×16 LCD display, 4 push buttons, couple of indicator LEDs and some GPIO’s broken out to a header.
DIY ESP8266 Development Board
http://www.electro-labs.com/diy-esp8266-development-board/
Tomi Engdahl says:
WiFi shield for Arduino using an ESP8266 module
https://hackaday.io/project/3749-wifi-shield-for-arduino-using-an-esp8266-module
I’m making a WiFi shield based on the ESP8266 module and also a library and some example projects.
Tomi Engdahl says:
Tracking Bitcoin With The ESP8266
http://hackaday.com/2015/06/18/tracking-bitcoin-with-the-esp8266/
[Kendrick] was looking for something to do with an ESP8266 WiFi module, and since he loves Bitcoin and Arduino, the obvious solution was to make a Bitcoin price tracker.
The ESP8266 is a complete microcontroller with a WiFi chip and a few pins for a serial connection. It’s certainly possible to write some firmware for the ESP to get the current conversion rate of Bitcoin, but for simplicity’s sake, [Kendrick] chose to use an Arduino for this project. He’s using a 5V Arduino, and the ESP operates on 3.3V logic, but a few Zeners take care of the logic level conversion.
The code running on the Arduino checks the CoinDesk API minute