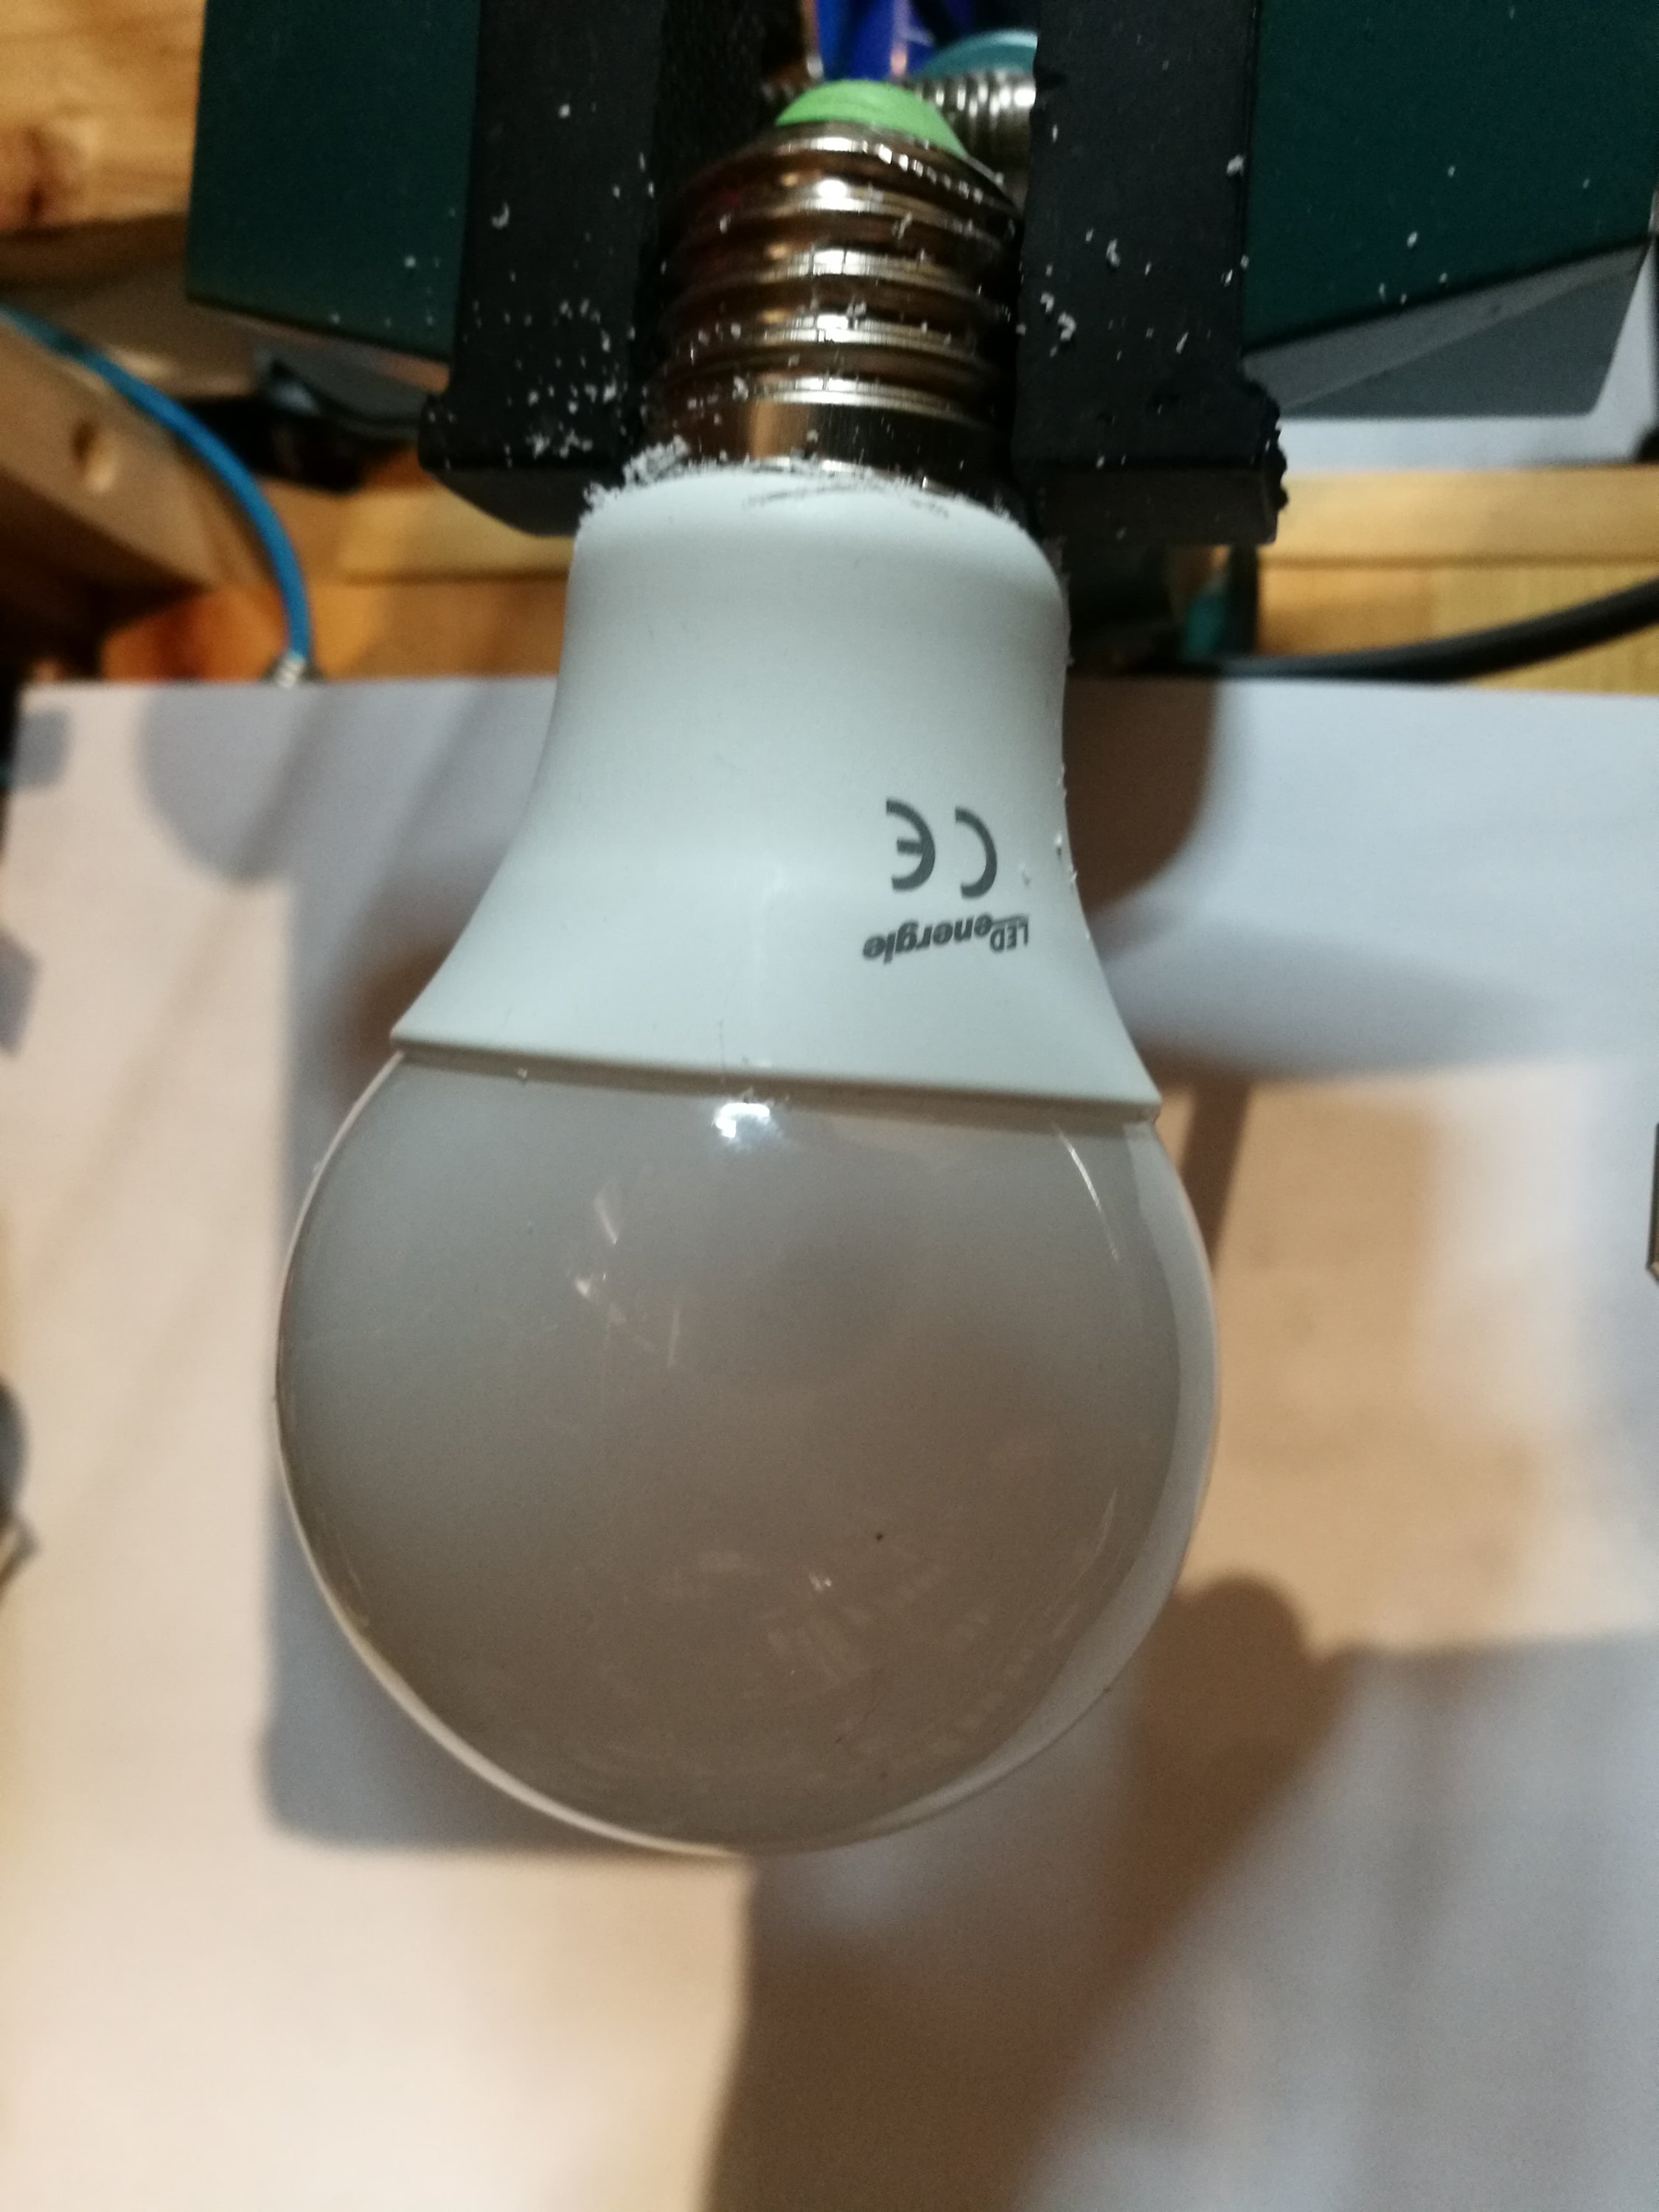
LED Energie brand LED bulb with following data stopped to work properly:
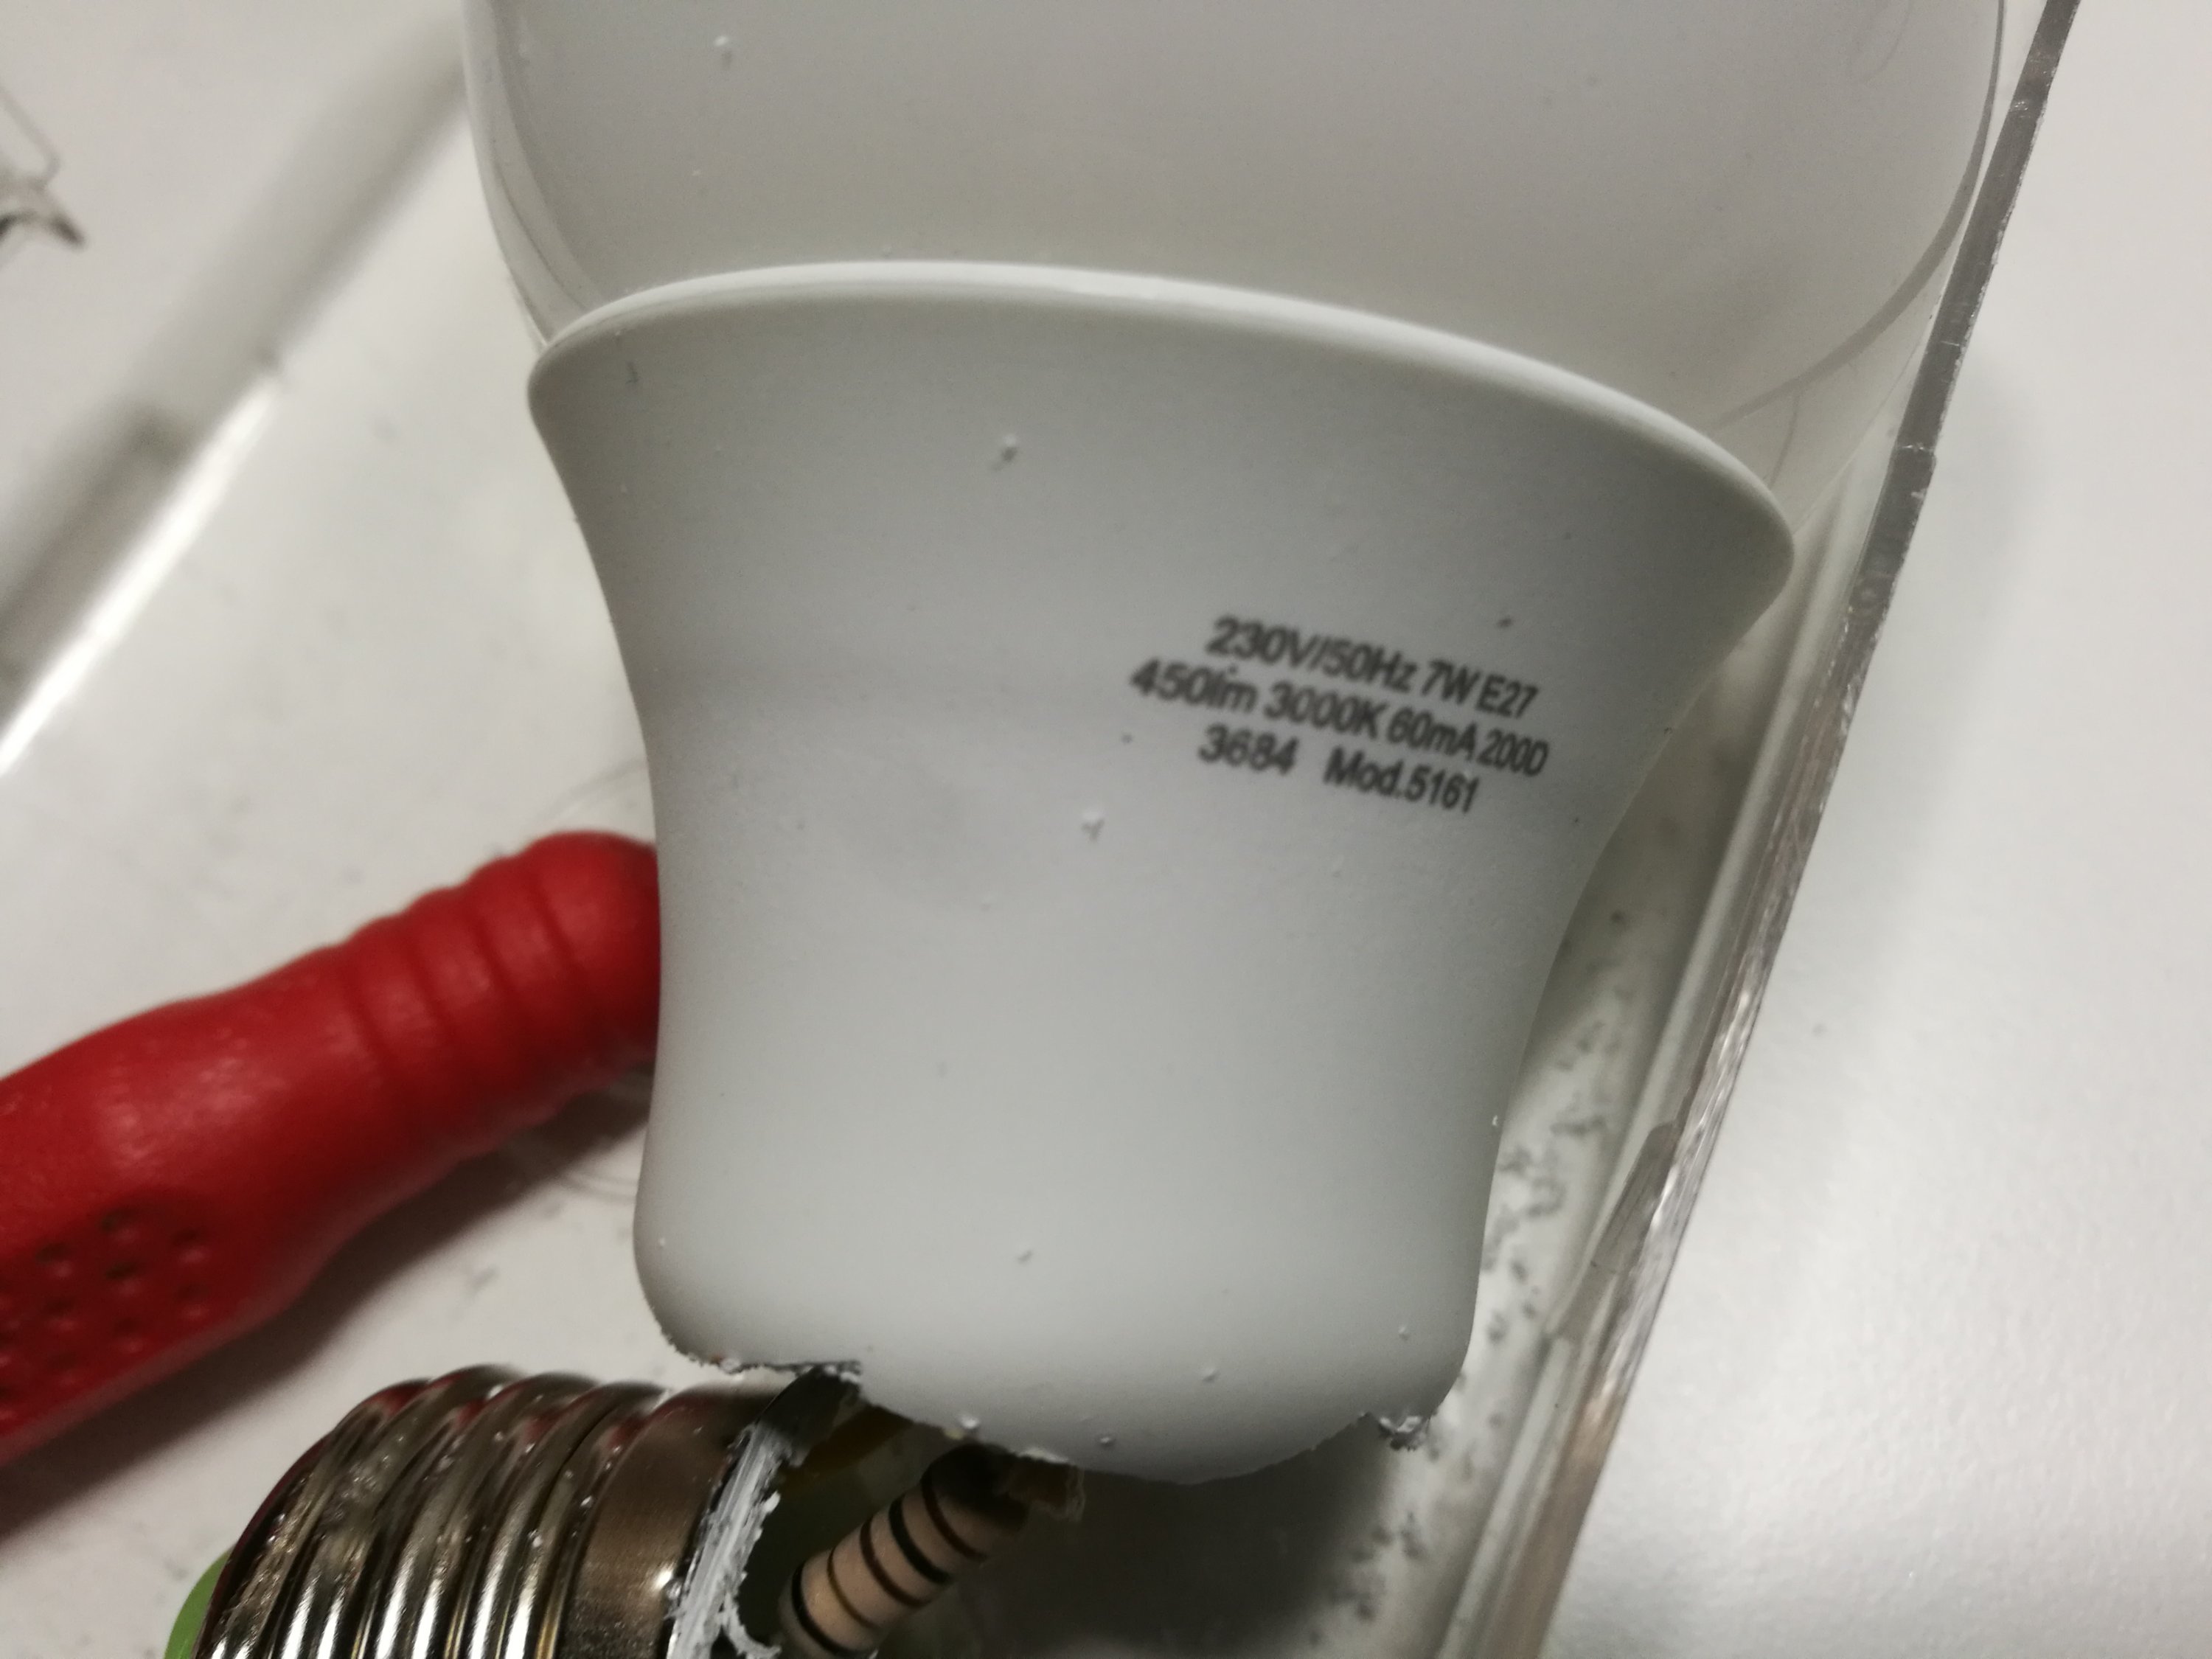
230V 50Hz 7W E27
450lm 3000K 60mA 20D
3684 Mod.5161
So lets make a tear-down
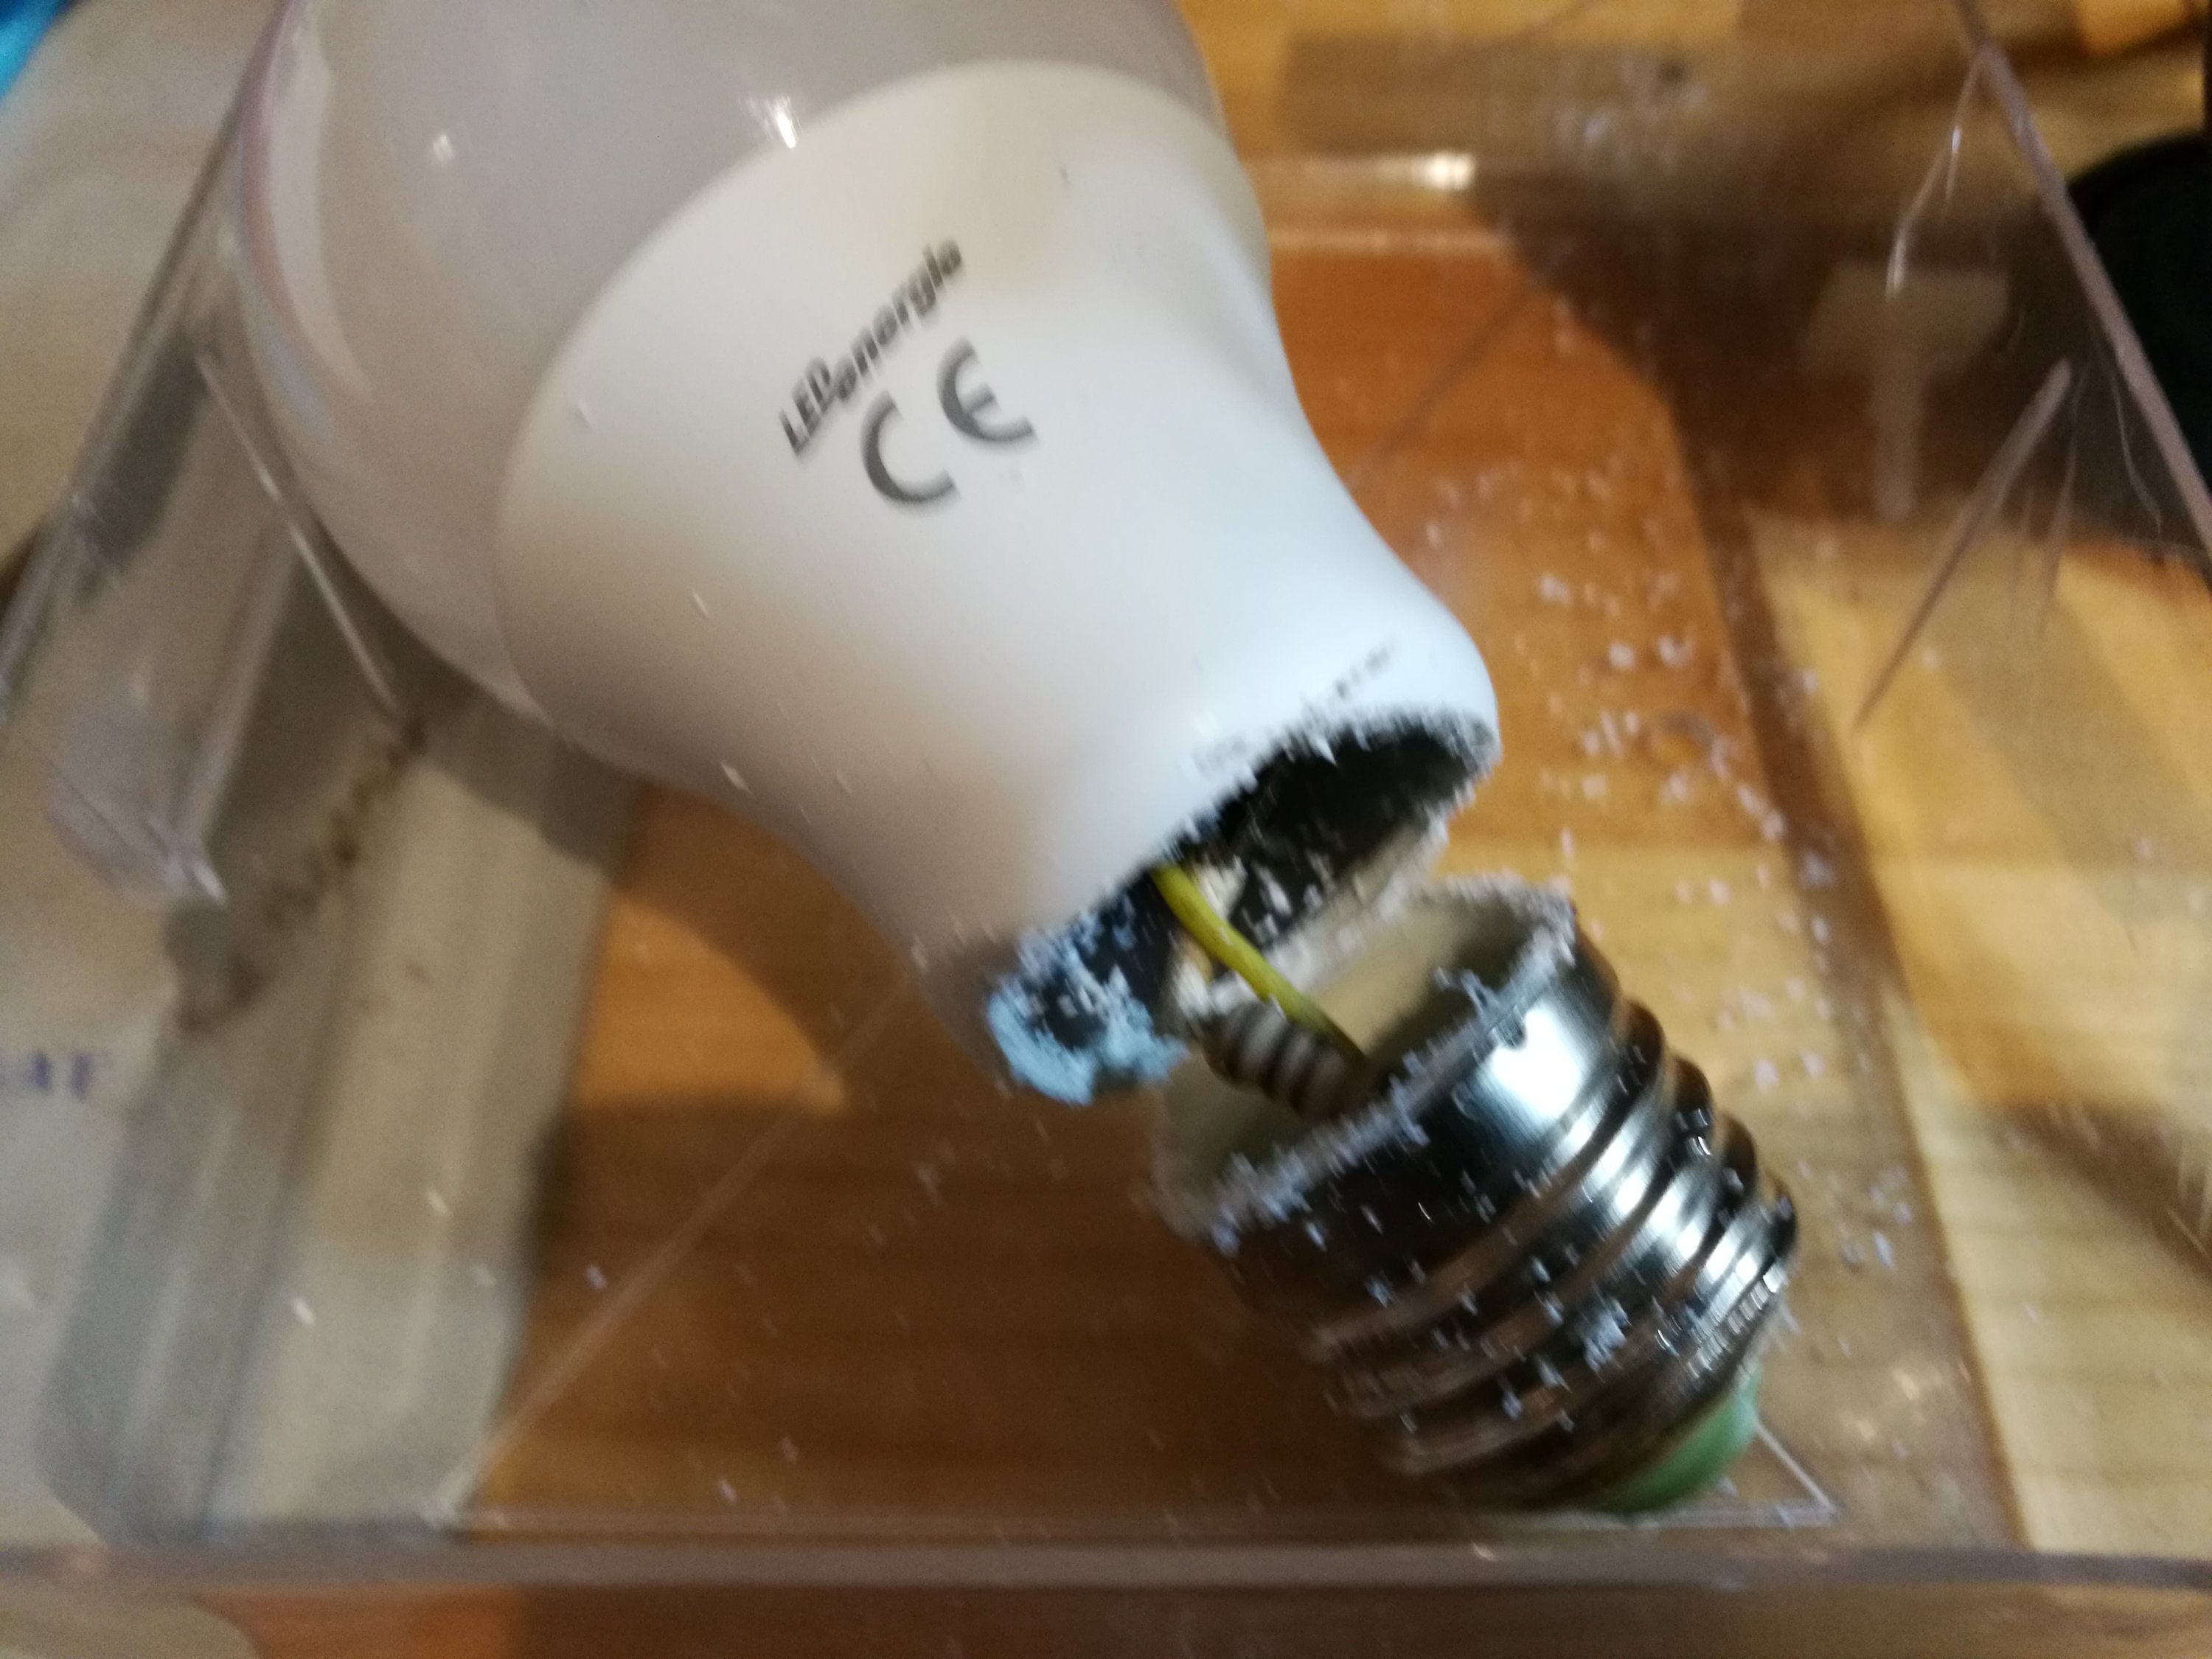
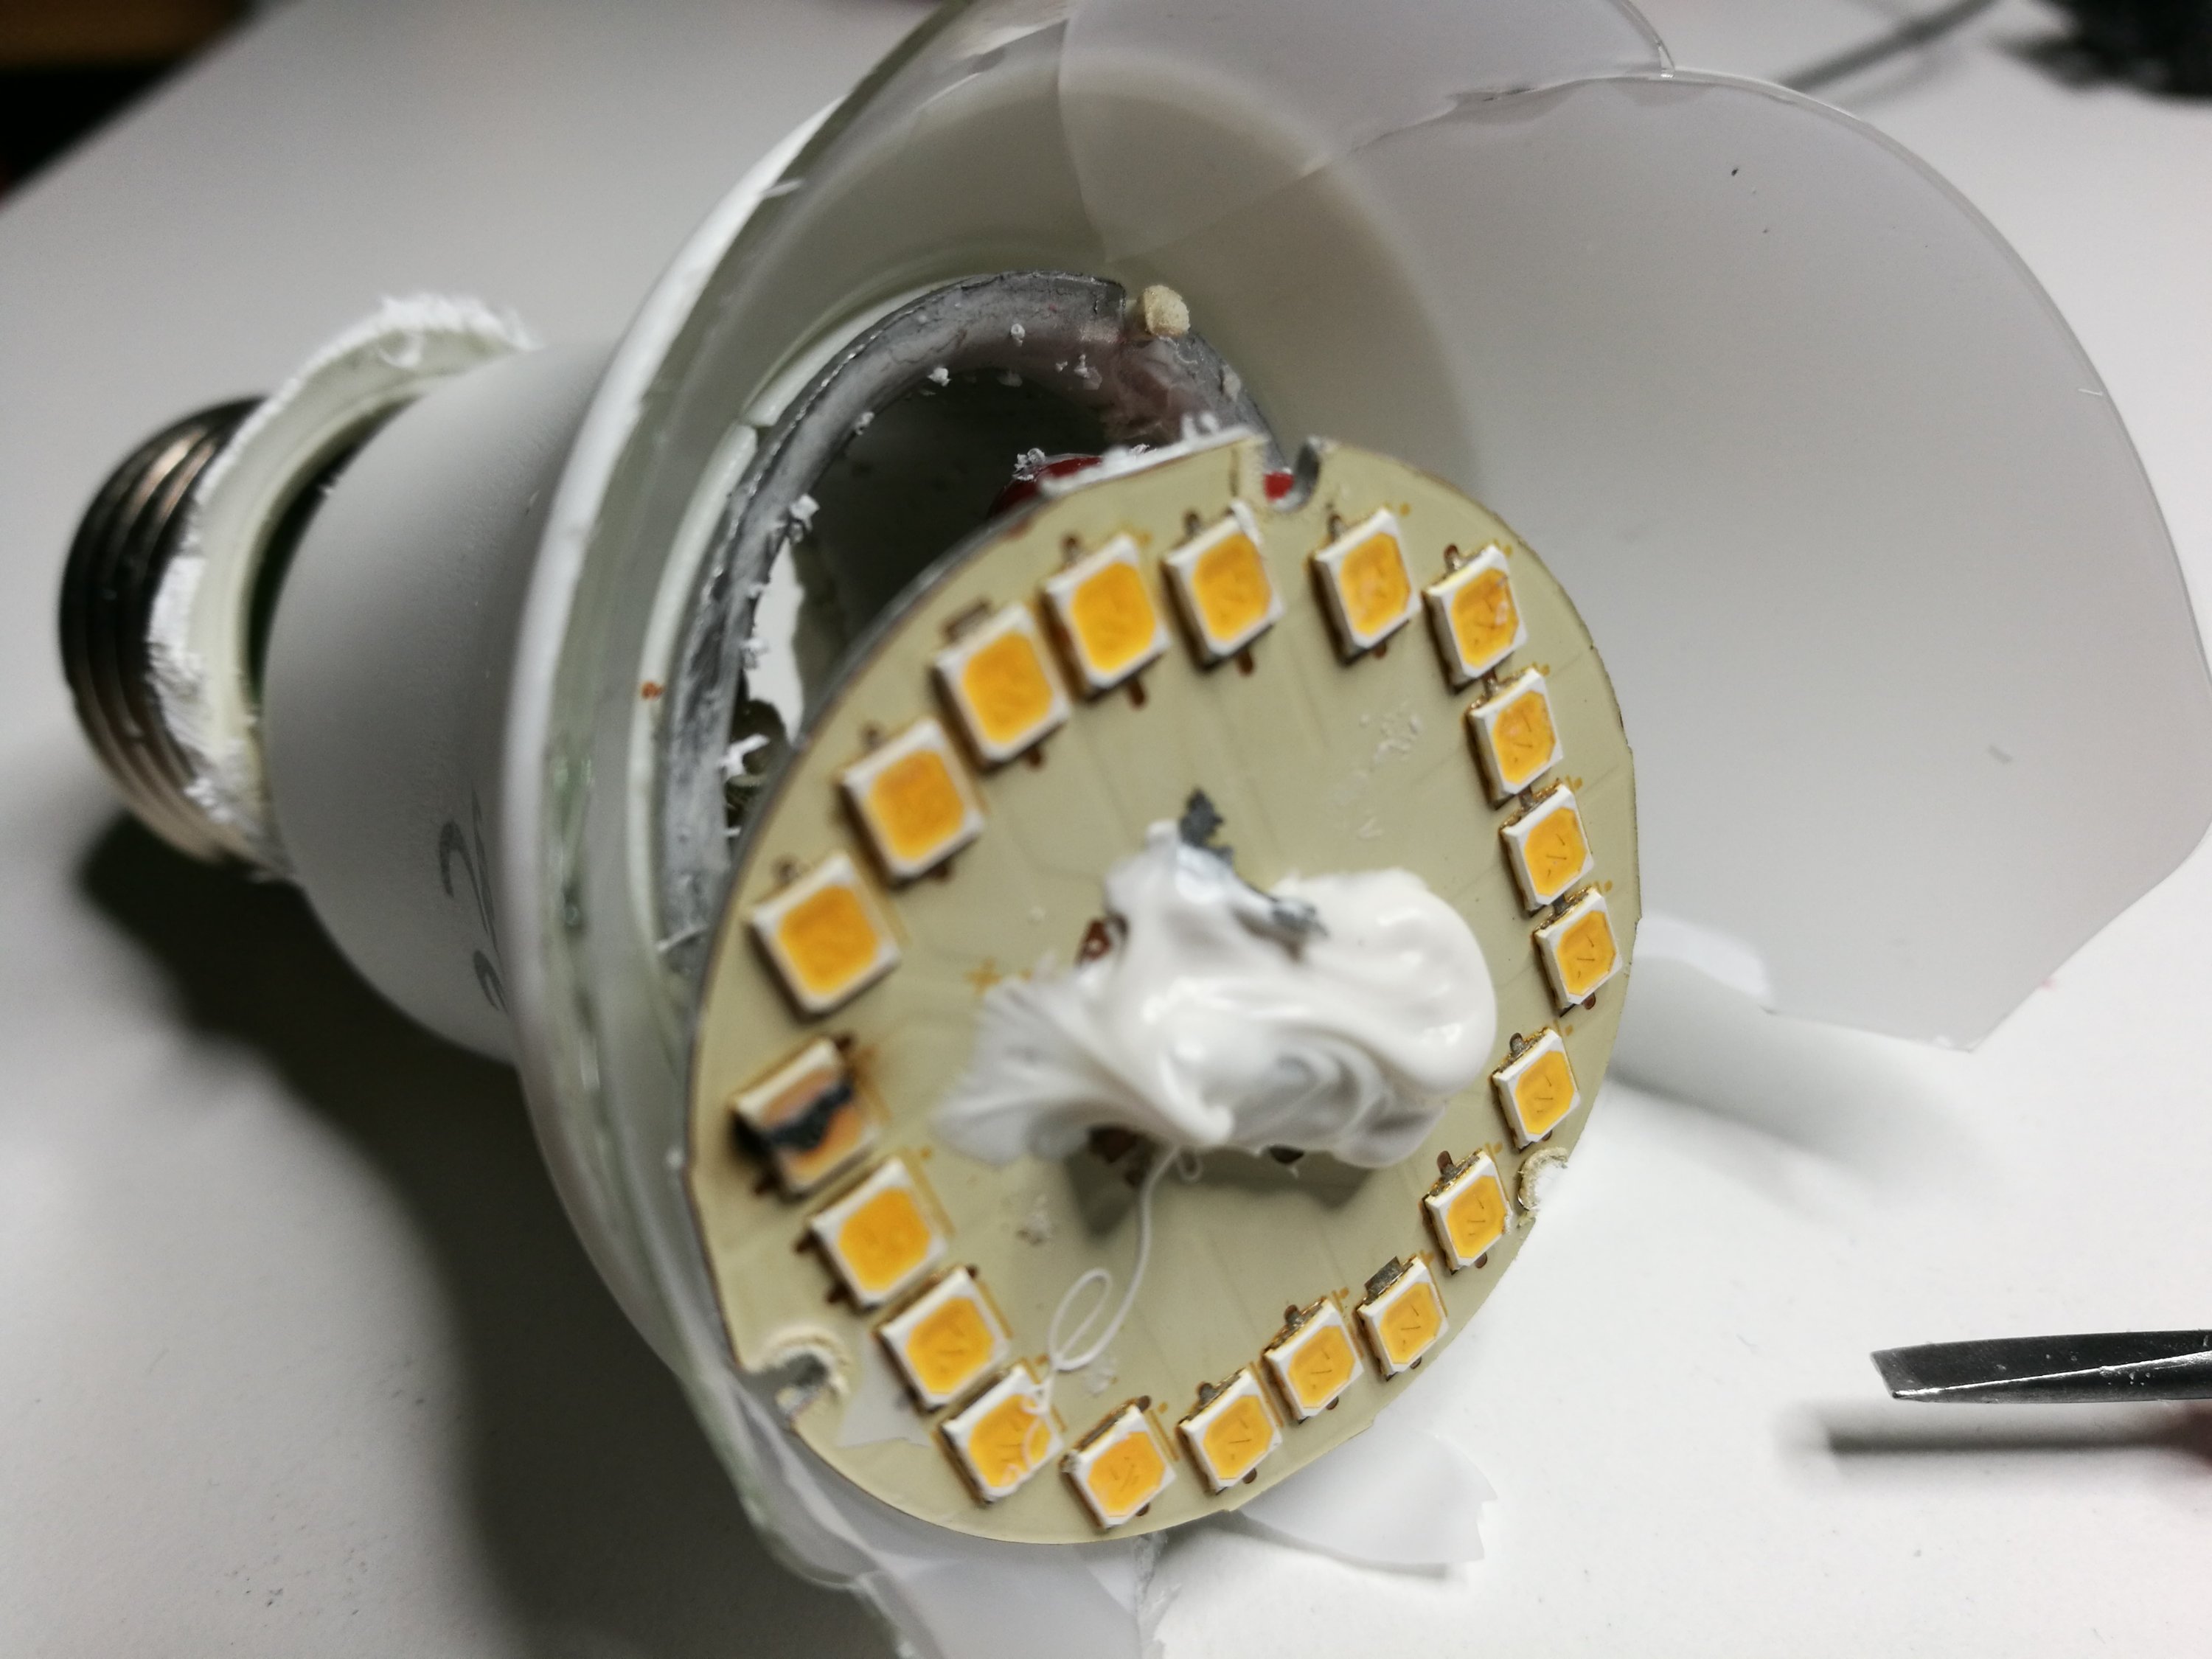
Inside
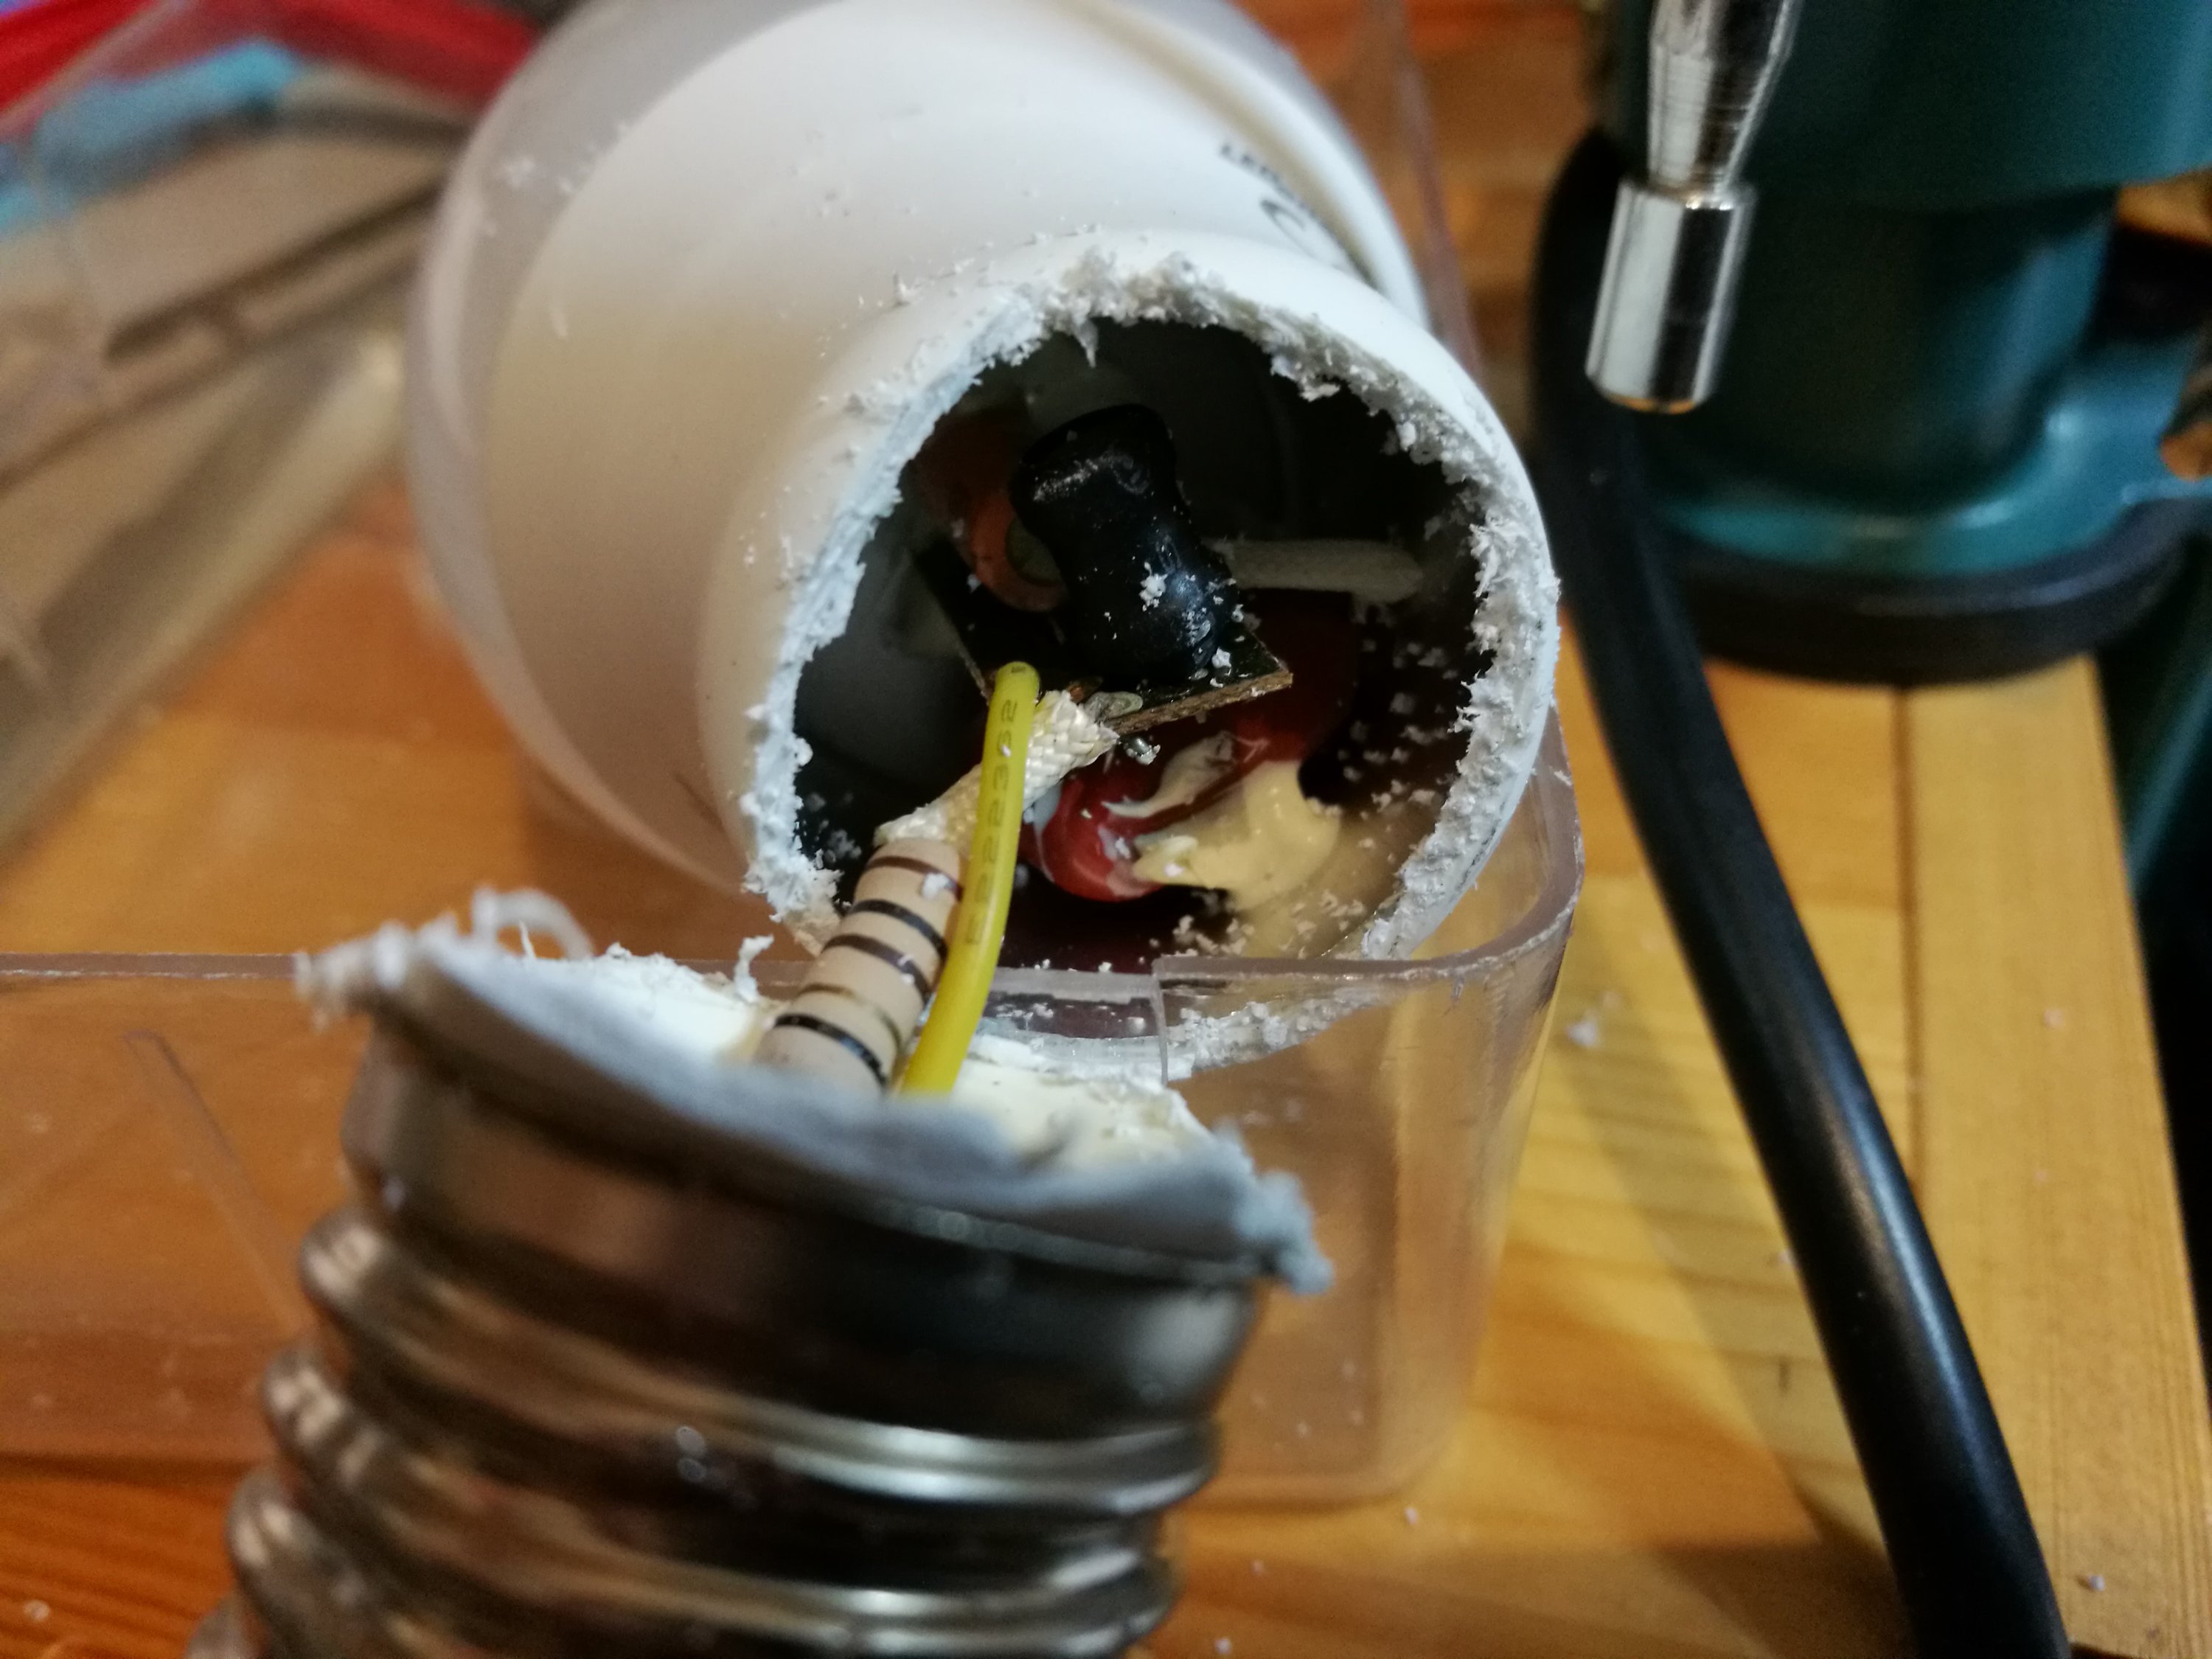
There seems to be 20 small LEDs in series inside bulb and one of them burned black. As such this LED string is expected to need around 70V over it. LEDs were soldered to a aluminium circuit board thar was glued to aluminium tube inside plastic lamp base part.
Look at the circuit board
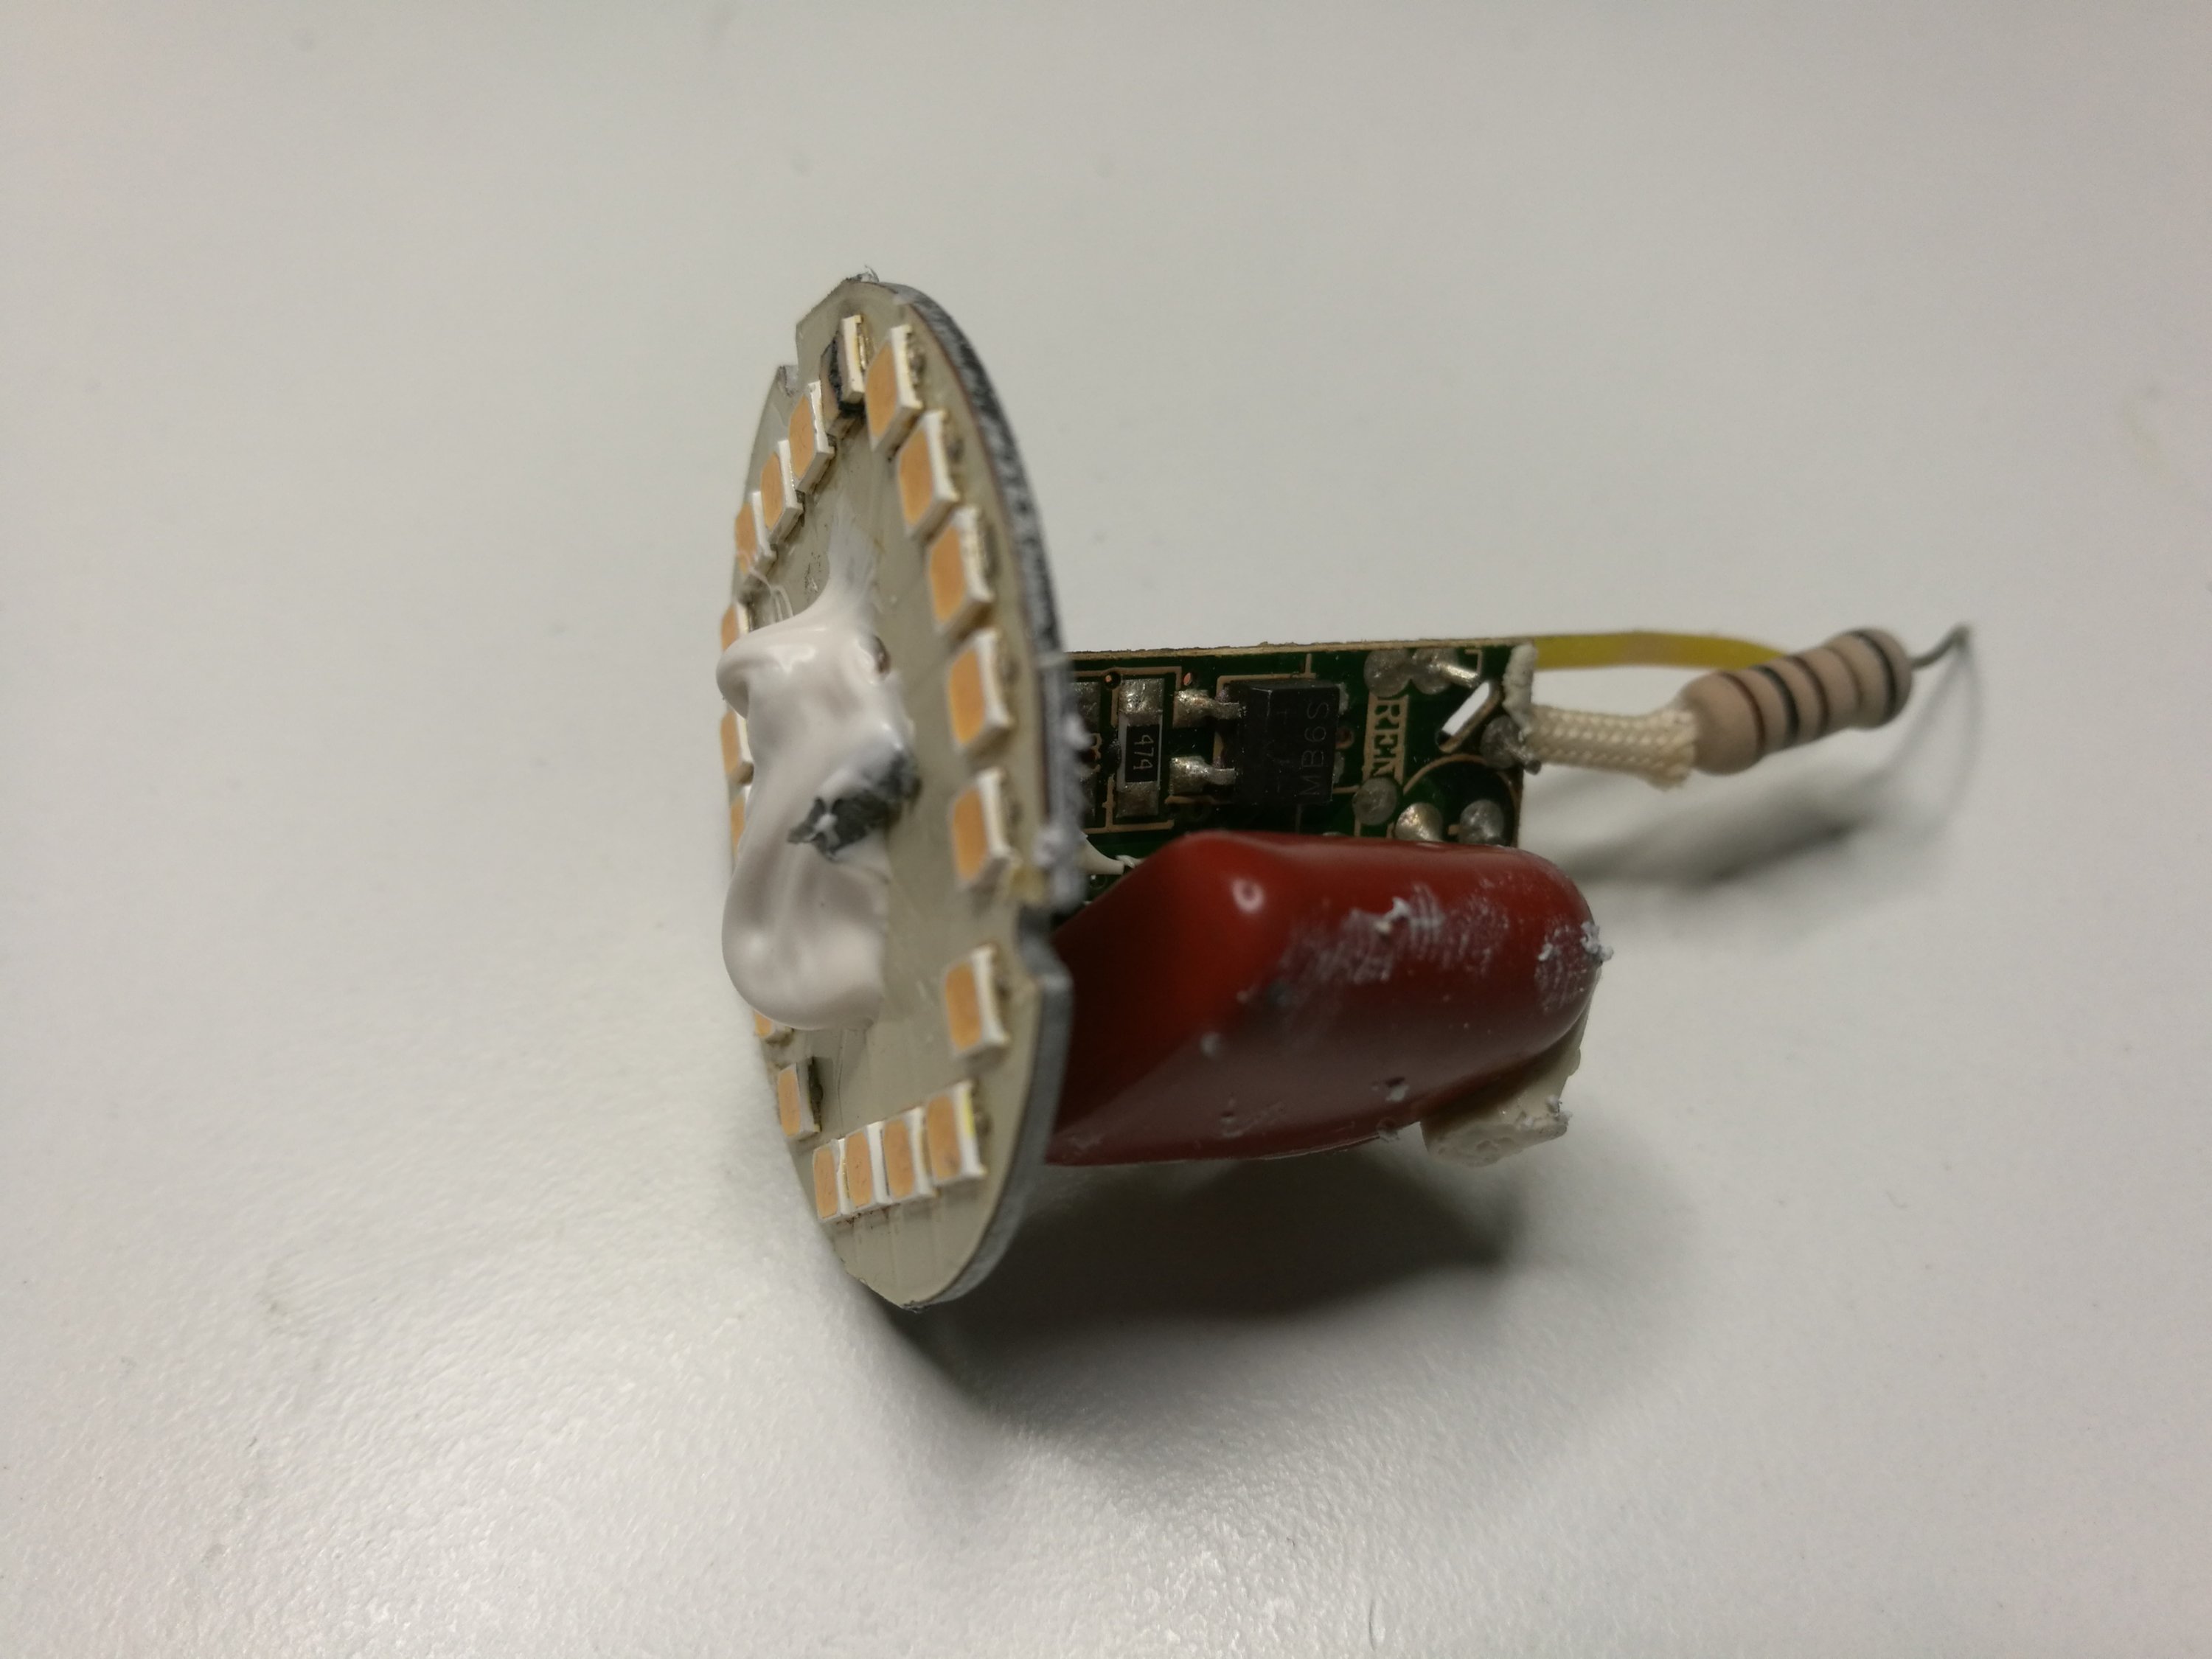
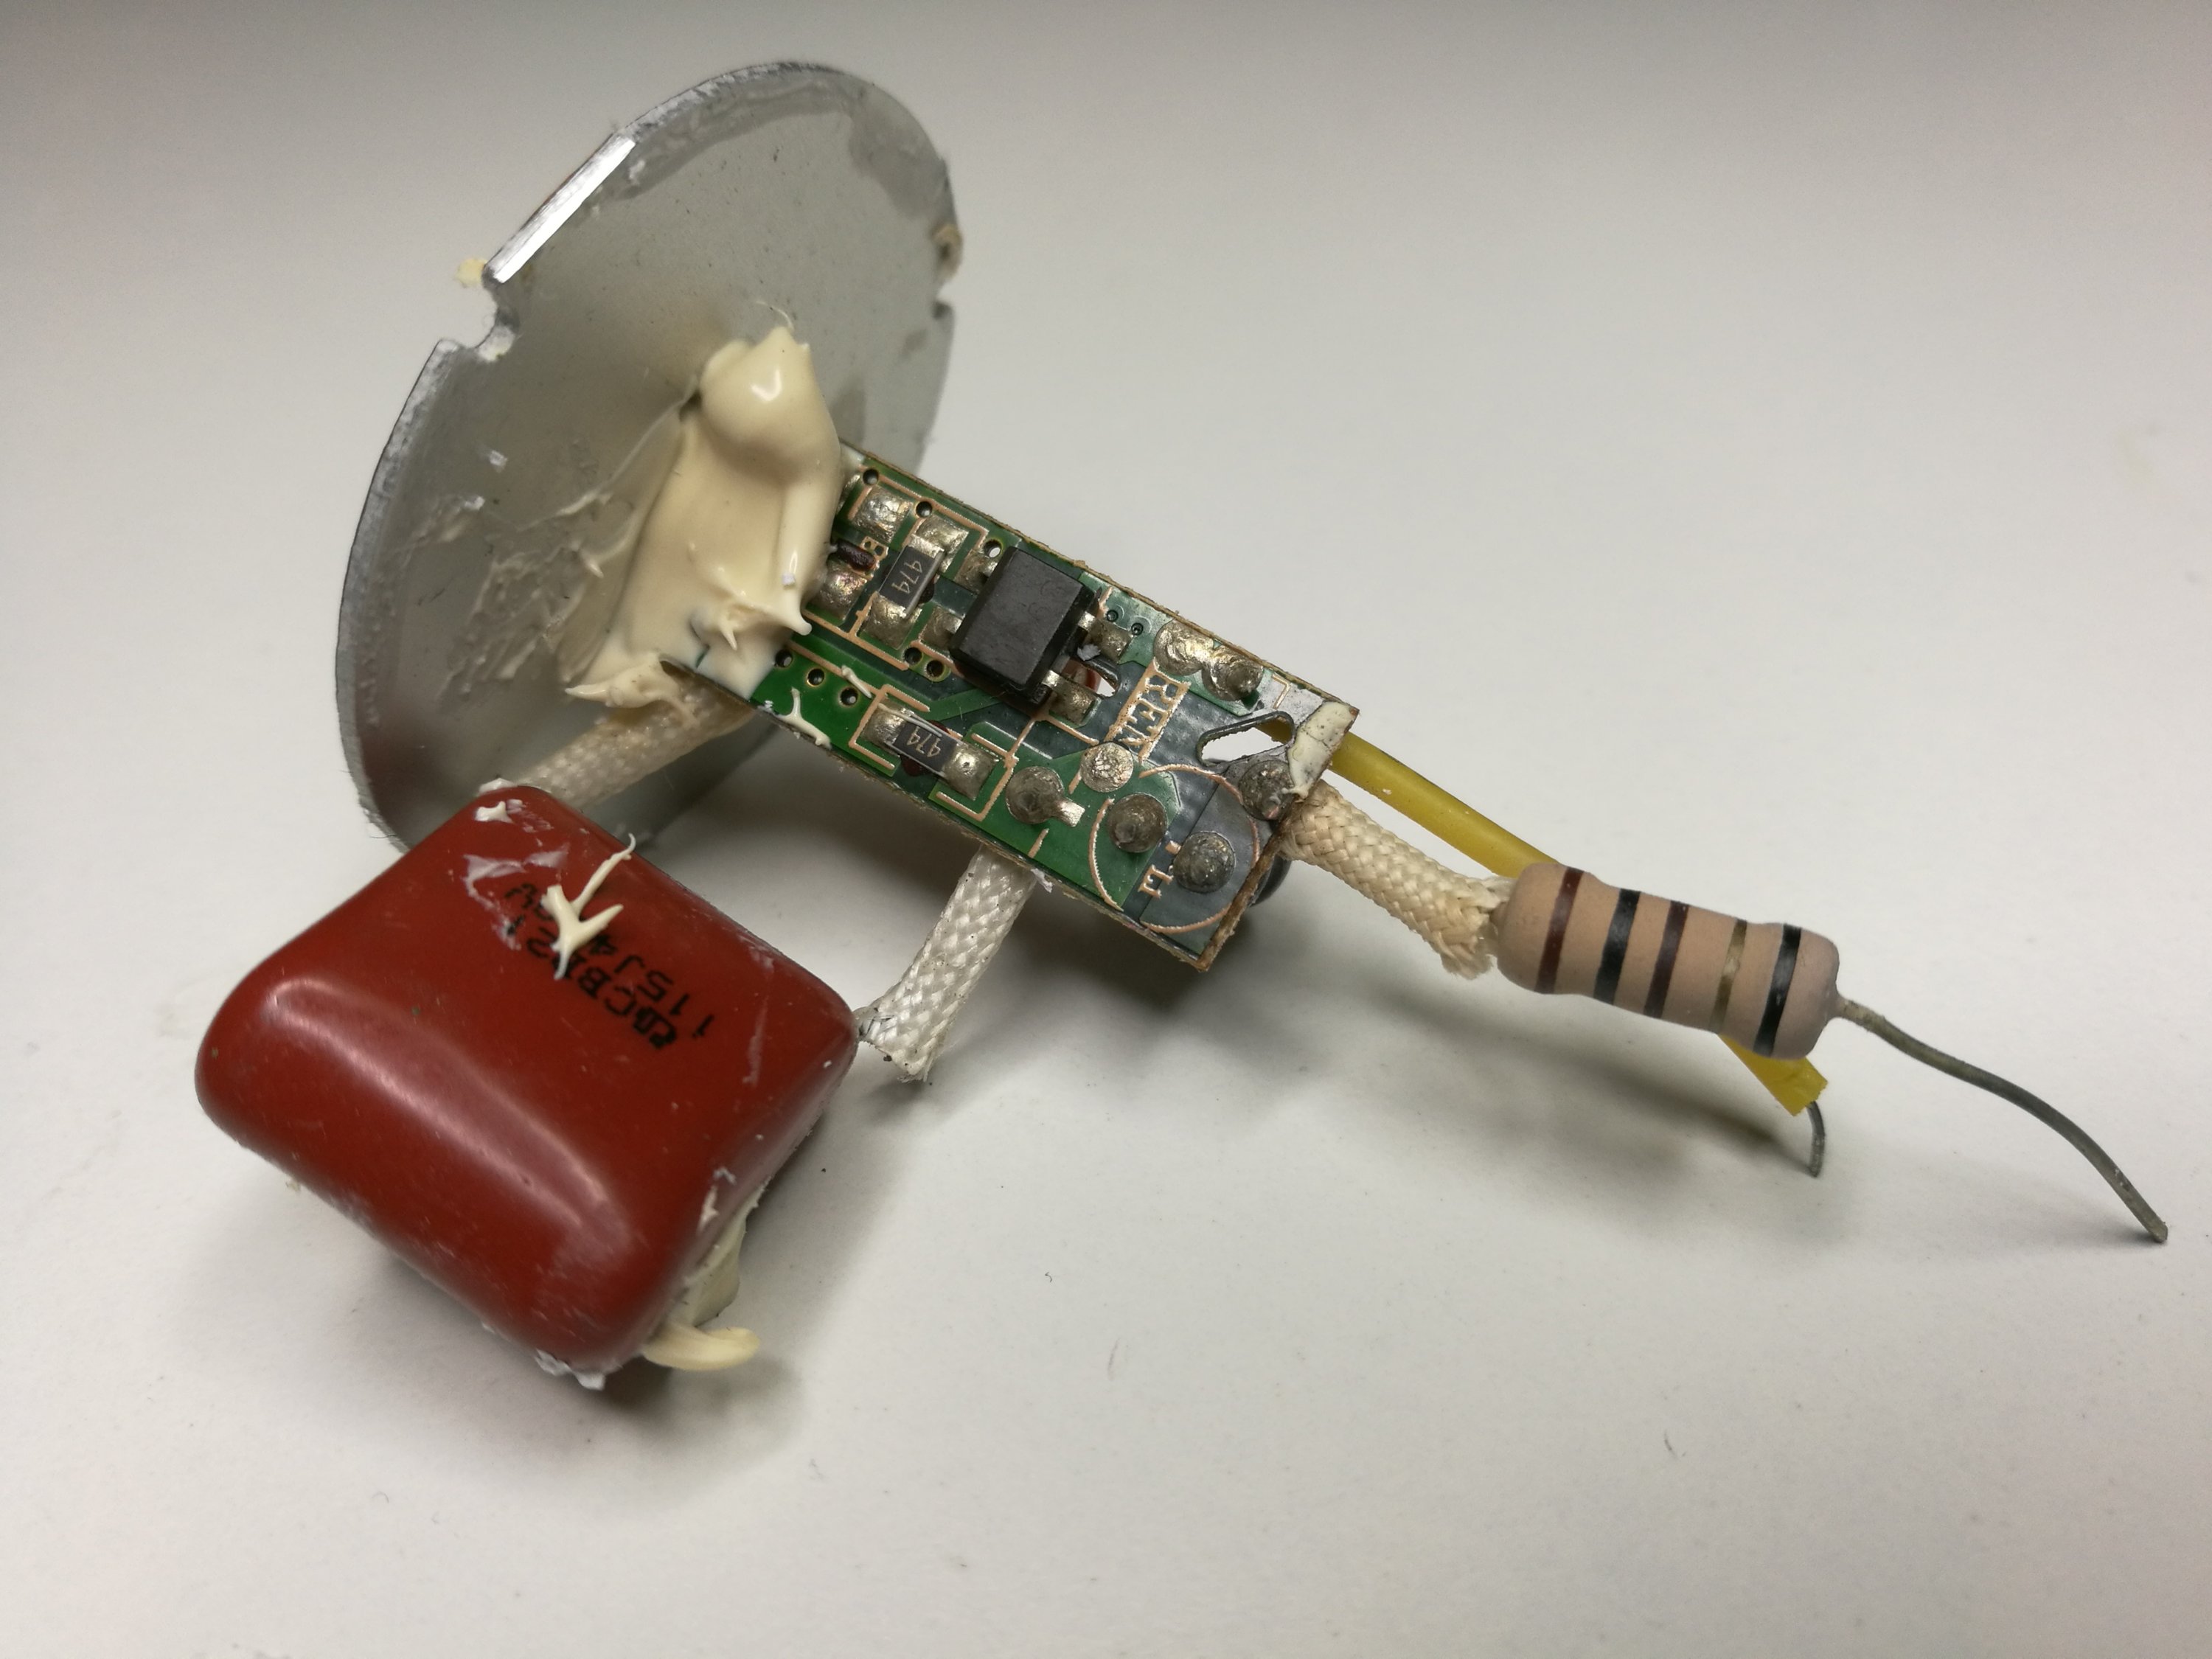
This looks like power supply is basically an RC current limiting (with small coil) followed by rectifier and small electrolytic filtering capacitor. In addition there are 470k bleder resistors to discharge capacitors.
The big resistor is a bit suspect here. According to color code it should be 100 ohms, but multimeter reading says 295 ohms. I suspect that either it has changed value or color code has changed colors due heating.
The RC circuit capacitor was 1.1uF 400V. The filter capacitor after rectifier was 2.2uF 400V electrolytic.
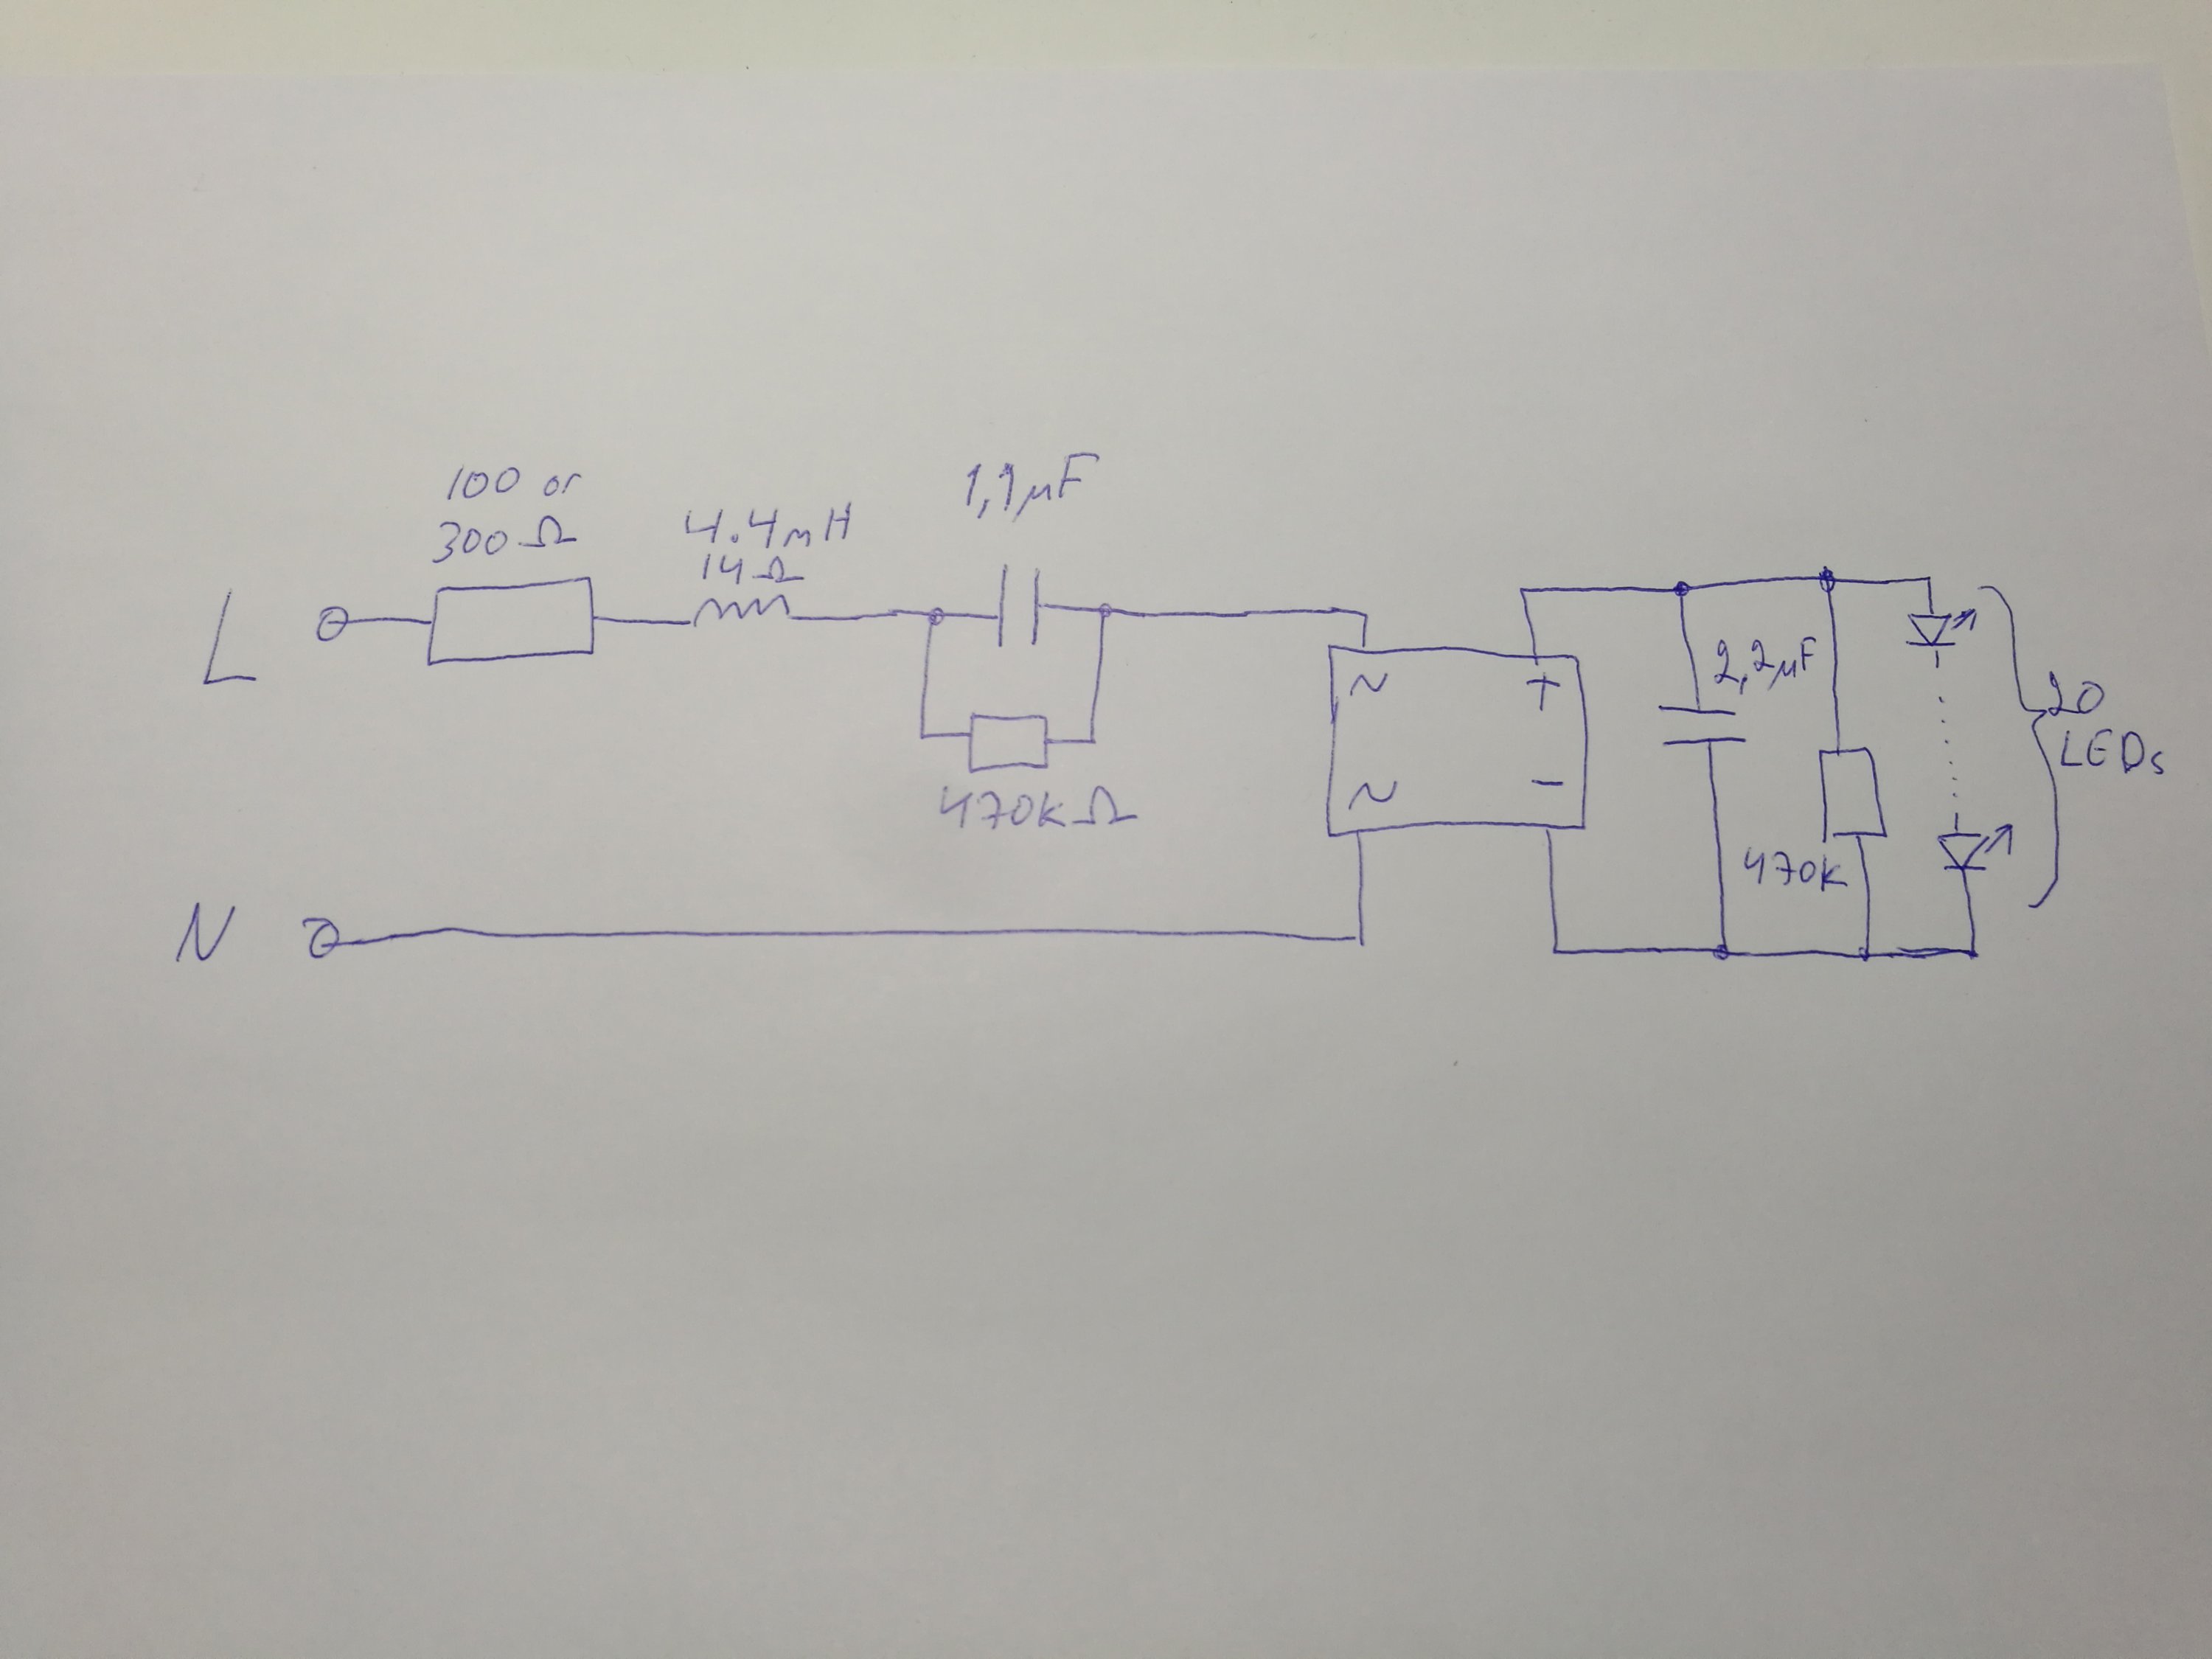
Here is the reverse-engineered circuit disgram:
197 Comments
Tomi Engdahl says:
IP65 LED tape coating fail
https://www.youtube.com/watch?v=UhmUxj9RJus
I was using this tape above my computer for ambient illumination. Over time it imperceivably changed from warm white light to a dull orange glow.
When it got the point that I couldn’t identify component colour bands I decided to take a closer look.
The gel they use to make it waterproof (more like splash-proof) has degraded through exposure to the blue/violet wavelength of the light. Directly above the LED chips it had gone so brown that it was blocking and colouring the light. Initially I thought it was the phosphor that had degraded, but when the coating is cleaned off the LED it is as bright as when new.
The LED strip was being under-run for long life, but it shows that the LEDs themselves aren’t the only factor in optical degradation. This is a good reminder that you should always treat LED tape as a consumable, and ensure it can be replaced easily in the future.
Modifying an old light with LED tape.
https://www.youtube.com/watch?v=7_ds5XFJvPs&t=0s
This was just a spontaneous fix of an irksome slimline fluorescent fitting that I decided to convert to a lower intensity light with some LED strip.
My use of the current regulated supply isn’t ideal since it means that if sections of LEDs fail the current through the remaining ones will increase. It was just hard finding a tiny 12V supply that would fit inside the slim casing.
If I’d had thicker wire to hand I’d have used it. But the stuff I used is more than capable of surviving a fault current that will take out the 3A fuse in the plug. (Continuous rating 2A.)
Tomi Engdahl says:
A troubling trend in lighting?
https://www.youtube.com/watch?v=fsIFxyOLJXM
Is this a bright idea? Or will it eventually leave you in the dark?
00:00 Intro
01:56 A brief (hah!) history of electric lighting
04:28 Ballasted light sources
07:59 The freedom of LEDs
08:49 The thing the video is about
09:26 Electrical boxes and wiring
11:10 Why the idea is so appealing
12:02 All the advantages
17:17 And now for the problems
21:22 The idea is spreading – should it?
23:08 Some light bulb longevity advice
25:25 Thermal cam footage of filament-style LED bulb
27:19 I hope you will consider PAR-style lamps if you can
28:36 Smooth jazz and bloopers
Tomi Engdahl says:
Inside a high voltage LED
https://www.youtube.com/watch?v=7AwQayxjMwE
A look through a microscope at a high voltage 24-LED array in a tiny 2835 style package.
Quick correction, I worked out that roughly 18V is being dropped across the linear regulator. Not 18mA like I said. The combined voltage of the LEDs is so high that very little more has to be dropped across the regulator. That keeps its temperature down. If it did get too hot it would probably self regulate the current down further.
Tomi Engdahl says:
page about batteries, chargers and flashlights
https://lygte-info.dk/
Tomi Engdahl says:
Bare 230V LED tape
https://www.youtube.com/watch?v=7aZiiCUSNBo
I’m not sure what application this bare mains voltage LED tape is intended for, but the implication in the listing that it can be used under kitchen cabinets, in bathrooms and children’s play rooms may not be appropriate.
Despite operating at full mains voltage, this tape can still be cut every 100mm (4″) and does not need an external rectifier. It achieves this with built in rectifiers, multi-chip LEDs and current limiting resistors. Rather pleasingly it doesn’t grill them for a change – even on a 245 volt supply.
The listing actually showed a linear current regulator on each section, but the tape that arrived has resistors. That’s fine. It means there may be a slight intensity change with voltage fluctuations, but the resistors are going to be much more reliable than an active component.
The track spacing is squirmy for the voltages involved. This tape is not suitable for use anywhere with even the slightest risk of condensation forming, and if mounted onto a metal backing there is very little between mains voltage and the surface it’s mounted on. Even hygroscopic adhesive could pose an issue.
The only places this tape could be used are in well insulated or grounded enclosures to avoid the risk of it being touched. The possibility of the tape parting from its adhesive would have to be considered, and it definitely needs a low value fuse.
Tomi Engdahl says:
Building my own “Dubai Lamps”
https://www.youtube.com/watch?v=ngkZiSA8MSM
How to build your own “Dubai Lamp” – an LED lamp that runs LEDs at a reduced current (lower power) to improve the efficiency and prolong its life. This was my first attempt to make LED lamps more efficient.
Tomi Engdahl says:
Purple LED tube with neat driver
https://www.youtube.com/watch?v=Aaz-mmBhTvE
Tomi Engdahl says:
What’s inside this cheap insect zapper
https://www.youtube.com/watch?v=rTLVPhAAMKo
Tomi Engdahl says:
Inside a new Philips ultra-efficient LED lamp (with schematic)
https://www.youtube.com/watch?v=nMc6mjE9Y1s
I was hoping this lamp was going to have similar circuitry to the Dubai lamp, which is not sold in other countries, and while it does have the same concept of under-run LED filaments for long life and higher efficiency, it uses fairly standard circuitry inside.
The one interesting feature of the circuitry, and also the bit that took me longest to reverse engineer because it caught me off-guard, is a novel design twist that reduces the voltage across the chip. The inclusion of transient clipping resistors and filtering should also add to the reliability.
It’s been pointed out that the circuit configuration will also increase the efficiency slightly, as the chip current will contribute to the LED current.
I’m surprised that a linear regulator wasn’t used as in many other lamps due to the simplicity. It’s possible that this lamp has been in the design stages for a while and used buck regulator circuitry as a result of that. The choice of 100V filaments is possibly to cater for 120V and 230V options. Tuning filaments for linear regulators is a bit more complex than the multi LED arrays.
I’m surprised that a linear regulator wasn’t used as in many other lamps due to the simplicity. It’s possible that this lamp has been in the design stages for a while and used buck regulator circuitry as a result of that. The choice of 100V filaments is possibly to cater for 120V and 230V options. Tuning filaments for linear regulators is a bit more complex than the multi LED arrays.
The high cost of this lamp (I paid £12 at John Lewis in the UK) is purely for the life/efficiency features. In the right location it will pay its way by reducing power and maintenance costs. Especially where architects/designers have put light fittings in locations that make servicing them difficult or hazardous.
In the home it could be useful in areas like halls and stairways where the lights are used a lot during the day.
Tomi Engdahl says:
Pound shop USB disco light teardown (with schematic)
https://www.youtube.com/watch?v=KIeXvyyTFnc
I think the best lesson that can be learned from this cheap USB disco light is the importance of supply rail decoupling in the vicinity of audio circuitry.
There’s an audio amplitude detector circuit that triggers continually when used on anything other than a perfectly noise free USB power supply.
That said, it’s a good demonstration of a simple electret microphone based audio detector with a minimalist single transistor amplifier.
The lens projects fairly good beams of light from the hard-driven (50mA) LEDs, so it might find use in other projects.
Tomi Engdahl says:
New LED lamp twist reverse engineered from a picture
https://www.youtube.com/watch?v=toXaBxp1It8
Just when you thought they couldn’t make an LED lamp simpler than the common linear regulator type, they come out with this.
It’s basically a single package combining the rectifier and current regulator into a single package.
Tomi Engdahl says:
Make custom LED neon shapes
https://www.youtube.com/watch?v=y9bSzE9ir1Q
LED neon or LED flex is a very handy material for creating neon-like signage and effects.
As time goes on it’s harder to find places that still make traditional glass neon. This is largely due to the advances made with LED technology providing a safe low voltage alternative for illumination of channel letters signs, and novel materials like this that emulate the traditional linear lines of neon.
Cost is a major factor too. While the LED neon flex won’t last as long as a properly processed neon tube, it is easier to drive and much more tolerant of rough handling.
This project uses short pieces of LED neon flex to create very punchy looking geometric shapes. It’s perfect for using up residual scraps from other projects.
Tomi Engdahl says:
Prototype mains LED lights
https://www.youtube.com/watch?v=1_5vTgjbvto
Exploring some very early prototype LED panels from when gallium nitride LEDs first appeared on eBay (the dumpster ones!) and made projects like this viable.
I also appear to have inadvertently predicted the use of large arrays of LEDs with simple current limiting as used in modern lamps, albeit with each LED containing large numbers of separate LED dice.
Perhaps I should revisit this project and add a two transistor regulator for stable current regulation on bumpy supply voltage.
I like the idea of 3D printing a custom housing too.
Tomi Engdahl says:
eBay “induction” night light teardown
https://www.youtube.com/watch?v=Y_M-l1VByLI
Tomi Engdahl says:
https://hackaday.com/2022/08/15/diy-led-bulb-lacks-correct-lugs-so-m3-bolts-to-the-rescue/
https://github.com/themainframe/gu10-12v-lamp
Tomi Engdahl says:
Tesco lamp with weird circuitry twist
https://www.youtube.com/watch?v=pIDg9O82c34
I can only guess that the unusual circuitry in what would otherwise be a typical linear current regulated LED lamp is to tick a box for European requirements.
It’s using a separate current regulator on the capacitor to soften the current peak at the top of the sinewave. Probably to fudge a slightly better power factor.
I’m not sure what the voltage divider is monitoring.
The addition of a high speed diode in series with the bridge rectifier output is perplexing. Is it some odd attempt at adding faster reverse recovery to the rectifier? At 50/60Hz it doesn’t seem like it’s needed.
Tomi Engdahl says:
Can we hack an Energizer lamp for longer life?
https://www.youtube.com/watch?v=UbrUyy-p-dg
Well of course we can. Here’s how to do it.
Note the “15 year life” is based on 2.7 hours a day, so actually 15,000 hour life, or more likely until you lose the receipt. But with this hack 15 actual years is possible, as it reduces the LED power dissipation and therefore heat significantly. Intensity will be slightly lower, but still very acceptable.
Very typical design, suggesting a “name brand” being applied to a generic lamp. But sensible and familiar circuitry that is easy to tweak.
Tomi Engdahl says:
How to Turn an LED On
https://www.youtube.com/watch?v=zGsQbOjXeEs
Let Audible help you discover new ways to laugh, be inspired, or be entertained.
Tomi Engdahl says:
Pound shop Xmas disaster
https://www.youtube.com/watch?v=O5OOzUsIThg
As we enter the last third of the year, which is one continuous Halloween and Christmas season, the local pound shops (UK dollar stores) have started introducing their seasonal stock.
In this case it includes this lovely LED string USB charging cable with an exciting new approach to driving LEDs. It’s interesting to note that while these came from One Below, they’re echoing the equally disastrous version sold by Poundland in previous years.
If you buy these lights, do it for the caps alone. They’re easy to remove once the LEDs have melted the glue!
It’s intriguing that the LEDs initially survived, but after some use their current dropped notably due to internal degradation.
Tomi Engdahl says:
6W vs 10W vs 13W LED lamp showdown (with schematics)
https://www.youtube.com/watch?v=QmyzcBAwcBU
I thought it would be interesting to compare three different power ratings of lamps from the same brand. These lamps came from a retail outlet called One Below, which is the reincarnation of Pound World. The 13W lamp was slightly more expensive than the others.
The circuitry is very typical of how non-dimmable LED lamps have standardised. They’ve chosen the very simple linear regulator approach, where as much voltage is dropped across the LEDs as possible, and the difference between that and the peak mains voltage (which the capacitor will charge to) is then dropped across the linear regulator chip and dissipated as heat.
That may sound inefficient, but in reality it’s a very simple and reliable way to regulate the LED current.
The current through the LEDs is set by a programming resistor which is chosen to have a voltage of around 0.6V across it at the desired LED current. Increasing the value of that resistor reduces the current. Whereas many lamps use two resistors in parallel to fine-tune the current, these lamps have just a single resistor per regulator, which makes hacking them slightly harder as it involves replacing the original sense resistor with a new one, and that is made harder by the aluminium core PCB sucking heat away from the soldering equipment.
Theoretically, the 13W lamp can be hacked to half the power by just removing the sense resistor on one of the two regulators.
One of the best things about these lamps is that you can replace the diffusers with 3D printed versions in any shape and size you desire. But only after reducing the output power. At very low power levels this can make for some very attractive decorative lamps.
Tomi Engdahl says:
Waterproofing your solar lights to make them last longer
https://www.youtube.com/watch?v=z3VjsPIQhpE
Silicone sealed solar lights one year update.
https://www.youtube.com/watch?v=czfa0S5uwcI
Tomi Engdahl says:
Waterproofing solar firefly globe lights. (And others.)
https://www.youtube.com/watch?v=lH33oHxQIOA
Tomi Engdahl says:
Inside the Aldi 5W LED bulkhead light. (With schematic.)
https://www.youtube.com/watch?v=Bv0kdFyYEAU
Tomi Engdahl says:
LED Bulbs Downgraded From A+ To F! – Energy Labelling
https://www.youtube.com/watch?v=YWcfz1lfD-w
With the new lighting energy labelling laws, you may have found yourself confused about what rating certain LED lamps now carry. For example, previously, A or A+ were considered low-efficiency and could now be labelled G instead! We explore this topic in more detail with Philips’ ultra-efficient range of LED bulbs. How do the new A+ rated labelled lamps compare to less efficient models regarding electricity costs?
Not all LED lamps are created equal!
00:00 Phillips Master LED bulbs
00:38 Who is top of the class
00:48 The new system
01:18 ‘A’ rated
02:00 Energy prices
02:25 On 24/7
03:08 Looks can be deceiving
03:38 From A+ to F
04:07 Less LED’s
04:45 Basic LED lamp
05:42 Saving money
06:50 50,000 hours lamp life
07:39 Switching cycles
Tomi Engdahl says:
Upgrading a downgraded light
https://www.youtube.com/watch?v=V9U2fCE9Sps
The accountants have clearly had a part in the redesign of the circuitry on this classic Chinese light panel. They are intended for use in ceiling bulkhead fixtures, where the new panel sticks to the steel backplate with magnets. This type of light has no easy way to change a lamp. You will literally have to turn off the power and hook wires into terminal blocks instead.
The earlier versions used buck regulators with no flicker, but the new ones have cheaped out in every way possible, creating a very flickery light that has the classic over-driven LEDs. There is no other explanation for this other than profit above all else.
Given the LED layout I reckon they have used the original LED positions and tracks, but replaced the original single chip LEDs with multi-chip ones to cater for the higher voltage that is better suited to the linear regulators. That would also explain the rogue track passing under the rectifier.
In this video I do several experiments to stop the flicker and reduce the power dissipation to give higher efficiency and a much longer LED life.
Note that a lot of the experiments involve live exposed connections, so suitable precautions should be taken if doing similar experiments.
Tomi Engdahl says:
https://hackaday.com/2022/11/24/homebrew-led-bulbs-keep-your-circadian-rhythms-steady/
Tomi Engdahl says:
https://electronics.stackexchange.com/questions/482647/solutions-to-fix-led-light-rfi-emi
Tomi Engdahl says:
I’ve thought a fair bit about how light bulbs that should last ‘forever’ or 20 years burn out in a year or so. Pretty cool overview of how to repair, including some hacks that will at a minimum entertain.
How to DISASSEMBLE and REPAIR an LED lamp WITHOUT A SOLDERING IRON Do-it-yourself LED lamp repair
https://m.youtube.com/watch?v=JBKF7rKB3zc
Tomi Engdahl says:
Inside a big pink lamp (with schematic)
https://www.youtube.com/watch?v=5_szNduBTqE
I had high hopes that this lamp may actually have used LEDs that had their output colour chosen to match the cover for maximum efficiency. But alas no. Just like the old tungsten lamps it uses white with a subtractive colour filter.
In modern terms the circuitry is quite old fashioned too. The new standard seems to be for simple linear current regulators with enough LED chips to match the mains supply voltage.
On a plus note, it does mean that this light is suited to a wider voltage range of about 80V to 240V.
Tomi Engdahl says:
https://hackaday.com/2023/03/14/three-way-led-bulb-gives-up-its-secrets/
Tomi Engdahl says:
Chinese factory lamp base crimper
https://www.youtube.com/watch?v=Y5N24xvDEkM
This is one of those weird things that you can get from AliExpress. It’s one of the crimping tools you sometimes see in Chinese lamp factory videos, where the workers are assembling LED lamps and crimping the lamp base on.
This means I can make unique low power lamps with custom internal circuitry, and also fix ones that I’ve cut apart to reverse engineer.
It wasn’t a super cheap tool (about £40), but It is kinda intended for mass hand production of lamps on a daily basis, and that means it actually was very cheap for what is a genuine piece of factory-grade equipment.
Tomi Engdahl says:
4 Ideas for LED bulb ,, will amaze you
https://www.youtube.com/watch?v=5sfuMjZXnkE
You will not throw away your damaged LED Lamp after watching this video
Tomi Engdahl says:
Advanced AC-Line LED Flyback Controller Packs Features, Functions
April 4, 2023
This advanced flyback-topology IC can serve both primary- and secondary-side regulator requirements.
https://www.electronicdesign.com/technologies/analog/article/21263313/electronic-design-advanced-acline-led-flyback-controller-packs-features-functions?utm_source=EG+ED+Analog+%26+Power+Source&utm_medium=email&utm_campaign=CPS230330035&o_eid=7211D2691390C9R&rdx.identpull=omeda|7211D2691390C9R&oly_enc_id=7211D2691390C9R
Tomi Engdahl says:
Spotless NEON Effect LED Strips, which is Best? Govee, BTF-Lighting, Alitove and more.
https://www.youtube.com/watch?v=Uke98FWkrHg
I tested 10 popular spotless “neon effect” LED strips from Amazon to see which one is the best.
Tomi Engdahl says:
Horrible eBay ultraviolet floodlight (with schematic)
https://www.youtube.com/watch?v=um8r-y6kwi0
In the very best tradition of direct imports from China, this light has a few technical issues.
I got this for comparing to other blacklight style light sources, and although the LED versions are more of a deep violet as opposed to proper UVA, they do perform pretty well.
Most dayglow pigments will respond very well to light that extends well down into the blue area of the spectrum.
Not sure how long this one would last in real use though, especially given it’s impressive list of technical issues. In fact, if you have any of these lights in UV, “burple” , white or other colours then consider them as a high shock risk. Definitely not something you’d want where kids could touch them, or mounted on any metal surface. I do not regard these as suitable for outdoor use at all. (Or indeed any use!)
The dark side of products like these is that people are buying them and installing them in the belief they are safe. Initially they will work, but they will inevitably fail, and when they do there’s a high risk of them failing in a dangerous state. Especially if used outdoors where the casing may rust and disintegrate very quickly leaving exposed live circuitry.
Tomi Engdahl says:
Flickery COB LED strip with terrible dimmer. (with schematics)
https://www.youtube.com/watch?v=Q19zDo0D1rE
Interesting material, but suffers from the curse of these mains voltage LED strips, which is the flicker at 100 or 120Hz. Not visible when looking directly at it, but definitely visible in peripheral vision and on moving objects.
One slight error in the video. I said I was testing a metre, but it was a half-metre (20″) section that I tested as 8W. So 16W per metre.
The dimmer is completely unsuited to sensible control of the LEDs, since they don’t light until quite far into the sinewave and then snap on. The snubber network is perplexing. Almost as if they felt they had to use it, but kept increasing the resistor value because it would be making the LEDs glow visibly. 200K is way too high for a snubber. They would have been better just not using it.
The use of the COB strip inside with densely packed LEDs gives a very linear glow. A nice use for this strip would be to combine it with a capacitive dropper with smoothing, for a low level flicker-free glow along the full length.
For functional illumination I’d tend to recommend using low voltage DC strip for a smooth PWM dimmable illumination. It’s more versatile due to being able to be cut in much smaller increments, and the low voltage supply is safer too. The high voltage strip has the advantage of lower current along very long runs, but I’d not want to use the clip-on friction connection for any significant load.
Tomi Engdahl says:
Trashy disco light gets even trashier (with schematic)
https://www.youtube.com/watch?v=ba4YoZEuhwM
I spotted a video by Franlab about one of these, and it reminded me I have the latest incarnation of these lights that has a more cost-optimised power supply than Fran’s unit.
I’ve featured a few different versions of these in previous videos, but this one has a radically different approach to its power circuitry.
This unit uses an onboard three terminal 5V buck regulator with a useful cheat to nudge the output voltage higher with a zener in the voltage feedback path. That could allow for this same circuit to be used for many custom voltages.
The regulator chip is a KW10L which only seems to bring up sales links on Google. It’s almost certain that it’s a pin-compatible rip off of a prominent branded version.
Other hacks you can do to this light:-
Wire the motor across the red LED for slightly lower speed at 2V.
Disconnect the motor for a static effect.
Replace the LEDs with a colour of your choice, noting that using three gallium nitride colours may need a resistor adjustment.
Add your own custom rotating lens plate, noting that the PCB is fully referenced to the mains supply.
Tomi Engdahl says:
Poundland Eveready WiFi lamp teardown – with very cool chip
https://www.youtube.com/watch?v=B_HSXRpDWyw
I’m not sure how much more streamlining they can do to a WiFi lamp that offers tunable white and RGB colour mixing options. It’s basically a power supply, Wifi module and then a rather spectacular I2C serially controlled five channel linear regulator.
As with all products like this, running them at a lower power setting will result in much less heat and significantly longer operational life. The biggest factors in lifespan will be LED reliability and heat related aging of the electrolytic capacitors.
It’s probably worth mentioning that the linear regulators used in these lighting products probably have other applications too. They are designed to operate over a wide voltage range, so should be suitable for low voltage projects as well as mains voltage use.
Although branded Eveready there was an Energizer sticker on the WiFi module. I’d guess this is a product from one of those companies that buys up dead brands for their status.
The Bright Power buck regulator is quite neat too. It’s a very standard approach to providing a low voltage supply, and there seem to be different versions for different voltage ranges, with each chip having two voltage options that can then be cheated higher with a zener diode in the feedback path.
Not sure the purpose of the mystery capacitor. I’d guess it’s a low value and intended to remove a bit of switching noise from the buck regulator.
Given the functionality of the light the circuitry is surprisingly uncluttered and minimalist. That’s entirely down to the very modular approach.
Tomi Engdahl says:
IKEA Solhetta bulb teardown
https://www.youtube.com/watch?v=M1qdbfcuiVA
This video was supposed to be about one version of the bulb/lamp, but it turned out that the box had two different bulbs in it, so it became a double teardown.
One oddity is that the resistor I thought was 510K is actually 5.1 Megohm, which is an unusually high value.
IKEA seem to have stuck with buck regulators for their bulbs which is strange in this era of cheap linear regulators. I’m not sure if there’s a significant efficiency advantage of using a buck vs linear regulator. But it may keep some of the heat away from the LED panel.
I think I prefer the simplicity of modern linear regulators with their single smoothing capacitor and no high frequency noise.
As with most IKEA products I’d guess they are designed with a bias to lasting longer than products from other brands.
The 6 pin buck regulator with built in rectifier is new to me. It makes sense, and also benefits from a wider pin spacing for better electrical separation.
The higher power lamp is the only one that is easy to hack for a lower output and massively longer life. The hack would involve removing one of the very low value sense resistors. I removed the 8.2 ohm resistor and the power dropped from 6W to 2.3W. Removing the 12 ohm resistor instead would give closer to 3.5W.
If attempting to open lamps in the way I did in this video, be aware that there are still glass ones in use, so take care to make sure the cover is soft plastic before attempting to squeeze it to release the adhesive. Also be aware that once the cover is removed it exposes live connections on the PCB when powered.
Tomi Engdahl says:
https://www.learningelectronics.net/circuits/mains-powered-white-led-lamp.html
Tomi Engdahl says:
3 Best LED Bulb Circuits you can Make at Home
Last Updated on December 4, 2022 by Swagatam 266 Comments
The post elaborately explains how to build a 3 simple LED bulb using many LEDs in series and powering them through a capacitive power supply circuit.
https://www.homemade-circuits.com/how-to-make-led-bulb-circuit/
Tomi Engdahl says:
http://vn.happyvalentinesday2020.online/ac-led-circuit-diagrams-2044.html
Tomi Engdahl says:
IKEA Solhetta
https://youtu.be/M1qdbfcuiVA?si=0Xkag3PWAOhs3VYe
Tomi Engdahl says:
3 new ideas for damaged LED bulbs that will amaze you
https://www.youtube.com/watch?v=GkNWtBBI96A
Tomi Engdahl says:
https://etn.fi/index.php/13-news/15583-linuxiin-kohdistuu-yhae-enemmaen-kiristyshyoekkaeyksiae
Tomi Engdahl says:
Trashy and a bit dangerous, but a clever design
https://www.youtube.com/watch?v=VyafaAWd1iI
Tomi Engdahl says:
Horrific LED tester that can literally kill you – (with scary schematic)
https://www.youtube.com/watch?v=msr4ug7tc-k
If you have one of these then you may wish to either stop using it or completely change the way you use it. At the very least, wear insulated gloves and make sure the unit is unplugged after use. Do not rely on the onboard switch.
There are safer units available that convert the incoming power to an isolated and current limited supply, but this one pretty much puts full mains voltage straight out.
The bizarre LED dangling through a ragged hole in the ungrounded case may actually be a crude FUSE! Because if the positive lead touches grounded metalwork there will literally be a dead short, with just the internal rectifier and the LED in series with the mains supply. LEDs do actually make surprisingly good fuses due to having a microscopic encapsulated bond wire. They do sometimes blow in half though… Sadly, the LED will not save you from electrocution. It takes much less current to kill a human than to blow an LED bond wire.
Technically speaking they could have made a marginally safer unit by putting a capacitor on each leg of the supply and limiting the current to a much lower level. Even high power resistors could have been used for that. It would still pose a shock risk, but with much less chance of being fatal. But for a proper reliability test on a faulty LED panel a higher current may be useful.