How should the IoT communications work? The communication between the IoT gateway and IoT cloud will use TCP/IP, but there are many things in addition to that. One issue is the selection of communication method, specifically which communication end initiates the communications. In a traditional “old Internet” it would have not mattered too much which end starts the communications, or does it use TCP or UDP protocols to transfer the data. As long as the end starting the communications knows the IP address of the other end, things worked well. So if the IoT gateways and IoT cloud have a fixed IP address or network name, it would be trivial to start the communication in any direction you want.
In modern Internet the situation is different, mostly due two facts: shortage of IP addresses and security reasons. Modern IoT communications use IoT model that had or can have many firewalls/router devices on the way from IoT gateway to IoT cloud. Besides firewalls there can be also NAT (network address translation) devices on the way.
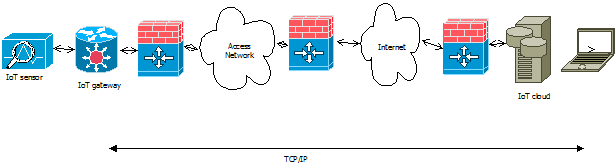
In this modern IoT model usually the only practical way is that the IoT gateway is the device that initiates the connection to IoT cloud. The typical situation is that IoT cloud is the only device that practically can have fixed IP address (or name) that is easy to define to IoT gateway. Typically the IoT gateways can have address that can change over time (for example connected through cellular network).
When there are stateful firewalls and/or NT device on the way, usually the only direction that is well tested to work is that when the communications is initiated by IoT gateway the reply packets can also pass through firewall back. But if IoT cloud would try to do initiate connection to IoT gateways, it is typically blocked by firewall / NAT device unless a special rules that allow this specific device to communicate are added to firewall (usually hard to manage solution that takes lots of work to get approved and configure correctly in corporate networks).
So the most practical way is that for Internet of Things communications the IoT gateway opens the connection to the IoT cloud. On the protocol side, the safest bet is to use TCP connection for the communications (usually firewalls limit the use of UDP services more). When taking account how most firewalls are configured, the best idea is to use a TCP port addresses that are commonly used also for other applications (and is thus normally passed through firewall). Usually the safest bet is is to use TCP port 80 (normal web HTTP port). Other potential ports are 443 (HTTPS) and 22 (SSH).
Keep in mind that I am here only considering the opening direction of the TCP connection. This does not affect the actual direction of the application data, when the TCP connection is open both ends of the connection are free to send the messages to each other as they wish. So at the applications level when the TCP connection is active, it can be freely IoT cloud or IoT gateway that initiates the actual application level communications.
1 Comment
Tomi Engdahl says:
Configuring IoT Devices: ProbMe™ Makes it Easy
http://www.eeweb.com/blog/eeweb/configuring-iot-devices-probme-makes-it-easy
User adoption of new wireless technologies presents several challenges. Three of the biggest that hamper deployment and widespread use of new technologies are installing infrastructure, ease of use, and ease of installation and configuration.
Given the globally installed base and use of Wi-Fi for everything from smartphones to tablets, to laptops and desktop computers, the first two items are taken for granted by most Wi-Fi wireless users. With the emergence of the global Internet of Things (IoT), however, the issues faced by a user trying to quickly, easily, and securely configure a new device to the home network are not yet solved. ProbMe, from Econais addresses simple and easy configuration of devices for the Internet of things.
Most devices that users connect to a Wi-Fi network need a service-set identifier (SSID) and a pass phrase, which is generally longer than a password.
Manufacturers of wireless routers initially supplied routers with a default and generic SSID as well as open settings that required no pass phrase to join the network.
Most router manufacturers are now providing unique SSID’s and initial unique pass phrases that are supplied on a sticker on the Wi-Fi router.
Most of the devices that consumers have connected to Wi-Fi wireless routers have rich computing resources, displays, keyboards, and other abilities that make entering the information for a secure connection relatively easy. However, the devices now being added to homes, offices, commercial spaces, industrial facilities are quite small and don’t have a display or convenient data-entry capability that allows users to configure them. Thus, the devices need to be configured by a smarter device that is also on the network.
There are two likely approaches. The first is to use a Wi-Fi protected setup (WPS) button on the coffee maker and assume the user’s wireless router has a WPS button as well. This requires the user to simply press the button on the coffee pot and also press the button on the wireless router.
Another common approach is to have the coffee maker come up as an access point with its own SSID and pass phrase, which is supplied by the manufacturer’s quick-start card. With a browser, a user logs in to the coffee maker, navigating to an area to enter the SSID and network pass phrase. The device is then configured as a client on the user’s network.
This is a very straightforward approach whereby when the coffee maker is plugged in, powered on, and the SSID of the coffee maker is broadcast so that it is easily identified. The user disconnects from their wireless network, connects to the coffee maker, configures it, and the process is complete.
The disadvantage of this method can be the required level of comfort with technology. Also, the process is quite time consuming, which is compounded if there are several devices to install, such as light switches, light bulbs, outlets, speakers, cameras, door locks, thermostats, alarms, and so on
Imagine an alternative approach to the ones described above. In this approach, the user brings home the coffee maker. After plugging it in, looks at the quick-start card, then using a smartphone enters the proper network SSID and pass phrase, and finally clicks, “Join,” “Save,” or “Submit.” The smartphone transmits the configuration information and automatically connects all the new ProbMe devices to the network.
ProbMe works by utilizing the discovery functionality of Wi-Fi networks, but instead of using the standard 802.11 management frames to simply interrogate the surrounding networks for their SSID information, the ProbMe method uses these frames as configuration carriers.