I got interested interested in ESP8266 WiFi module after reading New Chip Alert: The ESP8266 WiFi Module (It’s $5) article. Why is it cool? It’s a WiFi module with an SOC, making it somewhat similar to TI’s CC300. ESP8266 is an UART to WiFi module that you can pick for less than $5 USD.
ESP8266 is a really cheap and easy way to connect any small microcontroller platform (for example Arduino) wirelessly to Internet. The microcontroller on the module takes care of all the WiFi, TCP/IP stack, and the overhead found in an 802.11 network. It’s addressable over SPI and UART, making this an exceptionally easy choice for anyone wanting to build an Internet of Things thing. You can use AT commands to connecyt to WiFi networks and open TCP connections without need to have TCP/IP stack running in your own microcontroller: You can simply connect any microcontroller to this module and start pushing data up to the Internet. This might be why it seems that ESP8266 has pretty soon become every hacker’s favorite WiFi chip.
The ESP826 module I bought from Electrodragon is simple having only the ESP8266 IC and one other IC in it. The WiFi antenna is integrated to circuit board. The whole module is just size of post stamp.
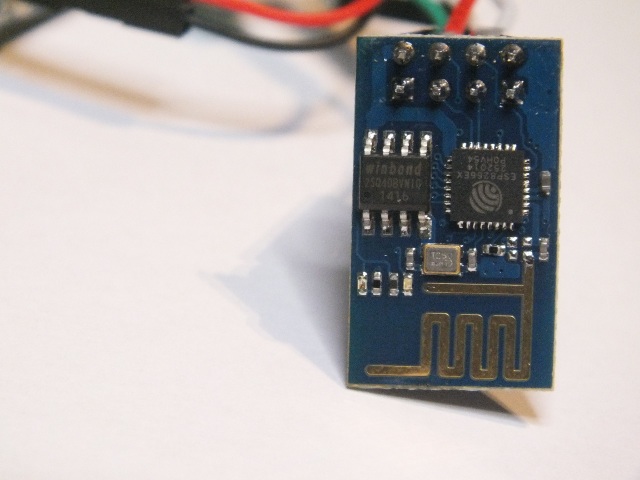
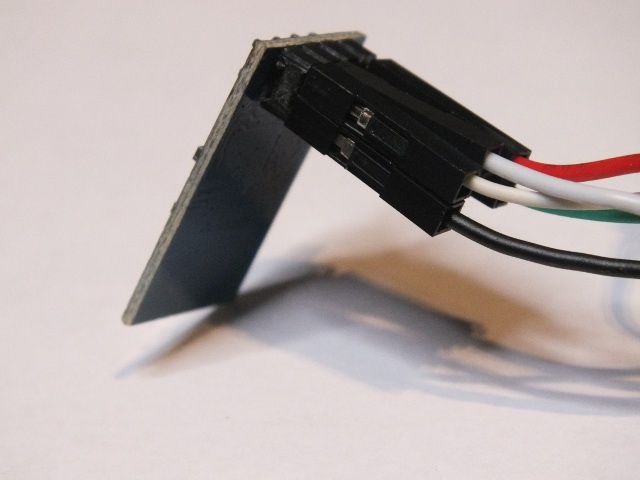
The other side of the he module des not have any components, just 8 pins I have attached wires to in this picture.
There’s a catch, right, there’s always a catch on the cheap products. One thing is that ESP8266 pretty much doesn’t exist outside China. Ordering from China is not a problem nowdays, but when all the documentation is in Chinese, that can be a problem. But fortunately there has been projects to get ESP8266 translated data sheet.
I had enough information, so I need to get one module to test. I ended up ordering ESP8266 module from Electrodragon (check module data). ESP8266 from Banggood.com would have been cheaper bit taken longer time to get because ESP8266 module was listed to out of stock at the time.
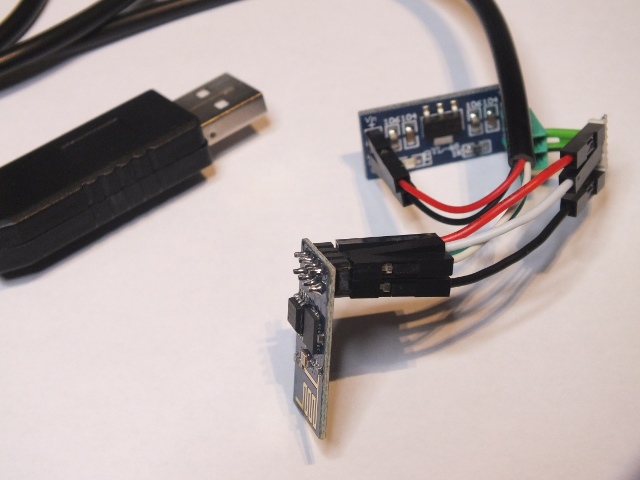
The module and IO pins run at 3.3V. For testing I used USB To RS232/TTL PL2303HX Cable Adapter and 5V to 3.3V regulator module to do the connection. I used separate 3,.3V regulator module because I wanted to guarantee that the module can get enough current (over 200 mA on peaks) (some other USB-serial adapter ICs have 3.3V regulators built in them but can’t give enough current out). Wi07c ESP8266 module data and different project examples got me started pretty well.
Test commands at 115200-N-8-1 serial port settings:
AT+RST
AT+CWMODE=1
AT+CWJAP=”SSID”,”PASS”
AT+CWJAP=”AndroidAP”,”XXXX”
AT+CIPSTART=”TCP”,”www.epanorama.net”,80
AT+CIPSEND=0,n: Where n is the length of the request string.
AT+CIPCLOSE
The results with those were promising. Wiring ESP8266 to your favorite microcontroller platform has pretty much everything you would need to do with an Internet of Things thing. That’s good enough, but things are even better.
It has turned out that it is possible to do run your own coode on the module itself: An SDK for the ESP8266 WiFi Chip turns the ESP8266 into something much better than a UART to WiFi module; now you can create a Internet of Things thing with just $5 in hardware. You can write the software using C programming language and GCC compiler to processor in the module (80MHz Tensilica). Included in the SDK are sources for an SSL, JSON, and lwIP library, making this a solution for pretty much everything you would need to do with an Internet of Things thing. Looks interesting, I just have to find time to test that out…
Review articles on ESP8266
First impression on the ESP8266 serial-to-WiFi module
The Current State of ESP8266 Development
Review on the new and cheap esp8266 WiFi module – video
The Current State of ESP8266 Development
Sites on ESP8266 information:
translation of the datasheet and AT command set
Project pages:
Using the ESP8266 module
A Development Board for the ESP8266
ESP8266 and PL2303HX-gpio adventures
Update Firmware ESP8266Cloud Update - also video
A Proof of Concept Project for the ESP8266
The ESP8266 Becomes a Terrible Browser
ESP8266 Retro Browser – Accessing a web site with an ESP8266 serial WiFi module and an Arduino Mega
Keep an Eye on Your Fermenting Beer with BrewMonitor
An ESP8266 Based Smartmeter
Checking Email With The ESP8266 – reads the subject and sender lines from the latest email and displays it on an LCD
ESP8266 Wifi Temperature Logger – using the ESP8266 and Arduino to update a remote Thingspeak server
Adding wifi to a desk lamp with the Wi07C (ESP8266)
Places to order:
ESP8266 module from Electrodragon
SDK:
An SDK for the ESP8266 WiFi Chip
The ESP8266 SDK is finally here – along with a VirtualBox image with Ubuntu that includes GCC for the LX106 core
Source code examples:
331 Comments
Tomi Engdahl says:
Hackaday Links: November 22, 2015
http://hackaday.com/2015/11/22/hackaday-links-november-22-2015/
Despite being a WiFi device, the ESP8266 is surprisingly great at being an Internet of Thing. The only problem is the range. No worries; you can use the ESP as a WiFi repeater that will get you about 0.5km further for each additional repeater node. Power is of course required, but you can stuff everything inside a cell phone charger.
Enlarge the range of ESP8266 without limits for just 2,5$ / kilometer
http://iotests.blogspot.fr/2015/11/extend-range-of-esp8266-as-wide-as-you.html
In this case, what you need is one (or several) repeaters, which get the connection from your ESP (typically, hitting a PHP link that sends a tweet or an email), and “forwards it” (ie, hitting the same page) to your wifi access point (or another repeater, which forwards it to the access point). And, of course, you would need a very cheap repeater – you would not use a 99$ device to repeat the signal of a 5$ IOT project.
This is exactly what the following project offers.
Each of these repeaters offers a range up to 0,5 kilometers, which means that it can ‘extend’ the reach of your first ESP by 1 kilometer (0,5 km from your ESP to the repeater + 0,5 km from the repeater to your access point), for less than 2,5 $. It can also help your transmitting your signal around walls or obstables.
Tomi Engdahl says:
Absurd Clock uses Twelve ESP8266 Modules
http://hackaday.com/2015/11/26/absurd-overuse-of-esp8266-in-a-clock/
Quick quiz: How many ESP8266 modules do you need to make an LED clock? Hint: a clock displays 12 hours.
Nope! Twelve is not the answer. But that didn’t stop Hackaday.io user [tamberg] from building a 12-ESP clock during the Bilbao, Spain Maker Faire. The “advantage” of using so many ESP8266s is that each one can independently control one hour LED and its associated slice of five minute-marker LEDs. Each ESP fetches the time over the Internet, but only lights up when it’s time.
ESP Clock
Made from 12 ESP8266 during Bilbao Maker Faire 2015
https://hackaday.io/project/8552-esp-clock
Tomi Engdahl says:
SubPos – Positioning System
A “dataless” Wi-Fi positioning system that can be used anywhere GPS can’t.
https://hackaday.io/project/4872-subpos-positioning-system
Tomi Engdahl says:
Starling: A modular internet connected LED display
Hackable wifi enabled modular LED display to showcase messages that matter to makers, hobbyists and everyone else!
https://hackaday.io/project/8502-starling-a-modular-internet-connected-led-display
Tomi Engdahl says:
$10 DIY Wifi Smoke Alarm Notifier (Roost & Nest Alternative) (Full Tutorial)
http://www.simpleiothings.com/10-diy-wifi-smoke-alarm-notifier-roost-nest-alternative-full-tutorial/
This tutorial will teach you how to build a Wifi Smoke Alarm Notifier for about $10 dollars. You won’t have to code anything, and you won’t have to solder or buy expensive electronics equipment. Any services you are asked to use will be 100% free. Its that easy. Lets get started!
Tomi Engdahl says:
Light Up Your Day With This LED Clock
http://hackaday.com/2015/12/05/light-up-your-day-with-this-led-clock/
We love clocks, and [Chris] got our attention with the internet enabled Light Clock. Time is displayed via RGB LED strip in a number of different ways around a 3D printed white disk. All the modes are based on two selectable colors to indicate hours and minutes, either in a gradient fashion or a hard stop.
Light is provided by a 144 LED neopixel strip and is powered by a beefy 4 amp 5 volt power supply, which also powers the controller. Brains are provided by a ESP8266 powered NodeMCU-12E board, and software is written using ESP8266 for Arduino core.
Being a WiFi enabled micro controller it is a simple matter of connecting to the clock using WiFi and using the embedded web pages to select your local timezone, color palette, and display mode. The correct time is set by network and will never be wrong.
The Light Clock
A wifi enabled clock that always keeps perfect time and is beautiful to match
https://hackaday.io/project/6925-the-light-clock
People have made RGB clocks before, there are several on this site. I wanted to take the concept and make it a little more beautiful and add WiFi
Tomi Engdahl says:
Hacklet 87 – Roomba Projects
http://hackaday.com/2015/12/05/hacklet-87-roomba-projects/
First introduced in 2002, The iRobot Roomba was conceived as a robotic vacuum cleaner. Just about every hacker, maker, and engineer out there immediately wanted one. The Roomba proved to be more than just a vacuum though; it was the perfect base for any household robotics project. Before long Roombas were being hacked to do way more than sweep your floor. iRobot recognized this, and added a hacker friendly serial port to later model Roombas.
We start with [fuzzie360] and Poor Man’s Raspberry Pi Turtlebot. [Fuzzie360] has their Roomba running Robot Operating System (ROS).
Finally we have [Fredrik Markström] and ESP8266 controlled Roomba. [Fredrick] is hacking an ESP8266 module to be the main computer of this little Robot. Of course, a ‘8266 means it will be carrying WiFi, so this robot needs to have a web interface. [Fredrik’s] first problem was powering the ESP8266.
The ‘8266 will control the Roomba through the serial interface included on all the current models.
ESP8266 controlled Roomba
Embedd an esp8266 embedded inside the roomba for web based control and statistics
https://hackaday.io/project/8290-esp8266-controlled-roomba
Tomi Engdahl says:
Hairband Lights Up Depending on your Mood
http://hackaday.com/2015/12/07/hairband-lights-up-depending-on-your-mood/
After learning how to use the ESP8266, [Chirag Nagpal] decided to do a fun project to experiment that polls data from Twitter. He calls it the Sentiband, and it analyses your last tweet’s sentiment and changes color accordingly.
There is an API available called Sentiment140 (Formerly ‘Twitter Sentiment’) which is capable of determining the emotional content of a tweet on Twitter. It uses classifiers built from machine learning, and was developed at Stanford by a few CS graduates.
SentiBand
The HairBand That knows your mood.
http://chiragnagpal.com/sentiband/
Tomi Engdahl says:
Make A Cheap GoPro Remote From An ESP8266
http://hackaday.com/2015/12/29/make-a-cheap-gopro-remote-from-an-esp8266/
GoPro cameras are getting pretty sophisticated, but they can’t yet read minds: you have to tell them when to start recording. Fortunately, they can be remote controlled very easily over a WiFi connection, and this neat tutorial from [euerdesign] shows how you can use an ESP8266 to build a very cheap GoPro remote. The idea is simple: you press a button connected to the ESP8266, which is programmed with the details of the ad hoc WiFi network that the GoPro creates. It then posts a simple URL request to the GoPro, which starts recording. Total cost? A few bucks for the ESP8266, a button and a few bits of wire.
DIY GoPro remote
http://euerdesign.de/2015/12/28/ultralowcost-diy-gopro-remote/
Tomi Engdahl says:
Help Needed: No-Soldering ESP8266 IFTTT Button
http://hackaday.com/2016/01/01/help-needed-all-in-one-esp8266-ifttt-button/
We all love to see amazing hacks in their finished state and be dazzled by what our peers can do. But that’s just the summit of the hacker’s Everest. We all know that the real work is in getting there. Hackaday.io user [stopsendingmejunk] is working on an ESP8266-based IFTTT Button based on a simple breakout board so that anyone could rebuild it without having to do any soldering, and he’s looking for collaboration.
https://hackaday.io/project/9000-all-in-one-esp8266-ifttt-button
Tomi Engdahl says:
Inject Packets with an ESP8266
http://hackaday.com/2016/01/14/inject-packets-with-an-esp8266/
[Kripthor] sent us a link to his blog where he writes the Hello World of low-level networking. Basically he’s constructing his own packet and sending it. By itself this isn’t a bad thing. You could use this power for all sorts of networks-diagnostic good. And so, despite the ominous name of his blog post “ESP8266 Jamming”, he’s not really doing anything that bad — he’s just creating many fake WiFi beacon frames and sending them out every so often.
Which can apparently do bad things to some vulnerable routers. Who knew? Want to test yours?
Naturally we wanted to see how he was doing it, and we opened up the Arduino code in GitHub. It turns out that Espressif has written a wifi_send_pkt_freedom() function that just sends out whatever packet you’d like to the network. That was easy.
It also turns out that the ESP8266 will enter monitor mode, where it listens to all WiFi traffic regardless of the MAC address that it’s directed toward.
ESP8266 Jamming
http://ruralhacker.blogspot.pt/2016/01/esp8266-jamming.html
Well, using Arduino IDE 1.6.5 and the additional board manager to program the ESP8266 chip, I made a small program to spam the aether with random beacon frames. It’s mostly harmless, but it shows packet injection is working just fine.
Tomi Engdahl says:
Hacker Welcomes Grandaughter with Web Enabled Frame
http://hackaday.com/2016/01/15/hacker-welcomes-grandaughter-with-web-enabled-frame/
building a twitter-enabled mirror/mood light. While we’d like to rage that this Internet of Things “thing” that people are doing has gone too far, this isn’t the first time we’ve seen this happen.
For the brains of his device [viscomjim] used an ESP8266 module. [Viscomjim] etched his grandchild’s name into the mirror and put some Neopixels behind it. When one of his family members tweets to the light’s channel they can change the color of the light to interact with their newest family member.
Controlling NeoPixels with Twitter
http://www.esp8266.com/viewtopic.php?f=41&t=7562
This is an example of using twitter to do something, very similar to cheerlights, but where you can pass data without having your own special filter word like “cheerlights”. Because of this you have to use a filter word that thingspeak will catch. These are the ones that work…
#thingspeak
thingspeak
#tweetcontrol
tweetcontrol
#cheeerlights
cheerlights
So to control your own stuff, you have to tweet something like this…
#tweetcontrol #kidsnamered
And the lights will turn red. Works well and can be adapted to do ANYTHING!!!!
Tomi Engdahl says:
ESP-Micro is a Tiny Development Board
http://hackaday.com/2016/01/20/esp-micro-is-a-tiny-development-board/
The ESP-8266 packs a lot of networking power into a small package. Some would say too small, which is why they often come on a slightly larger carrier PCB. The PCB is usually little more than a breakout with an optional 3.3V regulator. [Frazer Barnes] went one step further: he put an equally tiny USB to serial bridge, an oscillator, and some power management on an ESP-8266 breakout board.
You can program the ESP-8266 via the serial port, so having a built-in USB port is handy.
ESP-MICRO, The WiFi Dev Board
A tiny WiFi development board for the ESP8266 microcontroller with programming over USB.
https://hackaday.io/project/9049-esp-micro-the-wifi-dev-board
Tomi Engdahl says:
Five Bucks, Three Parts: WiFi Camera Remote
http://hackaday.com/2016/01/24/five-bucks-three-parts-wifi-camera-remote/
It’s just ridiculous how cheap and easy it is to do some things today that were both costly and difficult just two or three years ago. Case in point: Hackaday.io user [gamaral] built a WiFi remote control for his Canon E3 camera out of just three parts: an ESP8266 module, a voltage regulator, and a stereo plug that the camera uses as its remote trigger.
Canon DSLR WiFimote
Harness the power of the ESP8266 to take photos while you chill and watch Netflix
https://hackaday.io/project/9234-canon-dslr-wifimote
Tomi Engdahl says:
Custom Siri Automation with HomeKit and ESP8266
http://hackaday.com/2016/01/17/custom-siri-automation-with-homekit-and-esp8266/
Knowing where to start when adding a device to your home automation is always a tough thing. Most likely, you are already working on the device end of things (whatever you’re trying to automate) so it would be nice if the user end is already figured out. This is one such case. [Aditya Tannu] is using Siri to control ESP8266 connected devices by leveraging the functionality of Apple’s HomeKit protocols.
HomeKit is a framework from Apple that uses Siri as the voice activation on the user end of the system. Just like Amazon’s voice-control automation, this is ripe for exploration. [Aditya] is building upon the HAP-NodeJS package which implements a HomeKit Accessory Server using anything that will run Node.
Once the server is up and running (in this case, on a raspberry Pi) each connected device simply needs to communicate via MQTT. The Arduino IDE is used to program an ESP8266, and there are plenty of MQTT sketches out there that may be used for this purpose.
ESP8266 based HomeKit accessories
http://adityatannu.com/blog/post/2015/12/13/ESP8266-based-HomeKit-accessories.html
Tomi Engdahl says:
WiFi Serial Transceiver Module Breakout Board w/ ESP8266
http://store.hackaday.com/products/wifi-serial-module-breakout-board
An inexpensive WiFi serial transceiver module breakout board, based on ESP8266 SoC.
$6.97
Tomi Engdahl says:
Five Bucks, Three Parts: WiFi Camera Remote
http://hackaday.com/2016/01/24/five-bucks-three-parts-wifi-camera-remote/
It’s just ridiculous how cheap and easy it is to do some things today that were both costly and difficult just two or three years ago. Case in point: Hackaday.io user [gamaral] built a WiFi remote control for his Canon E3 camera out of just three parts: an ESP8266 module, a voltage regulator, and a stereo plug that the camera uses as its remote trigger.
And the codebase is just about as minimal, although it’s not without its nice touches. Control is easy — just pull down a pin for focus or shutter. The ESP listens to a custom port, and when it gets the message, “presses” or “releases” the pins. It’s a good, simple example of how to work with the ESP IOT SDK.
Canon DSLR WiFimote
Harness the power of the ESP8266 to take photos while you chill and watch Netflix
https://hackaday.io/project/9234-canon-dslr-wifimote
Having a tripod with you is not always all you need in order to take sharp, good looking pictures. Sometimes in low light conditions, your hand pressing down on the shutter trigger can make the image come out blurry.
So why not mix the power of the ESP8266 with a convenience of a shutter control? That way you could take photos while you’re chilling watching Netflix.
Tomi Engdahl says:
Truly Versatile ESP8266 WiFi Webcam Platform
http://hackaday.com/2016/01/24/truly-versatile-esp8266-wifi-webcam-platform/
[Johan Kanflo] built a sweet little ESP8266-based wireless camera. It’s a beautiful little setup, and that it’s all open and comes with working demo code is gravy on the cake! Or icing on the potatoes. Or something.
[Johan]’s setup pairs an ESP8266-12 module with an Arducam, which looks like essentially an SPI breakout board for the ubiquitous small CMOS image sensors. The board naturally has a power supply and headers for programming the ESP module as well as connectors galore. Flash in some camera code, and you’ve got a custom WiFi webcam. Pretty slick.
Building a low cost wifi camera
http://johan.kanflo.com/building-a-low-cost-wifi-camera/
Tomi Engdahl says:
Nanopower IoT power supply accurately monitors battery discharge
http://www.edn.com/design/power-management/4441220/Nanopower-IoT-power-supply-accurately-monitors-battery-discharge?_mc=NL_EDN_EDT_EDN_weekly_20160128&cid=NL_EDN_EDT_EDN_weekly_20160128&elq=ec28ae117ab744f78dcc12fd385a63a0&elqCampaignId=26717&elqaid=30561&elqat=1&elqTrackId=b88e12835fee4336afb5692e33daad3e
Wireless monitors should be small and unobtrusive, and they should require minimal maintenance. In the IoT world of tomorrow, experts suggest that many of these devices will be self-powered via optimized energy harvesters capable of providing an endless source of power. While such a prospect sounds ideal, and considerable progress has been made to improve the practicality of energy harvesting, solutions today often fall short in terms of size and performance, and there will always be cases where power is needed and no harvestable energy is available. Fortunately, battery technologies exist which are optimized for long lifetime, low average power applications such as those on the IoT spectrum.
Tomi Engdahl says:
1000 sensors, one line, using optical fiber
http://www.edn.com/design/systems-design/4441298/1000-sensors–one-line–using-optical-fiber?_mc=NL_EDN_EDT_EDN_weekly_20160128&cid=NL_EDN_EDT_EDN_weekly_20160128&elq=ec28ae117ab744f78dcc12fd385a63a0&elqCampaignId=26717&elqaid=30561&elqat=1&elqTrackId=924fe24bdc724e1fb8d98402907c23f7
Adding sensors to systems for purposes such as predictive maintenance is an application of growing interest in the Internet of Things (IoT) era. But if wireless sensors are not appropriate, developers can quickly run into a massive wiring problem as they try to connect large arrays of individual strain gauges, temperature sensors, and other sensor types. Happily, there is an emerging technology that employs optical fibers.
When most systems developers think of fiber optics, they generally envision fiber’s ability to carry extremely high speed data over long distances with little loss and no Emi issues. But at the VITA Embedded Tech Trends forum earlier this month, I learned about the use of fiber as a sensor array. A specially configured optical fiber with a powerful back-end processor can be used to measure such diverse things as mechanical strain, temperature, the presence of liquids, and even the fiber’s 3D position at thousands of points along its length. And the best news was, such a sensor system is commercially available.
There are two keys to this fiber optic sensing system (FOSS) technology. One is the use of a specialty fiber that has fiber Bragg gratings (FBGs) inscribed along its length. The other is the use of optical frequency domain reflectometry (OFDR).
The fiber Bragg grating is essentially a series of partially reflecting mirrors fabricated in the fiber core. One technique for fabricating such mirrors is to expose the optical core to a striped pattern of ultraviolet (UV) light. The UV permanently damages the core where it has struck and these damaged areas will partially reflect light travelling through the fiber.
Optical frequency domain reflectometry (OFDR) is a technique for determining the distance to a reflection point along a fiber through the use of light with a varying wavelength. The more well-known optical time domain reflectometer measures such distance directly by looking at the time delay between transmission and reflected return of an optical pulse sent along the fiber. OFDR sends a swept-wavelength signal and examines the time-varying interference patterns that result from mixing the return signal with a reference signal. A reflection point at a fixed distance along the fiber will yield an interference pattern that oscillates with a frequency proportional to the reflection point’s position along the fiber.
Using OFDR on a fiber containing FBGs allows a system to locate each such grating individually. Each grating reflects more strongly at a specific wavelength
The method of using a fiber sensor will vary with the parameters to be measured. By bonding a length of fiber to a surface, for instance, the fiber will measure the strains along its length due to flexure of the surface. To measure temperature at a point, bond the fiber to that point and provide strain relief on either side to eliminate strain as a signal source. One means of measuring liquid level in a tank would be to heat a fiber that is dangling into the liquid, then monitor the temperature profile along the fiber’s length as the fiber cools. The cooling rate for the fiber in the liquid will be different from that of the fiber in air, and the point where the cooling rate changes is the surface of the liquid.
Three fibers bonded together can serve as a 3D shape sensor.
Tomi Engdahl says:
Adorable Quadruped Robot Hops and Walks
http://hackaday.com/2016/01/29/adorable-quadruped-robot-hops-and-walks/
The ESP8266 is finding its way into all sorts of projects these days. It’s a capable little device, to be sure, but we’d have to say that finding it running a quadruped robot that can hop and run was a little unexpected. And to have it show up in such an adorable design was pretty cool too.
Kame, ESP8266 based quadruped
Kame is a quadruped robot with 8 servos and an ESP8266
https://hackaday.io/project/9334-kame-esp8266-based-quadruped
Tomi Engdahl says:
Hacklet 93 – Robotics Toolkit and ESP8266 Packet Injection
http://hackaday.com/2016/01/30/hacklet-93-robotics-toolkit-and-esp8266-packet-injection/
[Rand Druid] recently spent a Weekend on the Dark Side, creating an ESP8266 packet injector. The project started when [Rand] read about [Kripthor’s] deauth packet injection attacks
This worked well, but some devices (most notably [Rand’s] son’s Android Phone) would disconnect and reconnect so quickly the attack had no practical impact.
double-wifi[Rand] fixed the problem by adding a second ESP8266 module. The first is the listener. It listens for WiFi access points. Once an AP is found, it sends this information to the second jammer” module via a unidirectional single line serial link.
Weekend on the Dark Side
Compact, ESP8266 based, battery powered, multi target De-Auth attack implementation.
https://hackaday.io/project/9333-weekend-on-the-dark-side
Tomi Engdahl says:
Inject Packets with an ESP8266
http://hackaday.com/2016/01/14/inject-packets-with-an-esp8266/
And so, despite the ominous name of his blog post “ESP8266 Jamming”, he’s not really doing anything that bad — he’s just creating many fake WiFi beacon frames and sending them out every so often.
Which can apparently do bad things to some vulnerable routers. Who knew? Want to test yours?
Naturally we wanted to see how he was doing it, and we opened up the Arduino code in GitHub. It turns out that Espressif has written a wifi_send_pkt_freedom() function that just sends out whatever packet you’d like to the network. That was easy.
It also turns out that the ESP8266 will enter monitor mode, where it listens to all WiFi traffic regardless of the MAC address that it’s directed toward. [Pulkin] seems to have done the work for us and posted the code in his GitHub. Now things get nasty. Combining promiscuous monitor mode with some carefully constructed management frames can end up with a classic WiFi deauth denial-of-service attack on a $2 piece of hardware.
https://github.com/pulkin/esp8266-injection-example
Tomi Engdahl says:
ESP8266 Transmits Television on Channel 3
http://hackaday.com/2016/01/31/tv-transmitter-uses-esp8266/
We’ve seen a lot of ESP8266 projects in the past, but this one most definitely qualifies as a hack. [Cnlohr] noticed that the ESP8266, when overclocked, could operate the I2S port at around 80MHz and still not lose DMA data. He worked out how to create bit patterns that generate RF around 60MHz. Why is that interesting? Analog TVs can receive signals around that frequency on channel 3.
the output is monochrome only and is a little snowy
You’ll see in the video that the overclocked ESP8266 is quite capable.
ESP8266 Analog Broadcast Television Interface
https://github.com/cnlohr/channel3
Tomi Engdahl says:
RGB WIFI Dimmer
12V Dimmer with 4-PWM Outputs a 3A and ESP-01 suitable pinheader
https://hackaday.io/project/8653-rgb-wifi-dimmer
After I designed a small dimmer with an ATmega8, I thought it would by nice to trigger the brightness of the connected LEDs with my smartphone. So I started this project. The Dimmer uses all three PWM Channels of an ATmega8 and timer 0. Also there is a Pinheader to onnect an ESP-01 modul to the board, for the communication betwenn the ESP to the dimmer module I will use UART.
Tomi Engdahl says:
ESP8266 and Relay Control Using Smartphone
ESP8266 & SUPLA
https://hackaday.io/project/9517-esp8266-and-relay-control-using-smartphone
ESP8266 microcontroller start-up to control by smartphone a relay connected to the ESP. In a separate project I will try to present a similar case, but instead of the ESP8266 microcontroller we will use Raspberry PI version B+.
Open building automation is now coming!
https://www.supla.org/
Building automation systems available on the market are usually very complex, closed and expensive. In many cases they must be installed on the very early stages of house construction. SUPLA is simple, open and free of charge. It gives an opportunity to build elements based on RaspberryPI, Arduino or ESP8266 platforms and then join them either through LAN or WiFi. Through SUPLA you can, among others, control the lighting, switch on and off household appliances and media, open and shut gates and doors, or control room temperature. All the above can be done with just touch of a finger. SUPLA is available from any place on Earth if you just have a smartphone or tables available as well as Internet access. SUPLA is developed based on an Open Software and Open Hardware . This way, you can also develop this project!
Tomi Engdahl says:
ESP8266 triggering Prowl notifications
Portable and minimal setup for PROWL notifications with standalone ESP8266
https://hackaday.io/project/3605-esp8266-triggering-prowl-notifications
it is very easy to program with alternative firmware such as the LUA interpreter. The goal of this project is to make a standalone notifier using the PROWL service …
http://www.prowlapp.com/
Prowl is the Growl client for iOS. Push to your iPhone, iPod touch, or iPad notifications from a Mac or Windows computer, or from a multitude of apps and services. Easily integrate the Prowl API into your applications.
Tomi Engdahl says:
Cheap WiFi Outlets Reflashed; Found to Use ESP8266
http://hackaday.com/2016/02/06/cheap-wifi-outlets-reflashed-found-to-use-esp8266/
There’s a bunch of simple WiFi-enabled outlets on the market today, and all of these blister-pack goodies seem to have something in common – crappy software. At least from the hacker’s point of view; there always seems to be something that you want to do that the app just doesn’t support. Stuck in this position, [scootermcgoober] did the smart thing and reflashed his cheap IoT outlets.
Walmart lists the same device for a paltry $15
WiFi outlets like this and the WeMo have proved to be fertile ground for hacking.
EcoPlug Wifi Switch Hacking
http://thegreatgeekery.blogspot.ca/2016/02/ecoplug-wifi-switch-hacking.html
I opened up an ecoplug module bought from Home Depot. They are currently on clearance for $15 Canadian each (about $12 US).
The switches can only be controlled via the app (which is pretty crap) but I have captured and dissected the communication and discovered it is essentially just a UDP packet controlling the switch state. I was considering writing an openHab binding for it; but decided to open up the switch instead.
All the code is up on GitHub.
scottjgibson/esp8266Switch
https://github.com/scottjgibson/esp8266Switch
esp8266Switch
Alternate firmware for EcoPlug embedded wifi switch http://www.thegreatgeekery.com
Tomi Engdahl says:
Quickie WiFi Scanner
http://hackaday.com/2016/02/24/quickie-wifi-scanner/
Tomi Engdahl says:
Color TV Broadcasts are ESP8266’s Newest Trick
http://hackaday.com/2016/03/01/color-tv-broadcasts-are-esp8266s-newest-trick/
The ESP8266 is well known as an incredibly small and cheap WiFi module. But the silicon behind that functionality is very powerful, far beyond its intended purpose. I’ve been hacking different uses for the board and my most recent adventure involves generating color video from the chip. This generated video may be wired to your TV, or you can broadcast it over the air!
Originally I explored pumping out NTSC with AVRs, which lead to an entire let’s learn, let’s code series. But for a while, this was on the back-burner, until I decided to see how fast I could run the ESP8266’s I2S bus (a glorified shift register) and the answer was 80 MHz. This is much faster than I expected. Faster than the 1.41 MHz used for audio (its intended purpose), 2.35 MHz used for controlling WS2812B LEDs or 4 MHz used to hopefully operate a reprap. It occasionally glitches at 80 MHz, however, it still works surprisingly well
Why NTSC? If I lived in Europe, it would have been PAL. The question you’re probably thinking is: “Why a dead standard?” And there’s really three reasons.
Because it’s so easy. Okay, the timing’s a little squirrely but you can ignore color and the whole even/odd frame thing if you really want. To get up and running you really only need to create three distinct voltage levels and have timing control to about 1us.
Mechanisms to display it are all around us. Even new TVs usually come with a composite plug, many with analog tuners, too.
Because it’s great for learning many fundamentals of digital and analog signals.
Tomi Engdahl says:
Serial Telemetry To Wi-Fi With An ESP8266
http://hackaday.com/2016/03/04/serial-telemetry-to-wi-fi-with-an-esp8266/
Hackaday.io user [J. M. Hopkins] had a problem with his rocketry. Telemetry from the rockets came down to Earth via a 433MHz serial link, but picking just the bits he needed from a sea of data for later analysis on a laptop screen on bright sunny days was getting a little difficult.
His solution was to bring the serial data from his transceiver module to an ESP8266, and from that both share it over WiFi and display pertinent information via I2C to an LCD for easy reference.
All information received from the telemetry is passed to a client connecting via Telnet over the WiFi
70cm Serial WiFi Bridge
A box to convert an amateur radio 70cm serial stream to telnet over WiFi.
https://hackaday.io/project/9937-70cm-serial-wifi-bridge
In my high power rocketry project I’ve been relying on a laptop to capture my serial stream. With bright skies reading the laptop was troublesome to say the least.
So I jumped on the IoT bandwagon and purchased an ESP2866 board (Huzzah, Hackaday branded even) for a whole $10. After flashing away the LUA interpreter I started down the road to create this nifty project.
I made this project to convert the serial stream coming from my tiny amateur radio 70cm transceiver to a WiFi telnet connection (for cellphone or laptop), and allow succinct messages to appear on the LCD for information at a glance. The SMA connection allows my transceiver to utilize my large yagi for long distance communication.
Tomi Engdahl says:
Monitor A Serial Port From Anywhere
http://hackaday.com/2016/03/07/monitor-a-serial-port-from-anywhere/
This simple WiFi serial port monitor would have saved us a lot of trouble. We can’t count how many times where being hooked into an Arduino with USB just to get the serial out has nearly been more trouble than it’s worth. Times where we sat cross-legged on the floor and could choose comfort or accidentally shifting the set-up and ruining everything, but not both.
[Frenky]’s set-up is simple and clever. The Ardunio’s serial out is hooked to an ESP8266. The Arduino spams serial out to the ESP8266 in its usual way. The ESP8266 then pipes all that out to a simple JavaScript webpage. Connect to the ESP8266’s IP with any device in your house, and get a live stream of all the serial data. Neat.
Hardware serial port monitor with WiFi
Arduino connects to the TX line (of a router, RPI) and display serial data on smartphone over WiFi
https://hackaday.io/project/5680-hardware-serial-port-monitor-with-wifi
Tomi Engdahl says:
Banish Dangerous Shadows Under Kitchen Cabinets
http://hackaday.com/2016/03/10/banish-dangerous-shadows-under-kitchen-cabinets/
[nebulous] has a lot of problems with his kitchen cabinets. Aside from a noted lack of micro-controllers, he was especially suspicious of the dark spaces under them. Anything could be hiding there.
The core of the project is a $10 Arduino-compatible esp8266 board from digistump. The board is powered by the five volt regulator of an L298N motor driver module hooked to a power-supply. All this controls a set-of LED strips
Undercabinet Lights
http://www.crashed.net/~nebulous/projects/post/cabinet/
Tomi Engdahl says:
The Internet Enabled Kill-A-Watt
http://hackaday.com/2016/03/22/the-internet-enabled-kill-a-watt/
The Internet of Things has been applied to toasters, refrigerators, Christmas lights, Barbies, and socks. Unsurprisingly, the Internet of Things has yet to happen – that would require a useful application of putting the Internet in random devices. One of the best ideas is a smart electric meter, but the idea behind this is to give the power company information on how much electricity you’re using, not give you an idea of how much power you’re pulling down. The answer to this is the Internet-enabled Kill-A-Watt, and that’s exactly what [Solenoid] is building for his entry into the Hackaday Prize.
Modern power meters have an LED somewhere on the device that blinks every time a Watt is used. This is the data [Solenoid]’s creation is pushing up to the Internet
is based on the ESP8266 WiFi module,
Internet-of-Things Power Meter
Simple, cheap, easy to build and deploy, the IoT Power Meter provides accurate statistics on household power consumption.
https://hackaday.io/project/6938-internet-of-things-power-meter
The Internet-of-Things Power Meter (IPM) is a device fixed on top of the regular household power meter that provides detailed information about the electricity usage. Modern power meters have a LED blinking every time a Watt is used, the IPM detects these flashes using a light sensor, counts them, saves the values to an SD card. Later the data is stored to the cloud.
Usually power companies provide very rough electricity usage data, the IPM provides data with a minute resolution.
Tomi Engdahl says:
Beautiful Weather Station uses Acrylic, RGB LED, and and ESP8266
http://hackaday.com/2016/03/27/beautiful-weather-station-uses-acrylic-rgb-led-and-and-esp8266/
http://www.instructables.com/id/Acrylic-Sheet-RGB-Glowing-Weather-Station-With-Ind/
Tomi Engdahl says:
Ethernet Controller Discovered in the ESP8266
http://hackaday.com/2016/04/01/ethernet-controller-discovered-in-the-esp8266/
The venerable ESP8266 has rocked the Internet of Things world. Originally little more than a curious $3 WiFi-to-serial bridge, bit by bit, the true power of the ESP has become known, fully programmable, with a treasure trove of peripherals it seemed that the list of things the ESP couldn’t do was short. On that list, at least until today was Ethernet.
No, despite the misleading title, the ESP does not have a MAC and/or PHY, but what it does have is an incredible 80 MHz DMA-able shift register which can be used to communicate 10BASE-T Ethernet using a new project, espthernet. Join me after the break for video proof, and a deep dive into how this is possible.
DISCLAIMER: This project does not comply explicitly to the IEEE 802.3 standard. It will not work as well as properly engineered devices. Don’t get confused. This is a party trick, not a legitimate engineering solution.
No MAC? No PHY? No problem.
The ESP’s I2S bus is home to a variety of projects including an MP3 player, WS2812 controller, CNC driver, and Color NTSC broadcaster. By operating the I2S bus in the ESP8266 at 40 MHz, we can capture everything that happens on wire and shift it into 32-bit words. In software, we can look at what was received, one 32-bit-word at a time; decoding packets as they roll in. Between the DMA engine attached to the I2S bus, and the 160 MHz 32-bit Xtensa core, several of the layers of decoding can be done on-the-fly and, in software.
There’s still the little problem of electrical compatibility. Though the ESP can send and receive frames with a resistor and two capacitors, it’s best to use an actual line driver
So, now, the ESP is perpetually capturing this stream of 1’s and 0’s. Once a new chunk of data comes in, an interrupt is called and our code can begin to search for a packet in the data.
ESP8266 10-Base-T Ethernet Driver
https://github.com/cnlohr/espthernet
Tomi Engdahl says:
Open source FreeRTOS-based ESP8266 software framework
https://github.com/SuperHouse/esp-open-rtos
A community developed open source FreeRTOS-based framework for ESP8266 WiFi-enabled microcontrollers. Intended for use in both commercial and open source projects.
Originally based on, but substantially different from, the Espressif IOT RTOS SDK.
http://www.freertos.org/
Tomi Engdahl says:
Porting Spark Core Weather Sensor IoT to ESP8266-12
http://internetofhomethings.com/homethings/?p=345
After my initial tinkering with the ESP8266, I could visualize of lots of practical applications. Suddenly, the price barrier was shattered. Every little thing can be connected. First up was the task of freeing up my relatively expensive Spark Core application, replacing it with a dirt cheap ESP8266.
It seemed like an incredible wasted resource to use my $39 Spark Core to perform the duties that a $2.86 ESP8266-12 could just as easily perform.
Or could it?
My plan was to transfer the Weather Sensor functions that the Spark Core was performing to an ESP8266. While not overly complicated, 8 measurements using 3 sensor types were needed. This included:
Three Temperature Sensors on a one-wire bus (Using DS18B20)
A Humidity/Temperature Sensor on a separate one-wire bus (Using DHT11)
Barometric Pressure, Altitude, Temperature Sensor via I2C (Using BMP085)
My current configuration pulls data from the Spark Core. This is accomplished by sending http GET commands to retrieve the sensor values and storing them into a mySQL database once every hour by a scheduled CRON task on my web hosting platform. With the correct application loaded to the new module, a tweak to that script should be all that is necessary for the conversion to the ESP8266 data acquisition change.
Software Implementation
This was my first serious project using the ESP8266 after doing the basic “getting started” exercises. I started with nodeMCU and lua, then migrated to the SDK, and finalized the code using the Arduino IDE. This was not by choice but by necessity as there were insurmountable problems with lua and the SDK. And as of this post, there remains issues even with the Arduino IDE.
My code is based on the Arduino IDE example “WiFiWebServer”.
Tomi Engdahl says:
4 ways to eliminate ESP8266 resets
http://internetofhomethings.com/homethings/?p=396
If you have worked with the ESP8266 for any length of time, you have undoubtedly experienced the endless resets on power-up. The looping message occurs at about 5 second intervals, which seems to be the default internal watchdog timer time-out period.
I have yet to come across a definitive explanation for this behavior.
Is this the boot-loader?
The core firmware?
Perhaps a chip defect?
From what I have experienced and read from other users, there are two likely hardware causes that makes logical sense:
Inadequate power supply interface
A flash chip failure.
In order to prevent resets, you must include the following three features in the power source to the ESP8266.
Sufficient current. A regulated 3.3V source of at least 500ma is essential. Aside from the 300ma peak current needs of the ESP8266, it is essential to also consider the current requirements for other components you have – like the sensors and controls in your circuit.
A large capacitor (suggest using 470 uF) across the Vcc to Gnd rails on your breadboard or PCB is a vital ingredient that will minimize reset inducing voltage fluctuations.
A 0.1 uF decoupling capacitor across the ESP8266 Vcc to Gnd inputs very close to the pins (within 1/2 inch). DO NOT SKIP THIS COMPONENT! This cheap yet often overlooked component, when missing, is the root cause of ESP8266 resets.
Tomi Engdahl says:
ESP8266 Amazon Web Service (AWS) API
http://internetofhomethings.com/homethings/?p=739
Conclusion
There are many more IoT applications that can marry the ESP8266 with the AWS Cloud computing resources. Almost anything you can imagine can now become a reality; and for a tiny fraction of the cost needed just a short time ago. The API presented here brings the low-cost network enabled sensor/control power of the ESP8266 SoC to the all encompassing AWS Cloud.
Tomi Engdahl says:
Mobile Web Sensors Using ESP8266 – Phase 1: Mobile Weather Sensors Using ESP8266
http://internetofhomethings.com/homethings/?p=691
Mobile Web Sensors Using ESP8266 – Phase 2: Data Recorder
http://internetofhomethings.com/homethings/?p=759
Mobile Web Sensors Using ESP8266 – Phase 3: Google Map Visualizations
http://internetofhomethings.com/homethings/?p=777
Mobile Weather Sensors Using ESP8266 – Phase 4: Mobile App Gadgets
http://internetofhomethings.com/homethings/?p=826
Mobile Weather Sensors Using ESP8266 – Phase 5: Ant+ Heart Rate Monitor
http://internetofhomethings.com/homethings/?p=866
Tomi Engdahl says:
ESP8266 MQTT Publication & External Subscription
http://internetofhomethings.com/homethings/?p=1121
Publishing data produced by ESP8266 sensors to an MQTT broker server is a great option to making your IoT data visible to outside consumers with minimal consumption of precious MCU bandwidth. Simple, easy to implement and very light-weight.
What a great distribution system!
Simply publish your ESP8266 sensor data once, and many subscribers can consume the information, virtually at the same time. Sweet!
ESP8266 HTTP vs MQTT Servers
http://internetofhomethings.com/homethings/?p=1177
The ability to communicate with your IoT things — to send commands and receive responses is an essential pillar of your “connected” system. You need a network link to control things and to read sensors. Two of the most common Internet to machine communication protocols used with the ESP8266 and other MCUs are http and MQTT.
There are advantages and drawbacks using either one of these methods.
So which one is better?
In Closing
There are advantages and shortcomings when using either MQTT or http for web server applications. MQTT offers a clean and simple code interface, but it does require the use of a broker. That adds an additional layer of complexity and potential failure to your system.
In my opinion, MQTT is best suited to be used for data distribution, not as a web server. The MQTT publish/subscribe model works great to simultaneously send information from one source to many consumers. If speed is critical, the EspressIf SDK API is the best option to use the ESP8266 as a web server.
Tomi Engdahl says:
ESP8266 Triple Protocol Server
http://internetofhomethings.com/homethings/?p=1232
Like MQTT and Http, CoAP is deployed in IoT things for M2M communication. But what is it?
Simply stated, CoAP, or Constrained Application Protocol is a web communication structure designed for use with limited resource Internet Things. For some light reading (zzzz) with all the details, refer to RFC 7252 upon which it is based. This protocol is designed to be light-weight, using connection-less UDP over IP.
Triple Protocol Server Sketch
Since this was my first attempt with a CoAP implementation, I started out searching for a suitable example as a basis for the sketch. Fortunately, there was one available, microcoap.
The CoAP communication relies on UDP over IP. While a callback is preferred, this CoAP implementation requires polling in the loop() function to check for incoming CoAP packets.
In Closing
As you can see from the results, CoAP performs well as compared to polling MQTT and HTTP servers.
CoAP is indeed a viable option as an IoT M2M communication protocol, This method provides a solution that is lightweight, fast and there are many implementation options available. Unfortunate, these options do not directly include client side JavaScript webpages. A proxy is needed to translate the UDP CoAP to http. This proxy would undoubtedly slow down the message transfers, but this alone is unlikely to be significant enough to discount CoAP.
And as “lightweight” as CoAP is intrinsically, the implementation code is more complex and lengthy than any other server.
Triple Server Update – Part 1: Serving Arduino
http://internetofhomethings.com/homethings/?p=1277
Triple Server Update – Part 2: Web Configuration
http://internetofhomethings.com/homethings/?p=1270
Tomi Engdahl says:
ESP8266 Based Irrigation Controller
http://hackaday.com/2016/04/16/esp8266-based-irrigation-controller/
If you just want to prevent your garden from slowly turning into a desert, have a look at the available off-the-shelf home automation solutions, pick one, lean back and let moisture monitoring and automated irrigation take over. If you want to get into electronics, learn PCB design and experience the personal victory that comes with all that, do what [Patrick] did, and build your own ESP8266 based irrigation controller. It’s also a lot of fun!
ESP8266 based Irrigation Controller
Last edited on Apr 8, 2016
http://www.dumaisnet.ca/index.php?article=126641f7f62208d409b39fccf4a0f5e4
An irrigation controller is a pretty simple device. It’s just a couple of relays, a microcontroller and a power supply. For my project, I decided to use 4 relays (to control 4 valves). The uC I chose is a esp8266, more specifically, the ESP-03 board. This brings wifi capabilities to my project. So the esp8266 connects to my network and with a multicast message, it advertises its presence. My New Home Automation system then picks it up and connects to it. From that point, it can control all 4 valves.
Tomi Engdahl says:
Make Your Own ESP8266 Breadboard Adapter
http://hackaday.com/2016/04/20/make-your-own-esp8266-breadboard-adapter/
Want to play around with the ESP8266? You’ll need a breadboard adapter, which allows you to connect the ESP8266 to a breadboard as you refine your design. Sure, you could just buy one, but where’s the fun in that?
[Markus Ulsass] designed a simple breadboard adapter for his ESP8266 that can be easily etched and built at home, but which has most of the features of the commercial versions.
Update: ESP8266 Breadboard Adapter Board
http://lookmanowire.blogspot.fi/2016/04/update-esp8266-breadboard-adapter-board.html
Tomi Engdahl says:
1btn – an Open Source Dash
http://hackaday.com/2016/04/29/1btn-an-open-source-dash/
The availability of cheap radios, omni-present WiFi and powerful web services means the IoT wave is here to stay. Amazon got into the act with its “do only one thing” Dash button. But a more interesting solution would be an IoT “do it all” button.
[Anand] has been working on his 1btn Open Source WiFi connected IoT button for a while. It connects to the Internet over WiFi to trigger whatever action you have assigned to it using a simple, online interface. It’s reconfigurable and open source. Which means it can be used in pretty imaginative ways, and if needed, can be re-flashed with your own custom firmware should you decide to really get under its hood.
The 1btn’s ESP8266 module is usually in sleep mode, waking up when the button is pressed, making the connection, performing the task and then going back to sleep once confirmation is received.
1btn: Open Source WiFi connected IoT Button
1btn is a powerful, open source, do-it-all button for the Internet…
https://hackaday.io/project/11269-1btn-open-source-wifi-connected-iot-button
Tomi Engdahl says:
Minimal 433 MHz Web Home Automation
http://hackaday.com/2016/05/01/minimal-433-mhz-web-home-automation/
How minimal can a decent home automation setup be? If you need an HTML frontend, you’re going to need a webserver. An ESP8266 will do the trick. And then you need to be able to control your electronics. The cheapest and easiest way to do that is with the ubiquitous 433 MHz remote-controlled outlets and a $1 radio unit from an online auction site. Add in a cheap ESP8266 module, and your total outlay is going to be under $20.
That’s exactly what [Nikos Kantarakias] did. He combined a bunch of available ESP8266 Arduino libraries — one for driving the 433 MHz radio modules, [Paul Stoffregen]’s libraries for keeping time and for setting alarms, and another for keeping track of time zones — with some of his own code for setting up WiFi access, and it’s done.
It’s all available on GitHub for your perusal. The code does some strange things
THE433: Home Automation with ESP8266, NodeMCU
https://nobugsjustfeatures.wordpress.com/2016/04/02/the433-home-automation-with-esp8266-nodemcu/
This is a sketch for controlling RF remote control sockets or relays that operate at the 433MHz frequency and are compatible with the Arduino/esp8266 RCSwitch libraries.
The main feature is that you can schedule events (up to 10) to turn ON/OFF your devices that repeat daily/weekly or that actuate once only within a week from setting the command.
A web interface is used to control the RF devices directly given a relative command at the main form and also scheduling the time events by giving at the same form a keyword to enter the scheduled events interface.
A web interface is used to control the RF devices directly given a relative command at the main form and also scheduling the time events by giving at the same form a keyword to enter the scheduled events interface.
control 433MHz (compatible with Arduino libs) sockets/devices through web and time rules
https://github.com/nikant/THE433
Tomi Engdahl says:
Fail of the Week: ESP8266 Heats Temperature Sensor
http://hackaday.com/2016/05/06/fail-of-the-week-esp8266-heats-temperature-sensor/
Richard Hawthorn] sent us in this interesting fail, complete with an attempted (and yet failed) clever solution. We love learning through other people’s mistakes, so we’re passing it on to you.
First the obvious-in-retrospect fail. [Richard] built a board with a temperature sensor and an ESP8266 module to report the temperature to the Interwebs. If you’ve ever put your finger on an ESP8266 module when it’s really working, you’ll know what went wrong here: the ESP8266 heated up the board and gave a high reading on the temperature sensor.
ESP8266 + temp sensor fail!
http://blog.richardhawthorn.com/?p=272
Watches says:
This blog was… how do you say it? Relevant!! Finally I’ve found something that helped me.
Thanks!
Tomi Engdahl says:
1btn – an Open Source Dash
http://hackaday.com/2016/04/29/1btn-an-open-source-dash/
The availability of cheap radios, omni-present WiFi and powerful web services means the IoT wave is here to stay. Amazon got into the act with its “do only one thing” Dash button. But a more interesting solution would be an IoT “do it all” button.
[Anand] has been working on his 1btn Open Source WiFi connected IoT button for a while. It connects to the Internet over WiFi to trigger whatever action you have assigned to it using a simple, online interface. It’s reconfigurable and open source. Which means it can be used in pretty imaginative ways, and if needed, can be re-flashed with your own custom firmware should you decide to really get under its hood.
The 1btn’s ESP8266 module is usually in sleep mode, waking up when the button is pressed, making the connection, performing the task and then going back to sleep once confirmation is received. A Red/Green LED indicates if the action was successful or not.
1btn: Open Source WiFi connected IoT Button
1btn is a powerful, open source, do-it-all button for the Internet…
https://hackaday.io/project/11269-1btn-open-source-wifi-connected-iot-button
Currently crowd funding campaign is live at https://www.crowdsupply.com/knewron/1btn