I am interested in Arduino and IoT. Some time ago I visited Teleduino project page that looked really inteesting on this point of view.
Teleduino converts en ethernet enabled Arduino into a tool for interacting with devices over the internet. It seemed that with this service I can easily turn an Arduino to an IoT device that I can easiy control through web.
Teleduino system consists of Teleduino device (software running on Arduino board) and service (running on Teleduino project server). The Teleduino server translates instructions received from the internet into actions on the Teleduino device (Arduino board).
Web based API
Sending instructions and retrieving values from your online Teleduino device is acheived by interacting with the Teleduino. Teleduino service provides REST style web API for controlling Arduino. Requests can be submitted to the API using either GET or POST, and the returned result can be in either JSON (default), JSONP or serialised PHP.
Reset, ping, get uptime, get free memory.
Define pin modes, set digital outputs, set analog outputs, read digital inputs, read analog inputs, or read all inputs with a single API call.
Define, and read and write from serial port (4 for the Mega).
Read and write from EEPROM.
Define and position up to 6 servos (48 for the Mega).
Interface with I2C (TWI) sensors and devices.
API documentation can be found at https://www.teleduino.org/documentation/api.
Needed hardware
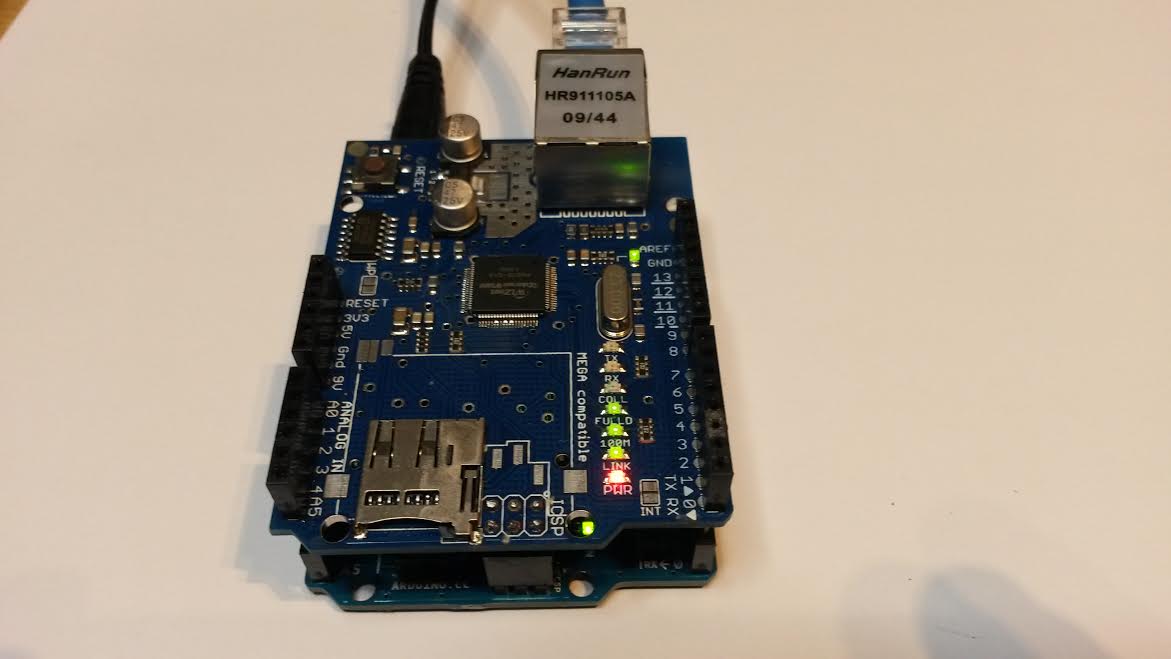
Teleduino service runs on Arduino hardware with Ethernet interface. To convert Arduino board to Teleduino device I need to have Ethernet shield plugged in and Teleduino software loaded in. The current Teleduino version supports Arduino UNO (358) and Arduino MEGA (2560) boards.
Once your Teleduino is configured, it automatically connects itself to the Teleduino server when powered on. There is a tutorial for taking the board to use in Arduino Control via a Web Service with Teleduino article.
There is a status LED that shows different status codes by flashing the LED (three and four flashes tell that it can connect to server).
My Teleduino testing
The hardware I used to test Teleduino was Arduino UNO and Ethernet shield (Wiznet based). To do testing I followed instructions at Arduino Control via a Web Service with Teleduino page.
First I requested Teleduino API key from https://www.teleduino.org/tools/request-key
The key was sent to my e-mail box in few minutes.
Next I downloaded Teleduino328 Library and Example Sketches (328-0.6.9 2014-02-16) – For Uno based boards software. I used Arduino IDE (1.0.6) to get the software to the Arduino UNO board. The process included copying the contents of the the downloaded ZIP file to Arduino IDE libraries directory. Then I opened Examples-Teleduino328-Teleduino328EthernetClientProxy source code. The example code needed to be modified to contain the right API key (https://www.teleduino.org/tools/arduino-sketch-key page provided tool to convert key to Arduino code that could be pasted to source code).
The source code seemed to indicate that the Teleduino device can use either IP address received with DHCP service or fixed IP. I decided to use DHCP service, and it got nicely IP address from my local home network without. The communication to Internet worked nicely through my NAT/Firewall device without problems.
First tests were web based communications testing according to Arduino Control via a Web Service with Teleduino page:
Try out the following URLs for Uno (replace {key} with your unique API key):
https://us01.proxy.teleduino.org/api/1.0/328.php?k={key}&r=getVersion
https://us01.proxy.teleduino.org/api/1.0/328.php?k={key}&r=getUptime
Also tried some command examples from API documentation – they had nice way to customize the examples to use your API key.
Findings on API: For output controlling you can set the output on/off or send out defined length pulse (length specified in milliseconds). To be able to send different length pulses is useful in remote control applications.
Android App
There is Android App Teleduino Controller. Basic limited version is free. There is Teleduino Controller PRO version that costs some money (around 1 Euro).
With the Teleduino Controller you can easily manage your Ethernet connected Arduino unit from your Android smart phone or tablet. Where you are doesn´t mather any more!
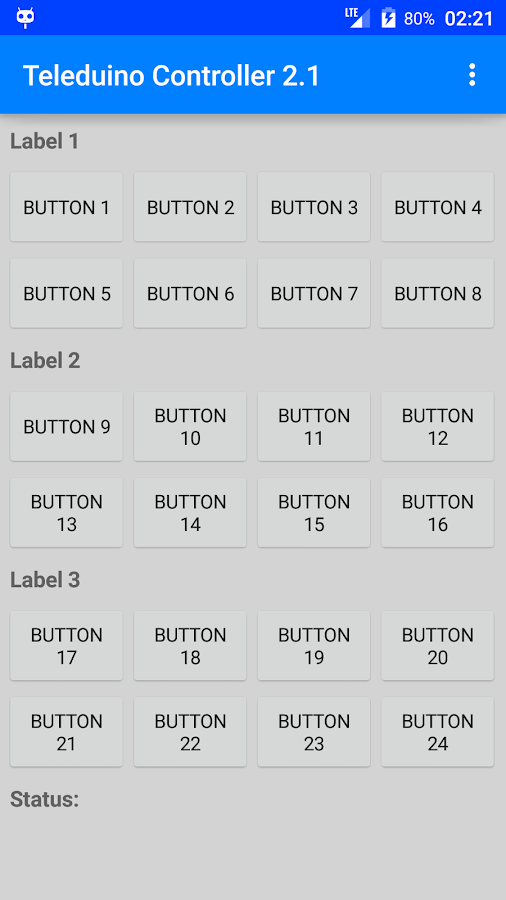
To use the App you need to set the API key to this App (on App settings). After that you need to define what different buttons will do: To program keys you need to press the key on the display long time, then you get to settings page where you can set button details (operartion to perform, pin to control etc..).
I could perform the following operations with the App: Define Digital Pins as output pins, Ping unit, get uptime, control output pin state, read input pin state, read output state, read analog value. Thing worked well.
In addition to that the app supports also serial ports (define speed, send data, etc..). Serial port sounds like an useful tool for communicating with other devices wired to Arduiono (for example RF transmitter for home automation).
Other tools
Because Teleduino provides very generic web API, you can use almost any web development tool to implement your own user interface to a web server or as mobile app.
There are PHP tools for Teleduino web development available at https://www.teleduino.org/downloads/
There is a webhook middleware for the ifttt.com service at http://captnemo.in/ifttt-webhook/ and https://github.com/mapkyca/ifttt-webhook. It looks like something that could be used with Teleduino API.
Security details
The security of IoT has been in the news lately, so it might be worth to look at the security of this system. In order to successfully connect and interact with your device an API key is required. It is your responsibility to keep all API keys private, and you are responsible for all API calls made with your API keys.
The web API supports making the calls with both normal HTTP (insecure) and HTTPS (secure) communications. When the communications to API are made over a secure connection using SSL, the API key should be pretty well secured on that communications (URL containing the API key will be transported to server through encrypted communiations channel). If you use standard HTTP, someone looking at the data communications can easily see the API key. So I recommend to use always HTTPS if possible.
The comunications to the server is one thing, there is also issue how server and Arduino communicate. Unfortunately the data between the Teleduino Proxy Servers and a Teleduino device remains un-encrypted. This is due to limitations of the Arduino Ethernet device (secure encryption would need more processing power and memory than what is available in Arduino). Teleduino takes no responsibility for any interception of data.
Availability issues: Teleduino makes no guarantee that the servers will be available 100% of the time, or that the service will continue indefinitely. Teleduino makes no guarantee that all instructions received on the API will make it to the requested device, and takes no responsibility for instructions sent to a device whether from the API, as a result of the server becoming compromised, or any other means. The Teleduino servers do not enforce a rate limit for API calls, however they expect you to avoid excessive numbers of API calls to the servers (no more than once every few seconds).
Links to more information
https://www.teleduino.org/documentation/tutorials
Project page links
http://www.instructables.com/id/Control-Servos-over-the-Internet-via-Arduino-with-/
http://hackaday.com/2014/12/28/turn-on-your-computer-from-anywhere-with-an-arduino-server/
http://www.instructables.com/id/Control-an-LED-over-the-Internet-via-Arduino-with-/
http://www.instructables.com/id/Control-a-Relay-over-the-Internet-via-Arduino-with/
http://www.instructables.com/id/Read-Light-Level-over-the-Internet-via-Arduino-wit/
http://www.instructables.com/id/Arduino-Control-via-a-Web-Service-with-Teleduino/
http://tronixstuff.com/2012/09/14/internet-controlled-relays-with-teleduino-and-freetronics-relay8/
6 Comments
Tomi Engdahl says:
I did some testing on the communications between Arduino and cloud. It seems that the comunication sends quite short (few characters) command command (at least for most operations) over TCP connection between Arduino and cloud service. Arduino is the end that opens the TCP connection.
Tomi Engdahl says:
Brewmonitor: The Arduino-powered, cloud-based homebrewing controller
arduino, control, DS18B20, homebrewing, mysql, PHP
http://www.planetarduino.org/?cat=457
Tomi Engdahl says:
Control an LED over the Internet via Arduino with Teleduino
http://www.instructables.com/id/Control-an-LED-over-the-Internet-via-Arduino-with-/step2/Control-LED-via-the-Teleduino-API/
Internet-controlled relays with teleduino and Freetronics RELAY8:
http://tronixstuff.com/2012/09/14/internet-controlled-relays-with-teleduino-and-freetronics-relay8/
In this article we’re going to look at controlling relays over the Internet. In doing so you will then be able to turn almost anything on and off as long as you have http access on an Internet-enabled device. Why would you want to do this? Connect an outdoor light – and turn it on before arriving home. Control the power to your TV setup – then you can control childrens’ TV viewing at a whim. Control farm water pumps without getting out of the truck.
livpp says:
I invite you to test my Teleduino Controller application, please visit:
https://offer.livpp.com/teleduino-controller/#teleduino
The application can be download from the following link:
https://offer.livpp.com/teleduino-controller.zip
If necessary, please contact me via the form:
https://offer.livpp.com/contact/#message
Tomi Engdahl says:
Looks interesting.
I think I needs to some day find and plug in my Teleduino connected Arduino on-line again..
Tomi Engdahl says:
I quickly looked at your Teleduino Controller application from
https://offer.livpp.com/teleduino-controller/#teleduino
It looked interesting and I got it working.
I got inputs and PWM outputs nicely working.
What I was wondering was how to control ON/OFF type outputs with it.