I have participated in Free Product Road Testing program by Farnell. Farnell indentified my blog to road test some of their products. I was willing to participate, because what’s more fun than free high tech products to test. The first product i got was Arduino UNO.

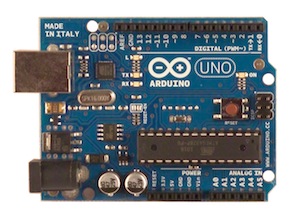
Arduino Uno is a a microcontroller board based on the ATmega328. It has 14 digital input/output pins (of which 6 can be used as PWM outputs), 6 analog inputs, a 16 MHz crystal oscillator, a USB connection, a power jack, an ICSP header, and a reset button. Something I am already used to see on Arduino boards. And looks what I expect from Arduino board.
The Uno is the latest in a series of USB Arduino boards, and the reference model for the Arduino platform. The Uno differs from all preceding Arduino boards with USB connection in that it does not use the FTDI USB-to-serial driver chip (like Arduino Dueminanove board I already own).
An ATmega8U2 on the board channels serial communication from ATmega328 main CPU UART (digital pins 0 and 1) over USB and appears as a virtual com port to software on the computer. Arduino Uno USB connection is designed operate in exactly the same way as a Duemilanove and maintain perfect backward compatibility with the previous model. The new Arduino Uno: what are the implications? article tells that having ATmega8U2 on the board for USB connection also means the Uno can do new things that are a problem for previous Arduino boards.
Having a dedicated ATmega8U2 to take care of the connection allows the Arduino to provide both traditional USB-serial and HID support on the same port, depending on the firmware running in the 8U2. Interesting side-note: Tiny ATmega8U2 used for the Uno USB connection is pretty much the same as the MCU used on the very first Arduino, but with hardware USB support baked in. The ATmega8U2 chip sits on the board next to he USB connector.
I only played with traditional USB-serial connection on my tests. The ’8U2 firmware is designed to use the standard USB COM drivers, and no external driver should be needed. So in theory using should be easy. I was waiting for a painless installation. However, on Windows, things too often just don’t work “plug&play”. The problem lies in fact that Arduino Uno is being issued its own USB vendor ID, and Windows (Vista in my case) does not know about it. To make the board to work correctly on Windows the installation of ArduinoUNO.inf file from open-source Arduino environment driver directory is needed. There are some manual installation tricks that needs to be done to get things to work, but fortunately Getting Started w/ Arduino on Windows document gives the needed instructions. I was expecting to get easier installation than with previous board, but this “no driver needed” driver installation process is actually somewhat harder than driver installation for older Arduino boards. Anyway when it is once done things run smoothly.
The Arduino Uno can be powered via the USB connection or with an external power supply. I used USB power on my first tests. The Arduino Uno has a resettable polyfuse that protects your computer’s USB ports from shorts and overcurrent (mistakes can happen when you prototype and play with electronics ideas). That’s a good idea although most computers provide their own internal protection (I think USB specs ask for that). In any case the on-board fuse provides an extra layer of protection.
After some testing with Arduino environment version 2.2 I got things to work. I needed to select right serial port and right board type.
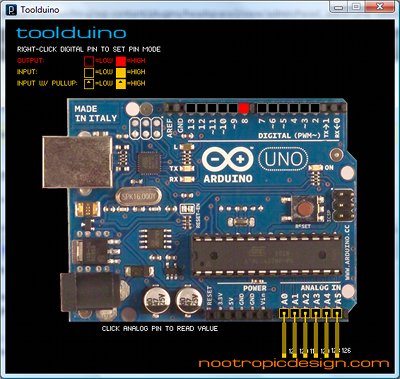
First test was to upload StandardFirmata to the board and control the Arduino UNO board with toolduino.

My opinion overall is that the Uno is a very nice board. It maintains backward compatibility while adding the potential for interesting new functionality. This is a great board for prototyping and all kinds of microcontroller hacks.
If you want to buy Arduino UNO you can get it from Farnell. Their list price seems to be 24,35 € without taxes.

17 Comments
Arduino Goes ARM « Tomi Engdahl’s ePanorama blog says:
[...] 16 Analog Inputs at 12Bit resolution and much more. This is much more powerful than the current Uno or [...]
Tomi Engdahl says:
Arduino-Open Hardware and IDE Combo
http://www.linuxjournal.com/content/arduino-open-hardware-and-ide-combo
Tomi Engdahl says:
Learning to Program the Arduino
http://www.linuxjournal.com/content/learning-program-arduino
This article should acquaint you with basic Arduino programming and show you how to write programs that interact with objects in the real world.
Tomi says:
Arduino voice changer turns you into [Vader]
http://hackaday.com/2012/10/12/arduino-voice-changer-turns-you-into-vader/
Halloween is just around the corner, so of course we’re looking forward to a bunch of awesome costumes put together by Hackaday readers. In an effort to match his voice to his costume, [Phil Burgess] over at Adafruit (and former Hackaday alumnus) put together an Arduino-powered voice changer to give his voice the gravitas of [James Earl Jones] or the lightheartedness of a member of the Lollipop Guild.
Arduino Due and some other ARM platforms « Tomi Engdahl’s ePanorama blog says:
[...] same platform and development tools it is possible that you can learn the basics on a tough little Arduino Uno, and then later you transfer exactly the same skill set to the super performance Arduino Due. [...]
Very minimal Arduino-compatible circuit « Tomi Engdahl’s ePanorama blog says:
[...] basic circuit is just an ATMega328 – the same microcontroller used in the Arduino Uno – with a few caps, resistors, and a 16 MHz crystal. It’s a very bare-bones system, but once [...]
Duemilanove 2009 Atmega 328P SCM Board « Tomi Engdahl’s ePanorama blog says:
[...] must be noted that this board is not the newest Arduino design (UNO) for this kind of board, this board is based on older Duemilanove. In this case I don’t [...]
latina sexy girl says:
I don’t know if it’s just me or if perhaps everybody else experiencing problems with your
website. It appears like some of the written text in your
content are running off the screen. Can somebody else please comment and
let me know if this is happening to them as well? This may be a issue with my web browser because I’ve had this happen before. Thanks
електронні книги says:
Every weekend i used to pay a quick visit this web page,
because i want enjoyment, as this this web page conations really pleasant funny data too.
Arduino overclocking « Tomi Engdahl’s ePanorama blog says:
[...] turns out that you can run an Arduino UNO at 65.3MHz when it is cooled with liquid nitrogen. Arduino UNO / ATmega328P at 8V is stable at 65.3Mhz when cooled with liquid nitrogen, while at room temperature [...]
купить книги киев says:
Good post. I learn something totally new and challenging on sites I stumbleupon everyday.
It will always be useful to read through articles from other authors and practice something from other websites.
Tomi Engdahl says:
Nice drawings of the Arduino UNO and Mega 2560
https://www.wayneandlayne.com/blog/2010/12/19/nice-drawings-of-the-arduino-uno-and-mega-2560/
If you’re looking to make your own shield for the Arduino platform, you’ll definitely need to know where all the pins and holes are located on the Arduino.
a detailed technical drawing of both the Uno and Mega 2560. The drawings are available in vector-based SVG format, but low-resolution PNG files are shown
Tomi Engdahl says:
This looks interesting:
Using The Second Microcontroller On An Arduino
http://hackaday.com/2014/11/30/using-the-second-microcontroller-on-an-arduino/
While newer Arduinos and Arduino compatibles either have a chip capable of USB or rely on a V-USB implementation, the old fogies of the Arduino world, the Uno and Mega, actually have two chips. An ATMega16u2 takes care of the USB connection, while the standard ‘328 or ‘2560 takes care of all ~duino tasks. Wouldn’t it be great is you could also use the ’16u2 on the Uno or Mega for some additional functionality to your Arduino sketch? That’s now a reality. [Nico] has been working on the HoodLoader2 for a while now, and the current version give you the option of reprogramming the ’16u2 with custom sketches, and use seven I/O pins on this previously overlooked chip.
Setup is simple enough, only requiring a connection between the ‘328 ISP header and the pins on the ’16u2 header
USB functions with Arduino Leonardo/Micro/Uno/Mega and HID Project
http://nicohood.wordpress.com/2014/06/12/usb-functions-with-arduino-leonardomicrounomega-and-hid-project/
Tomi Engdahl says:
16u2 Bootloader to reprogram 16u2 + 328/2560 with Arduino IDE
https://github.com/NicoHood/HoodLoader2
Tomi Engdahl says:
Arduino UNO clone gallery
An image gallery of arduino UNO clones found on the web
https://hackaday.io/project/9149-arduino-uno-clone-gallery
Tomi Engdahl says:
Arduino UNO & Genuino UNO
https://www.hackster.io/arduino/products/arduino-uno-genuino-uno
The UNO is a microcontroller board based on the ATmega328. It has 14 digital input/output pins (of which 6 can be used as PWM outputs), 6 analog inputs, a 16 MHz crystal oscillator, a USB connection, a power jack, an ICSP header, and a reset button.
Tomi Engdahl says:
Electronoobino board | How to make your Arduino UNO
https://www.youtube.com/watch?v=Jj8kctq_pTQ
design of the Arduino board, the ELECTRONOOBINO V1.0. You ahev the step by step tutorial below on how to get the bare minimum configuration for this chip.