New chips: ESP32 and ATmega328PB

Some of my favorite small micro-controller platforms (as you might have seen if you have been reading this blog) are Arduino and ESP8266. It seems that there is going ot be some upgrades to those platforms this year.

ESP32

ESP8266 chip is used to build  WiFi modules for serial-to-WiFi conversion and Internet of Things applicationsESP8266 turned to be IoT maker’s favorite component for a good reason: Espressif turned the IoT game on its head by releasing a chip with WiFi and a decent embedded processor for under $1 in bulk, and costing not much more than that in a module. A little more than a year ago, the ESP8266 WiFi module showed up uneventfully in Seeed Studio’s store. During the year 2015 the ESP8266 turned to be success because it was “good enough” (it has it’s limitations) and price was cheaper than practically anything else in the market. Now it is widely available in various module formats (NodeMcu dev kit being my favorite for quick hacks) and supported by lots many programming tools.

Now Espressif looking to repeat the success of the ESP8266 with the ESP32, , that should be coming out in 2016. Espressif has been working on the next generation of powerful WiFi-enabled tiny, cheap systems for some time. They have their silicon ready and there are beta test kits already. The ESP32 Beta Units Arrive article tells that are two Tensilica L108 processors running at up to 160MHz, a lot of peripherals including ADCs, DACs, I2C, SPI, I2S, and PWM, more RAM, AES and SSL for security, and Bluetooth Low Energy. WiFi has also been upgraded. It’s already shortlisted as the best new chip of 2016, but other than that, there’s not much more information.

While the features are great, Espressif has said the ESP32 is not a replacement for the ESP8266. They’re different markets, and if you just wanted to add WiFi to a project, there’s no reason not to choose the ESP8266.

ATmega328PB

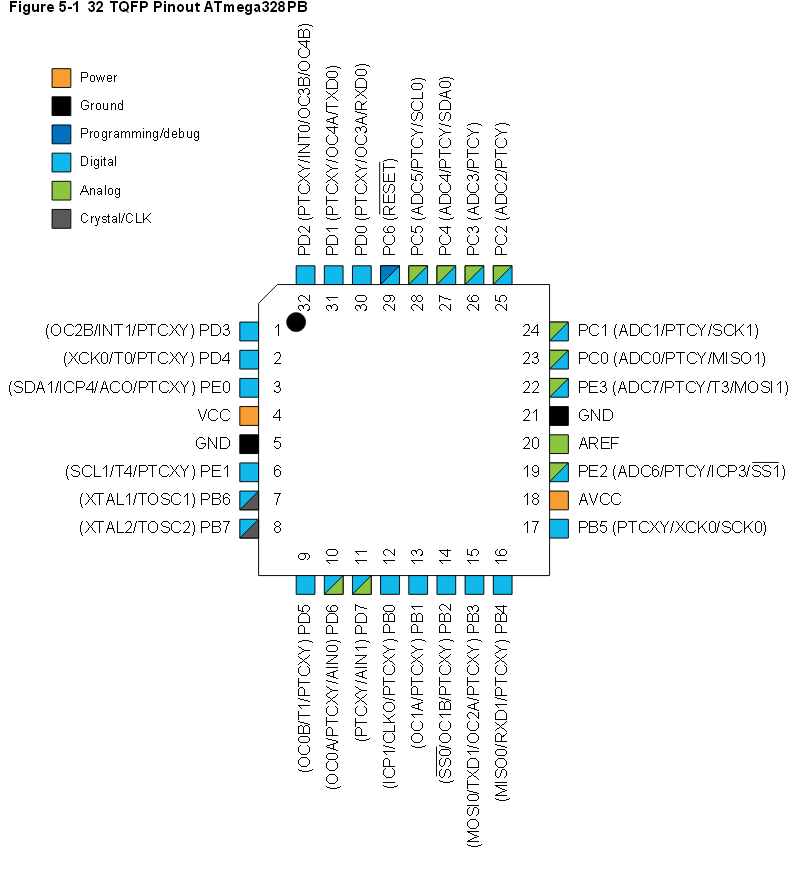
Most Arduino boards, like for example well known Arduino UNO are based on ATmega328 micro-controller from Atmel (there are nowadays also many Arduinos that use different CPUs). It seem that with ATmega328 you never have enough peripherals for everything you might want to do.  Whether it’s hardware-driven PWM channels, ADCs, or serial communication peripherals, we always end up wanting just one more of these but don’t really need so many of those. Bye-bye ATmega328P, Hello 328PB! posting at Hackaday tells that  Atmel’s new version of the popular ATmega328 series, the ATmega328PB, seems to have heard our pleas. ATmega328PB combines 32kB ISP Flash memory with read-while-write capabilities, 1kB EEPROM, 2kB SRAM, 27 general purpose I/O lines, 32 general purpose working registers, five flexible timer/counters with compare modes, internal and external interrupts, two USARTs with wake-up on start of transmission, two byte-oriented 2-wire serial interfaces, two SPI serial ports, 8-channel 10-bit A/D converter, programmable watchdog timer with internal oscillator, a unique serial number and six software selectable power saving modes. The device operates between 1.8-5.5 volts. The ATmega328PB supports capacitive sensors: 24 buttons in self-capacitance mode, or up to 144 buttons in mutual-capacitance mode. This ATmega328PB does not native USB thing in it, so if you need USB support, look at the ATmega32U4 as used in Arduino Leonardo board.

So what does this mean for you? It seems that chips are shipping right now, and there’s an inexpensive dev kit available as well. If you write your own code in C,you should be pretty ready to use new feature. With Arduino you might need to wait until new chips find their way to Arduino boards (there does not seem to be DIP version you could plug to Arduino UNO socket) and support for it on Arduino IDE is added (unless you can hack it to it yourself).

Here is ATmega328PB chip pin-out from summary:


Atmega328PB


587 Comments

  1. Tomi Engdahl says:

    ESPHome Bluetooth Proxies
    Bluetooth technology has a limited range. Home Assistant can expand its Bluetooth reach by communicating with Bluetooth devices through Bluetooth proxy devices powered by ESPHome
    https://esphome.github.io/bluetooth-proxies/?fbclid=IwAR1r2UHTEQ4rnwspVKN0n_H65nWmpvlr5Ho32GkRpRByL35mkdquKDyjSf0

    Reply
  2. Tomi Engdahl says:

    16 Brilliant ESP32 projects you must try in 2023!
    https://www.youtube.com/watch?v=1nkgTtTWnPM

    Chapters:
    00:00 Intro
    00:10 Omnidirectional robot
    00:52 Handheld computer
    01:34 Car Dashboard Controller
    02:17 Robot with RTOS and Wi-Fi control
    02:57 DIY graphics calculator
    04:02 Open Universal Remote
    04:47 DIY Oscilloscope
    05:29 Graphical Sensor Data
    06:06 Audio Spectrum Analyzer
    06:46 Object Identifier
    07:24 Smart Rain Gauge
    08:00 Voice command system
    08:38 DIY Virtual Mouse
    09:13 SMART LAMP from Empty Spools
    09:56 Mini Video Player
    10:30 Surveillance Camera
    11:05 Outro

    Reply
  3. Tomi Engdahl says:

    Powered by an ESP32, this multi-sensor smart light can gather information on routes, pollution, and even dangerous intersections.

    The Bright Block “Bike Gizmo” Is a Smart Light for Citizen Science Data Gathering on Two Wheels
    https://www.hackster.io/news/the-bright-block-bike-gizmo-is-a-smart-light-for-citizen-science-data-gathering-on-two-wheels-f432d8ec175e?fbclid=IwAR0P-aytF1IDx3M7zOUFq1Zd7uHw-txc8VNe1Mgixd7pr7nE06b0n5QRZcU

    Powered by an Espressif ESP32, this multi-sensor smart light can gather information on routes, pollution, and even dangerous intersections.

    Reply
  4. Tomi Engdahl says:

    Exploring the Arduino Nano ESP32 | MicroPython & IoT Cloud
    https://www.youtube.com/watch?v=R51tf66es9w

    Another new Arduino board! This time it’s the Arduino Nano ESP32, and we’ll test it out today. Includes MicroPython and Arduino IoT Cloud experiments.

    Reply
  5. Tomi Engdahl says:

    Run Linux on ESP32 – how to run the Linux kernel on an ESP32
    https://www.youtube.com/watch?v=5oKeVyxgwzk

    For some time, XTENSA versions of the ESP32 are able to run the Linux kernel. This video shows how to compile the kernel, and how to deploy and run it on an ESP32-S3.
    Attention: this video has a small mistake. Run the shell script only AFTER all the required components were downloaded.

    Reply
  6. Tomi Engdahl says:

    ESP32-DIV: Your Swiss Army Knife for Wireless Netw
    https://hackaday.io/project/193194-esp32-div-your-swiss-army-knife-for-wireless-netw

    Imagine having a device that can not only monitor network traffic but also scan for nearby Wi-Fi networks, simulate beacon frames

    Reply
  7. Tomi Engdahl says:

    These Drones Are Tracked and Controlled Using $1 Webcams and ESP32s
    Joshua Bird’s open source project allows users to control autonomous drones through a web interface and a series of ESP32 boards.
    https://www.hackster.io/news/these-drones-are-tracked-and-controlled-using-1-webcams-and-esp32s-71a738f52960

    Reply
  8. Tomi Engdahl says:

    Olimex Teases an Ultra-Low-Cost Feature-Packed Development Board for the RISC-V Espressif ESP32-H2
    Designed for low-power IEEE 802.15.4 Internet of Things (IoT) experiments, the new board includes battery charging and a sub-$8 price tag.
    https://www.hackster.io/news/olimex-teases-an-ultra-low-cost-feature-packed-development-board-for-the-risc-v-espressif-esp32-h2-4b39800b1244

    Reply
  9. Tomi Engdahl says:

    Microflex MCUs – Tiny USB development boards based on ESP32-S3, ESP32-S2, ESP32-C3, ESP32-C6, or Raspberry Pi RP2040 (Crowdfunding)
    SB Components is back with yet another crowdfunding campaign this time with the Microflex MCUs USB development boards all with the same tiny form factor and offered with a choice of five microcontrollers namely Raspberry Pi RP2040, ESP32-S3, ESP32-S2, ESP32-C3, or ESP32-C6.
    https://www.cnx-software.com/2023/12/12/microflex-mcu-tiny-usb-development-boards-esp32-s3-esp32-s2-esp32-c3-esp32-c6-raspberry-pi-rp2040/

    Reply
  10. Tomi Engdahl says:

    https://hackaday.com/2024/01/06/no-dac-try-pdm/

    Ever notice that the ESP32-S3 doesn’t have a digital-to-analog converter? [Chris] did and asserts that he doesn’t care because he can just use the PDM system to get the same result. PDM — pulse density modulation — is similar to PWM and, like PWM, requires a filter that could range from a simple RC network to an active filter. You can see the result in the video below.

    There are several ways [Chris] could produce the output he wanted. PWM was one choice, and some example code uses a timer to do PDM. However, that is not very efficient. The other alternative is to use the I2S output.

    Reply
  11. Tomi Engdahl says:

    Olimex’s New ESP32-POE2 Board Packs 25W of Power over Ethernet for Higher Current Projects
    Offering 12V at 2A, 5V at 5A, or 3.3V at 1A, the ESP32-POE2 board aims at higher power projects like door lock solenoids.
    https://www.hackster.io/news/olimex-s-new-esp32-poe2-board-packs-25w-of-power-over-ethernet-for-higher-current-projects-971ef369d23c

    Reply
  12. Tomi Engdahl says:

    Bojan Jurca’s ESP32 Oscilloscope Turns Low-Cost Microcontroller Boards Into Web-Connected Tools
    Designed for use in a web browser, the ESP32 oscilloscope delivers exactly what it promises — a handy tool in a pinch.
    https://www.hackster.io/news/bojan-jurca-s-esp32-oscilloscope-turns-low-cost-microcontroller-boards-into-web-connected-tools-74b3cdf95839

    Reply
  13. Tomi Engdahl says:

    How to Make Custom ESP32 Board in 3 Hours | Full Tutorial
    https://www.youtube.com/watch?v=S_p0YV-JlfU

    In this tutorial you will learn how to draw schematic, do PCB layout, manufacture your board and programming.

    Learn more about electronics, check out our online courses:
    https://courses.fedevel.com/

    Chapters:
    00:00 Start a new project in EasyEDA
    04:00 Add ESP32 into schematic
    05:00 Add CP2102N
    05:48 Add AMS1117-3.3
    06:41 Add USB connector
    07:43 Add ESD, Transistors, Buttons
    09:33 Add Capacitors
    14:06 Add Resistors
    18:29 Add LED
    19:12 Drawing schematic: Buttons + ESP32
    25:42 Connecting: USB to UART
    36:19 Connecting: LED, Power
    40:28 Connecting: Series resistors, Connectors
    47:40 ESP32 vs S2 reference schematic
    51:55 CP2102N Errata
    56:23 Adding titles
    59:20 Annotating schematic
    1:00:47 Fixing errors in schematic
    1:02:24 Importing schematic to PCB
    1:03:25 Component placement
    1:20:39 Start PCB Layout: setup rules, stackup and route it
    1:47:50 Updating schematic and importing changes to PCB
    2:07:39 Running DRC check and fixing errors on PCB
    2:11:32 Drawing polygons
    2:21:35 Updating tracks to 50OHMs, improving power connections
    2:28:23 Adding text
    2:41:04 Ordering PCB: Gerber files
    2:42:40 Ordering board assembly: BOM, Pick and place
    2:46:37 Ordering additional components
    2:50:52 Boards received! Check them
    2:52:20 Programming: Setup
    2:53:53 Programming: Blink (Example)
    2:55:03 Programming: Controlling LED over Internet (WiFi Example)
    2:56:32 Thank you very much

    Reply
  14. Tomi Engdahl says:

    Mike Rankin’s Compact Thermal Camera Packs a High-Performance Parallel Display in a Tiny Footprint
    Offering a live view of 768 temperature measurement zones, this thermal camera fits in the footprint of its own 1.69″ display.
    https://www.hackster.io/news/mike-rankin-s-compact-thermal-camera-packs-a-high-performance-parallel-display-in-a-tiny-footprint-1bb341d76bc7

    Reply
  15. Tomi Engdahl says:

    Using ESP32 built-in hall effect sensor
    All ESP32 cards have a built-in Hall Effect sensor. The Hall Effect sensor can detect changes in the magnetic field in its environment
    https://www.hackster.io/myhomethings/using-esp32-built-in-hall-effect-sensor-d6a5ad

    Reply

Leave a Comment

Your email address will not be published. Required fields are marked *

*

*