I got interested interested in ESP8266 WiFi module after reading New Chip Alert: The ESP8266 WiFi Module (It’s $5) article. Why is it cool? It’s a WiFi module with an SOC, making it somewhat similar to TI’s CC300. ESP8266 is an UART to WiFi module that you can pick for less than $5 USD.
ESP8266 is a really cheap and easy way to connect any small microcontroller platform (for example Arduino) wirelessly to Internet. The microcontroller on the module takes care of all the WiFi, TCP/IP stack, and the overhead found in an 802.11 network. It’s addressable over SPI and UART, making this an exceptionally easy choice for anyone wanting to build an Internet of Things thing. You can use AT commands to connecyt to WiFi networks and open TCP connections without need to have TCP/IP stack running in your own microcontroller: You can simply connect any microcontroller to this module and start pushing data up to the Internet. This might be why it seems that ESP8266 has pretty soon become every hacker’s favorite WiFi chip.
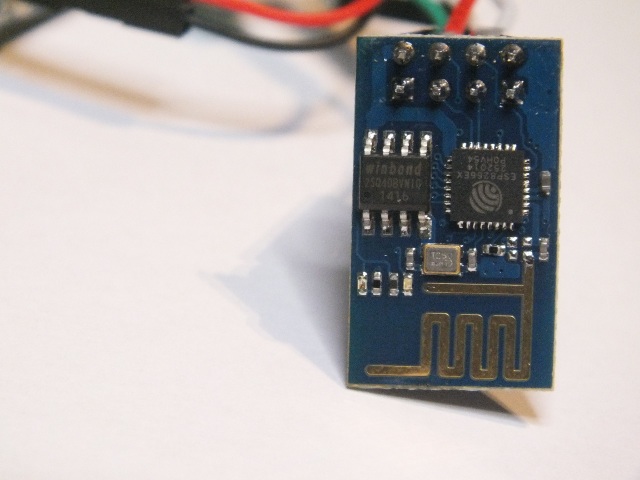
The ESP826 module I bought from Electrodragon is simple having only the ESP8266 IC and one other IC in it. The WiFi antenna is integrated to circuit board. The whole module is just size of post stamp.
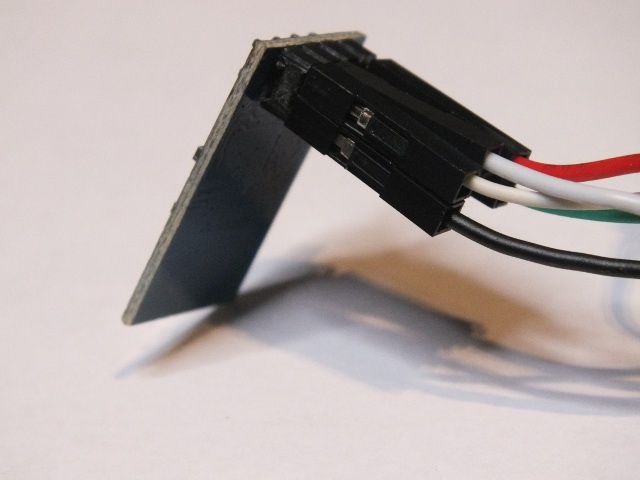
The other side of the he module des not have any components, just 8 pins I have attached wires to in this picture.
There’s a catch, right, there’s always a catch on the cheap products. One thing is that ESP8266 pretty much doesn’t exist outside China. Ordering from China is not a problem nowdays, but when all the documentation is in Chinese, that can be a problem. But fortunately there has been projects to get ESP8266 translated data sheet.
I had enough information, so I need to get one module to test. I ended up ordering ESP8266 module from Electrodragon (check module data). ESP8266 from Banggood.com would have been cheaper bit taken longer time to get because ESP8266 module was listed to out of stock at the time.
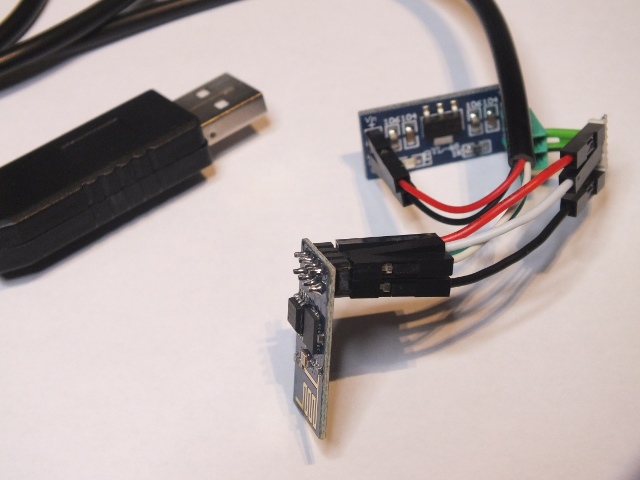
The module and IO pins run at 3.3V. For testing I used USB To RS232/TTL PL2303HX Cable Adapter and 5V to 3.3V regulator module to do the connection. I used separate 3,.3V regulator module because I wanted to guarantee that the module can get enough current (over 200 mA on peaks) (some other USB-serial adapter ICs have 3.3V regulators built in them but can’t give enough current out). Wi07c ESP8266 module data and different project examples got me started pretty well.
Test commands at 115200-N-8-1 serial port settings:
AT+RST
AT+CWMODE=1
AT+CWJAP=”SSID”,”PASS”
AT+CWJAP=”AndroidAP”,”XXXX”
AT+CIPSTART=”TCP”,”www.epanorama.net”,80
AT+CIPSEND=0,n: Where n is the length of the request string.
AT+CIPCLOSE
The results with those were promising. Wiring ESP8266 to your favorite microcontroller platform has pretty much everything you would need to do with an Internet of Things thing. That’s good enough, but things are even better.
It has turned out that it is possible to do run your own coode on the module itself: An SDK for the ESP8266 WiFi Chip turns the ESP8266 into something much better than a UART to WiFi module; now you can create a Internet of Things thing with just $5 in hardware. You can write the software using C programming language and GCC compiler to processor in the module (80MHz Tensilica). Included in the SDK are sources for an SSL, JSON, and lwIP library, making this a solution for pretty much everything you would need to do with an Internet of Things thing. Looks interesting, I just have to find time to test that out…
Review articles on ESP8266
First impression on the ESP8266 serial-to-WiFi module
The Current State of ESP8266 Development
Review on the new and cheap esp8266 WiFi module – video
The Current State of ESP8266 Development
Sites on ESP8266 information:
translation of the datasheet and AT command set
Project pages:
Using the ESP8266 module
A Development Board for the ESP8266
ESP8266 and PL2303HX-gpio adventures
Update Firmware ESP8266Cloud Update - also video
A Proof of Concept Project for the ESP8266
The ESP8266 Becomes a Terrible Browser
ESP8266 Retro Browser – Accessing a web site with an ESP8266 serial WiFi module and an Arduino Mega
Keep an Eye on Your Fermenting Beer with BrewMonitor
An ESP8266 Based Smartmeter
Checking Email With The ESP8266 – reads the subject and sender lines from the latest email and displays it on an LCD
ESP8266 Wifi Temperature Logger – using the ESP8266 and Arduino to update a remote Thingspeak server
Adding wifi to a desk lamp with the Wi07C (ESP8266)
Places to order:
ESP8266 module from Electrodragon
SDK:
An SDK for the ESP8266 WiFi Chip
The ESP8266 SDK is finally here – along with a VirtualBox image with Ubuntu that includes GCC for the LX106 core
Source code examples:
331 Comments
Tomi Engdahl says:
MicroPython Smart Holiday Lights
https://learn.adafruit.com/micropython-smart-holiday-lights/overview
Celebrate the holidays with MicroPython and smart holiday lights that are controlled from the web! This project shows you how to animate NeoPixels with MicroPython running on the ESP8266 WiFi microcontroller. Just pick the color and type of animation on a web page, click a button, and your holiday lights will spring to life with animated holiday cheer. The smart holiday lights will even remember their last animation run it on power up. This project is a great demonstration of the ESP8266 and MicroPython’s strengths like easy WiFi access with the WebREPL and storing data in MicroPython’s file system.
One unique feature of MicroPython on the ESP8266 and its WiFi microcontroller is a WebREPL (read-evaluate-print loop, like a Python ‘command line’) accessible through a webpage. Instead of using a serial connection to the board you can run Python code directly from your browser in a simple terminal. You don’t even need to connect the board to a WiFi network, it can create its own that you use to access the WebREPL!
Tomi Engdahl says:
These Ornaments Measure Christmas Cheer
http://hackaday.com/2016/12/24/these-ornaments-measure-christmas-cheer/
The ornament projects we post around here tend to be simple, stand-alone projects. We are, however, well into the era of the Internet of Things (like it or not) and holiday ornaments need not be single, unconnected blinking objects. For Christmas this year, [Sean Hodgins] came up with some connected DIY ornaments that respond to Christmas cheer.
[Sean Hodgins] had some beautiful PCBs done up in festive shapes and he hand-pastes and oven-solders the SMD components on both sides. Each one is battery powered and controlled by an ESP8266.
ESP8266 Christmas Ornaments
The best way to spread Christmas cheer is posting it on the internet for all to download.
https://hackaday.io/project/19051-esp8266-christmas-ornaments
Tomi Engdahl says:
IoT-ifying an Old LED Signboard
http://hackaday.com/2016/12/26/iot-ifying-an-old-led-signboard/
Scrolling LED signs were pretty keen back in the day, and now they’re pretty easy to come by on the cheap. Getting a signboard configured for IoT duty can be tricky, but as [kripthor] shows us, it’s not that bad as long as security isn’t your top concern and you can tweak a serial interface.
Retrofitting a LED Display into the IoT
http://ruralhacker.blogspot.fi/2016/12/retrofitting-led-display-into-iot.html
I have a LED panel. I have an ESP8266. Annhmm! LED – ESP!
Kinda works well if you spell it: L E D – E S P! Or maybe not…
Tomi Engdahl says:
SST Is A Very Tidy ESP8266 Smart Thermostat
http://hackaday.com/2017/01/01/sst-is-a-very-tidy-esp8266-smart-thermostat/
The smart thermostat has become in a way the public face of the Internet of Things. It’s a demonstration that technological uptake by the general public is driven not by how clever the technology is, but by how much use they can see in it. A fridge that offers your recipes or orders more eggs may be a very neat idea, but at street level a device allowing you to turn your heating on at home before you leave work is much cooler.
There is no reason though for an IoT thermostat to be a commercial product like the two mentioned. Our subject today demonstrates this; SST is a Wi-Fi smart thermostat using an ESP8266 that can be controlled by an app, thanks to its use of the open-source Souliss IoT Framework.
SST – ESP8266 Smart Thermostat WiFi IoT ready
SST – ESP8266 WiFi Smart Thermostat based on Souliss IoT
https://hackaday.io/project/19167-sst-esp8266-smart-thermostat-wifi-iot-ready
Tomi Engdahl says:
Garage Door Opener Logs to Google Drive
http://hackaday.com/2017/01/15/garage-door-opener-logs-to-google-drive/
A garage door opener is a pretty classic hack around these parts. IR, Bluetooth, WiFi, smartphone controlled, web interfaces — we’ve seen it all. But if you want to keep track of people going in and out, you need some way of logging what’s happening. You could go ahead and roll up your own SQL based solution, tied into a custom web page. But there’s an easier way; you can build a garage door opener that logs events to Google Drive.
ESP8266 WiFi Garage Door Opener from any Web Browser
http://www.whiskeytangohotel.com/2017/01/esp8266-wifi-garage-door-opener-from.html
Tomi Engdahl says:
Servo-Controlled IoT Light Switches
http://hackaday.com/2017/01/17/servo-controlled-iot-light-switches/
The Internet of Things is fun to play with; there’s all manner of devices to automate and control remotely. It can be sketchy, though — make a mistake when coding your automatic plant watering system and you could flood your house. Make a mistake with a space heater and you could burn it down. Combine these risks with the fact that many people live in rental properties, and it can be a difficult proposition to bring the Internet of Things to your home.
[Suyash] came up with a way around this by building 3D printed light switch covers that add servo control. It’s a great solution that it doesn’t require the modification of any mains wiring, and interfaces with the standard switches in the normal way. It makes it a lot safer this way — there are municipal wiring codes for a reason.
The backend of things is handled by the venerable ESP8266, with [Suyash]’s custom IoT library known as conduit doing the heavy lifting.
Cloud-Controlled house lights using home-grown electronics and 3D printed light switch covers
https://github.com/suyashkumar/smart-lights
This project is a hassle-free cloud connected lighting system that interfaces with standard light switches via a 3D printed lightswitch cover with a built-in servo mount
This project uses an ESP8266 WiFi microcontroller along with my conduit IoT service/library to expose functionality that can be called via a RESTful API from anywhere in the world!
Control microcontrollers via central RESTful API from anywhere in the world. [ESP8266, Arduino]
https://conduit.suyash.io
https://github.com/suyashkumar/conduit
Tomi Engdahl says:
Increase The Range Of An ESP8266 With Duct Tape
http://hackaday.com/2017/01/30/increase-the-range-of-an-esp8266-with-duct-tape/
For the longest time now, I’ve wanted to build a real, proper radio telescope. To me, this means a large parabolic reflector, a feed horn made of brass sheet, coat hanger wire, and at least for the initial experiments, an RTL-SDR dongle.
I decided to 3D print a small model of this dish. In creating this model, I inadvertently created the perfect WiFi antenna for an ESP8266 module using nothing but 3D printed parts, a bit of epoxy, and duct tape.
The design of a parabolic WiFi antenna isn’t that much different from the design of an optical telescope. In fact, nothing is different save for the frequency of light we’re looking at. A rule of thumb for optics is that a perfect reflector needs to have a surface finish within 1/10th to 1/20th of the wavelength of light the reflector will be used at. For a visible light telescope at a wavelength of 400 nanometers, this means a parabolic mirror needs to have a surface finish that is perfect to within 40 nanometers. That’s the size of viruses, but it’s still something that can be made with cerium oxide, pitch, and a second block of glass.
WiFi, on the other hand, has a wavelength of 12.5 centimeters, and the surface of a parabolic WiFi antenna needs to be perfect within only a millimeter or two. This is easily attainable with a 3D printer.
Tomi Engdahl says:
ESP8266 Based NeoPixel Dashboard
https://hackaday.io/project/19773-esp8266-based-neopixel-dashboard
This is an ESP8266 based Neopixel dashboard, it shows current time, can show a custom message and have upto 41 prebuild effects.
ESP8266 Based NeoPixel Dashboard
ESP8266 Based NeoPixel Dashboard
This is an ESP8266 based Neopixel dashboard, it shows current time, can show a custom message and have upto 41 prebuild effects.
Moreover, the color and brightness of the message as well as time can be changed. The speed of the message scroll as well as effects can also be changed dynamically. The time is RTC backed and The whole dashboard is LiIon Battery Backed.
Tomi Engdahl says:
Hacking on the Weirdest ESP Module
http://hackaday.com/2017/02/13/hacking-on-the-weirdest-esp-module/
china radio says:
Have you ever thought about creating an e-book or
guest authoring on other websites? I have a blog centered on the same information you discuss and would love to have you share
some stories/information. I know my subscribers would enjoy your work.
If you are even remotely interested, feel free to send me an email.
Tomi Engdahl says:
I already done some guest authoring for some web sites and magazines.
I have not yet created an e-book.
Tomi Engdahl says:
ESP8266 Wi-Fi – SCREW SHIELD
https://hackaday.io/project/20244-esp8266-wi-fi-screw-shield
Main idea for this project is to create an easy adaptable screw shield for ESP8266 – 05 Wi-Fi module.
Description
Time to time we need to adopt in the field popular ESP8266 WiFi module which is used widely in IoT systems.
And here is the thing. When we do not have soldering station around ourselves and even worst we do not have power supply for soldering station we have a small problem.
Solution for this problem can be simple SCREW SHIELD for ESP8266-05 Wi-Fi module
Tomi Engdahl says:
Internet Button ESP8266 & AWS IoT full tutorial
https://hackaday.io/project/20273-internet-button-esp8266-aws-iot-full-tutorial
ESP8266 Internet Button project: when button is pressed, a cloud backend gets a notification and performs an action.
Tomi Engdahl says:
Configure ESP8266 Wifi with WiFiManager
http://hackaday.com/2017/03/18/configure-esp8266-wifi-with-wifimanager/
There’s no doubt that the ESP8266 has made creating little WiFi widgets pretty easy. However, a lot of projects hard code the access point details into the device. There’s a better way to do it: use the WiFiManager library. [Witnessmenow] has a good tutorial and a two-minute video
WiFiManager does what a lot of commercial devices do. It initially looks like an access point. You can connect to it using a phone or other WiFi device. Then you can configure it to join your network by setting the network ID, password, etc.
Avoid Hard-Coding WiFi Credentials on Your ESP8266 Using the WiFiManager Library
http://www.instructables.com/id/Avoid-Hard-Coding-WiFi-Credentials-on-Your-ESP8266/
Tomi Engdahl says:
ESP8266 WiFi Configuration Library
https://tzapu.com/esp8266-wifi-connection-manager-library-arduino-ide/
The burden every headless wireless connected device needs to overcome is how to connect to the network without having to hardcode any credentials in it’s firmware.
For the ESP8266 based devices programmed with the Arduino IDE, I have put together this little library that tries to make connecting as seamless and quick as possible. It’s called WiFiManager.
ESP8266 WiFi Connection manager with web captive portal
https://github.com/tzapu/WiFiManager
Tomi Engdahl says:
ESPTool
A WiFi Security Swiss Army Knife
https://hackaday.io/project/12869-esptool
The ESPTool is a convenient Tool to test your WiFi Security against attackers. It can demonstrate how easy it is to crack a WiFi Password or jam your WiFi so you can’t access the internet. This Tool is designed for education and self-tests.
Be aware that it is illegal to use this device on Networks other than your own.
Tomi Engdahl says:
Adding Buttons to the ESP-12 – The Cheat Way
http://hackaday.com/2017/03/23/adding-buttons-to-the-esp-12-the-cheat-way/
[Buger] had an ESP-12F and wanted to play with nodeMCU, but found they were lacking buttons for reset & flash. We’ve all been there – mucking about with a project on a breadboard, trying to save the time required to solder up a button by shorting pins with wire or bending component legs to touch. This either doesn’t work or ends up bricking the microcontroller when it inevitably goes wrong. [Buger] found a tidier solution to adding buttons to the ESP-12F with the minimum of effort.
It’s the spirit of deadbug applied to buttons.
ESP12-F reset and flash button hack
http://buger.dread.cz/esp12-f-reset-and-flash-button-hack.html
Idea is simple – metal case of the ESP is grounded, piece of wire is making “a button”. In default positions wire shoud be just above the metal case, but not touching it. When you press the wire, it simply touches the ESP’s metal case and pin become LOW. If you release it, it stops touching the metal case and pin become HIGH again
Tomi Engdahl says:
CP/M 8266
http://hackaday.com/2017/03/25/cpm-8266/
Hands up if you’ve ever used a machine running CP/M. That’s likely these days to only produce an answer from owners of retrocomputers. What was once one of the premier microcomputer operating systems is now an esoteric OS, a piece of abandonware released as open source by the successor company of its developer.
Aside from those retrocomputers, how about running CP/M on an ESP8266? From multi-thousand-dollar business system to two-dollar module in four decades, that’s technological progress.
[Matseng] has CP/M 2.2 running in a Z80 emulator on an ESP8266.
CP/M 8266
Emulation of a Z80-based CP/M 2.2 machine with 64K ram on an ESP8266
https://hackaday.io/project/20552-cpm-8266
Tomi Engdahl says:
Home automation over WiFi using WeMos ESP8266
https://www.youtube.com/watch?v=7Dv70ci-MOw
This video shows how to use a smartphone to controll LED ligths.
It also supports controlling switches.
https://github.com/bitluni/bitluniHomeAutomation
Tomi Engdahl says:
Provide ESP8266 based itead Sonoff with Web, MQTT and OTA firmware using Arduino IDE – Now EOL
https://github.com/arendst/Sonoff-MQTT-OTA-Arduino
This software is End of Life. New features will be introduced in Sonoff-Tasmota available on https://github.com/arendst/Sonoff-Tasmota
Tomi Engdahl says:
Sir, It Appears We’ve Been Jammed!
http://hackaday.com/2017/03/30/sir-it-appears-weve-been-jammed/
In a move that would induce ire in Lord Helmet, [Kedar Nimbalkar] has hacked together a simple — yet effective — WiFi jammer that comes with a handful of features certain to frustrate whomever has provoked its wrath.
The jammer is an ESP8266 development board — running some additional custom code — accessed and controlled by a cell phone
How to Hack WiFi networks with ESP8266 – WiFi Jammer
https://www.youtube.com/watch?v=N5JVQ-m5Kd0
Hey friends, Have you ever wanted to hack all wifi signal without knowing the wifi passwords. or just want to kick someone out from their wifi or a neighbors wifi. Well today in this video i will show you how to make wifi jammer in easiest way. Here is the $8 DIY Wifi hacker to try for yourself. This wifi jammer is so tiny you can fit into pocket. and carry it anywhere. it can powered through your power bank. You can perform multiple types of deauth attack, random beacon spam, beacon spam attack.
Tomi Engdahl says:
esp8266 internet controlled relay (garage opener)
https://hackaday.io/project/21074-esp8266-internet-controlled-relay-garage-opener
A project to activate a remote control for a garage via smart phone using an esp8266 module, a pair of relays and some cloud services.
Tomi Engdahl says:
Hackaday Prize Entry: WiFi In Wall Switches
http://hackaday.com/2017/04/07/hackaday-prize-entry-wifi-in-wall-switches/
The Internet of Things and Home Automation are the next big thing, even though we’ve had X10 switches and controllers for forty years. Why the sudden interest in home automation? Cheap microcontrollers with WiFi, ZigBee, and Z-wave, apparently. For this Hackaday Prize entry, [Knudt] is building a WiFi switch, meant to be retrofitted into any Euro wall switch.
The top layer is the switch itself and a small OLED display.
The second layer of this contraption is basically an ESP8266, providing all the logic for this wall switch. The bottom layer is a bit more interesting, housing the 110-230V input, with a Triac or relay.
Modular WiFi-Switch
Modular ESP8266 Wi-Fi switch to the installation in switch boxes.
https://hackaday.io/project/20035-modular-wifi-switch
Tomi Engdahl says:
Everyone Loves Faster ESP8266 TFT Libs
http://hackaday.com/2017/04/08/everyone-loves-faster-esp8266-tft-libs/
Reader [Jasper] writes in with glowing praise for the TFT_eSPI library for the ESP8266 and the various cheap 480×320 TFT displays (ILI9341, ILI9163, ST7735, S6D02A1, etc.) that support SPI mode. It’s a drop-in replacement for the Adafruit GFX and driver libraries, so you don’t need to rework your code to take advantage of it. If you’re looking to drive an LCD screen with an ESP8266 and Arduino, check this out for sure.
A TFT library for the ESP8266 that supports different SPI driver chips
https://github.com/Bodmer/TFT_eSPI
Tomi Engdahl says:
Weather Station PCB
DIY PCB for Weather Station
https://hackaday.io/project/21083-weather-station-pcb
This is my development of PCB for Weather Station by Squix78 . I saw one day at Adafruit project from Ruiz Brothers and decide to make my own PCB, because parts from Adafruit are really good, but to expensive if I want to send them to my country.
t contain following parts:
ESP12E
3.3V voltage regulator LM1117
Reset button
Flash button
FTDI connector
LCD connector
Some resistors
Some capacitors
LED for flash state
build in charging with MCP73831T + LED indicator
auto-reset feature
USB to Serial converter chip CH340G
Tomi Engdahl says:
SwitchiFy – 4 way switching board with Wifi
https://hackaday.io/project/19693-switchify-4-way-switching-board-with-wifi
SwitchiFy is an ESP8266 based wifi relay board with a 4-way switching configuration which are widely used in big living rooms and bed room.
So I design a ESP8266 controlled 4 way switching relay board which can be put in between two 3 way switches. It used 2 relays to implement a 4 way switch (DPDT switch) and there are 3 sets of 4 way switches in the board.
While designed the board, I took careful consideration for creepage distance and clearance. The minimum creepage distance maintained in this board is 100 mils between high voltage and low voltage tracks. The high voltage track width can handle 4 Amps (which is more than necessary for home appliances such as light, fan etc.)
There was a mechanical constrain while designing the board. I co-ordinated with the electrician frequency while designing the board. He told that the standard switch box size available (in souther part of India) is 5 inch X 3 inch.
One of my friends developed a android application to control the SwitchiFy boards. The app scans for the Switchify devices and the user can select his required one.
Tomi Engdahl says:
Electric Water Heater controler
To Control an electric water heater to only use the surplus power from my 3KW PV array
https://hackaday.io/project/11499-electric-water-heater-controler
the plan is to build an energy meter that connects to the network and a power control on a new electric hotwater heater to only heat water when there is surplus power.
Tomi Engdahl says:
DIY DynDNS with ESP8266 and Dweets
http://hackaday.com/2017/04/12/diy-dyndns-with-esp8266-and-dweets/
You’re on a home router, and your IP address keeps changing. Instead of paying a little bit extra for a static IP address (and becoming a grownup member of the Internet) there are many services that let you push your current IP out to the rest of the world dynamically. But most of them involve paying money or spending time reading advertisements. Who has either money or time?!
[Alberto Ricci Bitti] cobbled together a few free services and an ESP8266 module to make a device that occasionally pushes its external IP address out to a web-based “dweet” service. The skinny: an ESP8266 gets its external IP address from ipify.org and pushes it by “dweet” to a web-based data store. Freeboard reads the “dweet” and posts the resulting link in a nice format.
Know your router public IP address, from anywhere. Great for cheap routers or IP cameras.
https://github.com/riccibitti/CloudMyIp
CloudMyIp is an inexpensive ($3) IOT device that reads the public IP address assigned to your router by your ISP (Internet Service Provider), and publishes it on a web page anyone can read with a link. Great for accessing your home network or IP cameras from abroad, saving the money for a subscription to a dynamic dns service (or the time spent for similar “free” services requiring you to connect and read their ads once a month for continued service).
Tomi Engdahl says:
Google Calendar Interface for Your Internet of Lawns
http://hackaday.com/2017/04/13/google-calendar-interface-for-your-internet-of-lawns/
If you live somewhere where summers are hot and dry, you can instantly tell which homes don’t have automatic sprinklers installed. Or they may have them installed, but like the blinking “12:00” on that VCR of yore, the owners may not have mastered the art of programming the controller. To be fair, the UI on most residential irrigation controllers is a bit wanting, which is the rationale behind letting Google Calendar tell your sprinklers when it’s time to water.
It’s still pretty simple stuff, though, centered around an ESP8266 as it is.
Irrigation Using Google Calendar!
http://www.instructables.com/id/Irrigation-Using-Google-Calendar/
Tomi Engdahl says:
A Smart Switch Board For The ESP8266
http://hackaday.com/2017/04/17/a-smart-switch-board-for-the-esp8266/
With a plethora of IoT projects and inexpensive commercial smart light fittings and mains switches appearing, you might be forgiven for thinking that another offering in this crowded marketplace would be superfluous. But there is always room for improvement in any field, and in this particular one [Xose Pérez] has done just that with his Espurna board.
This board is a very well executed ESP8266 mains relay, with an on-board mains power supply and power monitoring. It was designed with his Espurna (“Spark” in Catalan) custom firmware in mind, which offers support for Alexa, Domoticz, Home Assistant and anything that supports MQTT or HTTP REST APIs.
The ESPurna board, a smart wall switch with power monitoring
http://tinkerman.cat/the-espurna-board-a-smart-wall-switch-with-power-monitoring/
Tomi Engdahl says:
A Smart Switch Board For The ESP8266
http://hackaday.com/2017/04/17/a-smart-switch-board-for-the-esp8266/
Tomi Engdahl says:
Attack on the Clones: A Review of Two Common ESP8266 Mini D1 Boards
http://hackaday.com/2017/05/15/attack-on-the-clones-a-review-of-two-common-esp8266-mini-d1-boards/
ESP8266-based development boards have proliferated rapidly. One favorite, the WEMOS Mini-D1 is frequently imitated and sold without any branding. As these boards continue to ship to hobbyists and retailers around the world, we thought it might be interesting to conduct a little experiment.
There are a few ESP8266 development boards available, and the most popular seem to be the NodeMCU ‘Amica’ board. Of course, there are dozens of other alternatives including the WiFiMCU, Sparkfun’s ESP8266 Thing, and Adafruit’s HUZZAH ESP8266. Given that, why is this review limited to the Mini D1 boards? Because the Mini D1 is the cheapest. Or was, until it was cloned.
Like the NodeMCU, the Mini D1 is also ubiquitous and has already been picked up by cloners. The D1 is smaller and slightly cheaper. The pin headers are provided separately if you don’t want them attached. It’s practically the same dimensions as this motor controller, this type of battery, and this charging circuit for some really tiny swarm-ready robots. It also shines when you need many MQTT nodes, or to upgrade an RC car. In short, it’s tiny, it’s cheap, and it’s still a great board that we expect interesting projects to use for some time.
We ordered 28 Mini D1 clones split among the two most common designs on Taobao.
Electrically, the clones reviewed were identical to the original WEMOS board. All components were the same across boards, and the soldering job was good
However, there are some very slight differences in board layout.
In summary, both boards are essentially identical
The clones are barely cheaper even in bulk. We’d say that an actual WEMOS board is likely the best value for money.
This brings us to another point: on their website, WEMOS provides a tool to verify if a product is genuine using the ESP8266 chipID. Unfortunately, it doesn’t seem to work presently.
All imitation boards properly registered as serial devices in both Linux and Windows and worked correctly with both NodeMCU and Arduino firmware. All reset switches worked.
The cloned WEMOS Mini D1 boards do what they’re supposed to do. While the build quality is quite tolerable, there are some minor flaws. Ordered from the manufacturer, cloned boards are not much cheaper than the original, on the order of $1 per board, and ordering them was not a very streamlined process.
The worst experience surrounding these boards was actually ordering them. Everything arrived — eventually. Some parts in a week, others in a month.
D1 mini
https://www.wemos.cc/product/d1-mini.html
Efried says:
I would spend USD 30 getting a system that may be programmed via Internet browser,
Tomi Engdahl says:
Bitcoin Price Ticker
http://hackaday.com/2017/05/21/bitcoin-price-ticker/
Are you a Bitcoin miner or trader, but find yourself lacking the compulsive need to check exchange rates like the drug-fuelled daytraders of Wall Street? Fear not – you too can adorn your home or office with a Bitcoin Price Ticker! The post is in Italian but you can read a translated version here.
It’s a straightforward enough build – an Arduino compatible board with an onboard ESP8266 is hooked up with an HD44780-compatible LCD. It’s then a simple matter of scraping the Bitcoin price from the web and displaying it on the LCD. It’s a combination of all the maker staples, tied together with some off-the-shelf libraries – it’s quick, and it works.
https://translate.google.com/translate?sl=auto&tl=en&js=y&prev=_t&hl=en&ie=UTF-8&u=https%3A%2F%2Fwww.reboot.ms%2Fforum%2Fthreads%2Farduino-bitcoin-ticker-tenere-sottocchio-il-prezzo-del-bitcoin.5312%2F&edit-text=
Tomi Engdahl says:
Multipurpose ESP8266 keychain
http://hackaday.com/2017/05/21/multipurpose-esp8266-keychain/
One of the best feature of the ESP8266 is its ability to self-host a web server, allowing for fairly complicated user interactions. The dEEbugger by [S-March] is a nifty little ESP8266 based device with a plethora of features in a small package.
The USB-powered device has a web user interface that enables it to be used as a low bandwidth oscilloscope, I2C terminal, or UART terminal. As an scope, you may connect to it via your tablet and then use it as a remote voltage monitor. There is a peak detection feature which is a nice touch and gives the entire project a premium feel.
The dEEbugger is an ESP8266 based keychain swiss army knife for electronics
https://github.com/S-March/dEEbugger_PUBLIC
The device was designed with breakouts for the two ADC channels, UART and I2C. It can run off of 5V or 3.3V or USB power. If USB is being used, the 5V and 3.3V pins can be used as outputs.
To use the dEEbugger, plug in power and navigate to dEEbugger.local in you browser. If your devices does not support mDNS, you can just navigate to the dEEbugger IP address instead.
Two Channels (ADC and UART Stream)
Peak Detection
The dEEbugger supports real time peak detection as well.
In additin to acting as an oscilloscope, the dEEbugger can act as a “wireless” serial terminal allowing you to send and receive data over the UART pins through the web application
Terminal settings: connect/disconnect button, baud rate selection, terminal clear button and enable/disable a local echo.
When “Find Devices” button is pressed, a list of all I2C devices on the bus will be returned.
When a device is selected, all readable registers will be returned with their current values.
Tomi Engdahl says:
Google Home Meets ESP8266
http://hackaday.com/2017/05/23/google-home-meets-esp8266/
[Luc Volders] is building his own smart house with the help of Google Home and an ESP-8266. Inspired by the house computers from the TV show, Eureka [Luc] created an IoT ecosystem using a mix of off the shelf devices and open source software.
There are about a thousand ways to create a DIY smart home these days. All of them involve setting up a command receiver (like Amazon’s Echo or Google Home), some sort of cloud connection, and an end device controller. This can get complex for the beginner. [Luc’s] article is great because he walks is through each step tutorial style. He even keeps things simple by programming the ESP8266 using BASIC with ESP-BASIC.
Google Home and the ESP8266
http://lucstechblog.blogspot.fi/2017/05/google-home-and-esp8266.html
For those of you living under a rock I will explain brief what Home Assistant is. It is the house computer from Eureka. It is Google’s answer to Alexa. It is a stand alone speaker system with a build-in microphone. Indeed no screen, no keyboard, no mouse. The device is attached to the internet (be it wired or wireless) and the microphone listens to a command that activates it. The command is “OK Google” and that is something we know from Android Phones. However this is much more advanced.
There are lists with questions (easily found on the internet) you can ask Home Assistant.
Basically you can ask it anything you can ask Google on your computer, and then some. And all is done by speaking out the questions and you will be answered by a pleasant womens voice. Really Amazing.
Now this wonder device will set you back at the time of this writing about 129 Dollar. But it gets better.
To get things really rolling Google supplied a Do it Yourself kit based on a Raspberry free with number 57 of the MagPi magazine. Naturally the magazine is totally sold-out.
And still better. Google gave the complete SDK free, for everyone to use.
Actually it works better as the Raspberry version. There is no button needed to activate it. Hands free commanding !!! Next to that it reacts better to questions being split up in multiple frases, and it has a timer and alarm function.
IFTTT compatibility.
You can have your Google Home (including the Raspberry DIY unit) paired with IFTTT. And then suddenly a wealth of possibillities rises.
Command your Philips Hue lights, send a tweet by voice (works flawless believe me), control your Nest thermostat, control your TV with Chromecast, keep a list of notes etc. etc. etc.
And best of all: we can control our ESP-8266 with the Google Home Assistant through IFTTT.
And that is what this entry is going to show you.
Google Home ==> IFTTT ==> ESP8266
To get this working we need to do several steps which I discuss into detail step by step.
- Install ESP-Basic on a NodeMcu or Wemos-D1
- Set up your ESP-8266 with some leds
- Program The ESP with a Basic Program.
- Open a communication port on your router
- Get a IFTTT account (if you do not have it already)
- Set up a few IFTTT recipes
- Command your ESP by voice.
Install ESP-Basic on a NodeMcu or Wemos-D1
Set up your ESP-8266 with some leds
Program The ESP with a Basic Program.
Tomi Engdahl says:
Back to Basic – Basic language on the ESP8266
http://lucstechblog.blogspot.fi/2017/03/back-to-basic-basic-language-on-esp8266.html
Tomi Engdahl says:
ESP8266 Micropython – Tutorial 4: How To Interrupt
ESP8266 Micropython – Tutorial 4: How To Interrupt Micropython, learn
https://hackaday.io/project/24881-esp8266-micropython-tutorial-4-how-to-interrupt
ESP8266 Micropython -Tutorial 5: Micropython UDP
https://hackaday.io/project/24882-esp8266-micropython-tutorial-5-micropython-udp
TCP is to establish reliable connection, and both sides of communication can send data in the form of flow. Compared to TCP, UDP aims at connectionless protocol. When using UDP, you don’t need to establish connection and only need to know the IP address and port no. of the other part. Then you can send data packets directly.
Tomi Engdahl says:
D1 Mini Analog Shield
Add 12 analog pins to the D1 Mini ESP8266 board
https://hackaday.io/project/21500-d1-mini-analog-shield
Tomi Engdahl says:
Modular WiFi-Switch
Modular ESP8266 Wi-Fi switch to the installation in switch boxes.
https://hackaday.io/project/20035-modular-wifi-switch
The WiFi switch consists of three PCBs.
Part 1 = Switch and Display
Part 2 = WLAN and Logic Stuff
Part 3 = Power and Powerswitch
Tomi Engdahl says:
AGI-ESP8266
WiFi accessible IoT plant monitoring system for your window sill
https://hackaday.io/project/16298-agi-esp8266
This project is a wirelessly accessible system for monitoring the key environmental data related to assist in growing plants on your window sill.
By utilizing sensors and a wireless capable microcontroller to log soil moisture, temperature, humidity and natural sunlight, the AGI-ESP8266 is intended to be used by home owners in remote arctic communities to grow lettuce, kale and spinach on their window sills.
Food security in the Arctic is a major social issue, with most groceries and fresh produce needing to be delivered by air cargo; the fresh produce experiences major fluctuations in ambient temperature during transit.
Tomi Engdahl says:
AGI-ESP8266
WiFi accessible IoT plant monitoring system for your window sill
https://hackaday.io/project/16298-agi-esp8266
By utilizing sensors and a wireless capable microcontroller to log soil moisture, temperature, humidity and natural sunlight, the AGI-ESP8266 is intended to be used by home owners in remote arctic communities to grow lettuce, kale and spinach on their window sills.
In the DIY hacker community, the ESP8266 microcontroller is the ideal IoT device for logging data. AGI-ESP8266 is intended to assemble a cheap, robust system for logging temperature/humidity, ambient light and soil moisture data over a long period of time.
Phase One:
The first phase of this project involved programming an esp8266 to utilize MQTT to pass sensor data to a wireless local area network host. This portion is complete and the available code is on the github repository on this page. Following the instructions there will get you a basic system to log temperature, humidity and ambient light via MQTT.
Tomi Engdahl says:
ESP8266 MQTT Remote Gate Entry
http://hackaday.com/2017/06/04/esp8266-mqtt-remote-gate-entry/
Do you live in an area where you (or your car) are locked in by a gate? If so, you may know how [Alexander Else] feels about letting his guests in and out constantly with a remote control — it’s just not convenient. [Alexander] could have just purchased some extra remote controls and passed them out, but they aren’t exactly as cheap as party favors. Not to mention it wouldn’t make sense to hand one out to every single visitor anyway. Because the gate is a community gate, hacking the actual gate system was not an option. There was only one thing he could do — hack the remote control!
Like just about every other hacker, [Alexander] had a spare ESP8266-based board lying around
Now [Alexander] can just set up HTTP Request Shortcuts on each trusted visitor’s smartphone. From there on out they can open/close the gates themselves!
Originally, he was using IFTTT to trigger the string of events that make it all happen, but there was a delay of about 8 seconds (from trigger to relay action). [Alexander] was not having this so he turned to the HTTP Request Shortcuts app. When he made this change, the delay disappeared.
esp8266 internet controlled relay (garage opener)
https://hackaday.io/project/21074-esp8266-internet-controlled-relay-garage-opener
A project to activate a remote control for a garage via smart phone using an esp8266 module, a pair of relays and some cloud services.
Tomi Engdahl says:
Software and firmware for a esp8266 based garage controller
https://github.com/aelse/garage-controller
Tomi Engdahl says:
IuT voltmeter for a breadboard
https://hackaday.io/project/23122-iut-voltmeter-for-a-breadboard
Measure several voltages on a breadboard and display results on a smartphone for less than $10 for parts
OBJECTIVES:
1) inputs to be protected from overvoltage
2) must be powered from an isolated non-grounded power supply for at least 4 hours
3) resolution down to mVs with decent accuracy and repeatability
4) cost of components below $10; use off-the-shelf modules for easy and quick assembly
Design intentions
- usable straight away with any mobile phone or tablet etc, equipped with a web browser, with automatic refreshes of the measured voltage(s)
- fully self contained (no need to connect to any additional network)
- use of inexpensive ESP8266 then ESP8285 modules for implementing both a web server and an access point
- use of ADS1x15 module for voltage measurements
- protect inputs of ADS1x15 from overvoltage with resistors in series (no damage if the voltmeter’s input is connected to a voltage source of up to 50 V)
- rechargable Li-ion battery for powering the device (to be capable of 4 hour operation without recharging it; allows for operating the IuT voltmeter independently of the breadbord circuit’s power supply and does not require earthing of the volmeter similarly to a conventional DMM);
- ESP82xx is to be programmed in Lua (NodeMCU firmware) for the ease of development and debugging at first
Tomi Engdahl says:
Weekend on the Dark Side
Compact, ESP8266 based, battery powered, multi target De-Auth attack implementation.
https://hackaday.io/project/9333-weekend-on-the-dark-side
View Gallery
10.6k
6
558
44
Team (1)
Rand Druid
Join this project’s team
Hackaday
ESP8266 Injection
MDK3
Project source code
Source code for 2 modules
ongoing project
hardware
arduino ESP8266
This project is submitted for
Hackaday.com Tip Line
This project was created on 01/26/2016 and last updated a year ago.
Description
“Not standard” use of ESP8266 module. After reading Hackaday article about packet injection on ESP8266, just can’t stop myself from trying it. I already have experience with MDK3 tool, and it wasn’t difficult to bring part of it to the new hardware.
Tomi Engdahl says:
IoT POV Fidget Spinner
A WiFi fidget spinner, taken from concept to ordering parts in one weekend
https://hackaday.io/project/25372-iot-pov-fidget-spinner
What do you get, when you combine an urge to distract yourself from disappointing events in your personal life with two recent Hackaday posts?
An internet connected fidget spinner! Or at least concept, planning, PCB design and ordering parts.
Tomi Engdahl says:
New Brain for Smart Vacuum
http://hackaday.com/2017/06/12/new-brain-for-smart-vacuum/
The ESP8266 has found its way into almost everything now. With its tiny size, low price tag, and accessible programmer, it’s perfect for almost any application that requires WiFi. [HawtDogFlvrWtr] decided that will all of the perks of the platform, an ESP8266 was practically begging to be shoehorned into his automatic vacuum cleaner. This isn’t a Roomba, though, it’s a Neato that now has a custom WiFi interface.
A Neato control framework built on the ESP8266
https://www.neatoscheduler.com/home.php
Neato Scheduler is a framework built on an ESP8266 Wifi serial adapter, that allows you to interface wirelessly to your neato botvac (65, 70e, 75, 80, 85, D75, D80 and D85) and provides you a few important features that even newer models don’t have.
Tomi Engdahl says:
KiT: Keep In Touch
A tactile IoT device for spontaneous long-distance interaction
https://hackaday.io/project/25361-kit-keep-in-touch
PROBLEM:
The Internet has allowed us to communicate faster across longer distances than ever before, but it still cannot replace in-person interactions with another person. This problem is especially acute for couples in long-distance relationships who rarely get to see each other.
SOLUTION:
KiT is a device that enables simple, spontaneous interaction between people spread far apart. The KiT hardware is simple: an ESP8266, a few potentiometers, and an LED. The secret sauce lies in the application: with just a twist and a push of a button, you can send a “Touch” to KiT’s partner hardware. The paired hardware will light up and match the “Touch” you sent, allowing you to wordlessly communicate with your partner.
Tomi Engdahl says:
Mini WiFi/BLE 4WD robot platform
A compact & modular WiFi/BLE controlled 4WD robot platform with all
https://hackaday.io/project/25430-mini-wifible-4wd-robot-platform
The WiFi capabilities of the new micros as ESP8266 or ESP32 invite to create to build easy to control robots. The aim of this platform is to have a compact sized module, contain all basic functions as a base for a big variety of robot such as tanks, fire truck, line follower, …….. And as particular mechanical parts often are difficult to get it’s all based on 3D printed parts.
Tomi Engdahl says:
How to Send Text Message (SMS) using ESP8266
https://circuitdigest.com/microcontroller-projects/sending-sms-using-esp8266
This tutorial will help you to send SMS to any registered mobile number from ESP8266.
Concept behind the Tutorial:
We know that the ESP8266 module can be configured both as AP or STA. Here we have configured it to work as station and have connected it to our Wifi Router. Once the connection is establish we have to find out a way to send SMS online. This online must also be easily accessible by out ESP8266 module. This is where we leverage the power of IFTTT (If This Then That) website. Using this website we can send SMS, E-mail, Whatsapp messages, Facebook updates, Twitter tweets and what not. They have a heck a lot of tools that can be used with little knowledge, but in this tutorial we are going to use the send message feature and leave the rest for other future tutorials.
After few tweaks in the IFTTT website we will able to get a HTTPS URL which when triggered will send a predefined Text message to a specific mobile number. Now, this URL has to be called by our ESP8266 module when needed and your SMS will be fired to your mobile number. Sounds fairly simple right!!? Let us see the steps involved.