VGA signal generation hacks

This is continuation to Interesting VGA hacks hacks posting. Interesting VGA hacks hacks was concentrated on using VGA card for nontraditional uses, this posting on the other hand concentrates on generating VGA signals with other hardware than VGA graphics card.

It seems that modern microcontrollers are well suited to display information on analog VGA monitors:

AVR VGA generator implements VGA on microcontroller. This AVR-based VGA generator uses ATmega1284 to output a stable VGA signal. Anyone who’s looked into the VGA standard will know that this is quite an accomplishment. Red, green, and blue each get their own two-bit range selected via a set of resistors for a total of 64 colors. 128×96 pixel video is up and running.

Arduino Uno output to VGA monitor project shows how you can output VGA signals to a monitor, turning your Uno (or similar) processor into a “video card”. The biggest challenge is to ge the pixel data out – it just can’t be done with software running on this processor and we also don’t have enough memory to even hold those pixels all at once.   The fastest way we can get bits “out the door” is using the SPI hardware.

Code: VGA RGB Signal project Connect Arduino to VGA input on TV. You can find the circuit diagrams and code at Github at arduino-vgaout.

VGA interfacing AVR microcontrollers project shows us how to push data to a VGA monitor from your AVR project.  It turns out that it is pretty simple, requiring only n open port and a few resistors and diodes. Well, it is that simple for the most basic version which gives you 56×60 pixels. Version 2 outputs 240×240 resolution.

Microcontroller VGA Interface projects page (tinyvga.com) show examples how to use Microchip PIC 16F84 VGA Output and several versions for Atmel AVR VGA outputs.

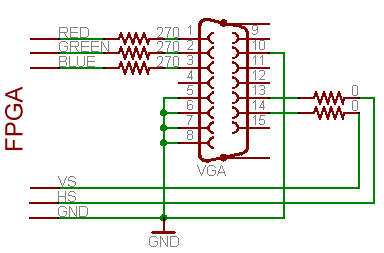
Other popular way to generate VGA signal is to use FPGA chips:

FPGA VGA Resistor DAC page tells that VGA is a very friendly protocol to use with FPGA’s and CPLD’s and because of this we can easily build video controllers with basic PLDs. The VGA protocol itsself is slow, running around the 20-30 MHz range depending on the resolution chosen, meaning that we can even breadboard or wire-wrap prototype designs!

VGA Controller (VHDL) page shows a VHDL source code of a VGA interface controller. It generates the signal timing for a VGA interface, offers configurable VGA mode (i.e. resolution and refresh rate). The page has an example implementation using a DE2-115 development board.
FPGA Tutorial 4. VGA in VHDL on Altera DE1 Board video tutorial I will show how to program VGA interface in VHDL, suing DE1 Altera board. Eventually it will program a simple game.

Pong Game page shows that FPGAs can become video generators easily. The pong game consists of a ball bouncing on a screen. A paddle (controlled from a mouse here) enables the user to make the ball bounce back up.

Draw VGA color bars with FPGA in Verilog page mentions a FPGA workshop. The most useful comments will be in the VGA controller module we wrote: vga640x480.v.

Design Recipes for FPGAs – A Simple VGA Interface article gives tips for VGA implementation using FPGA.


Other related information:

Calculator for video timings

VGA signal timing

VGA timings

VGA signal timing calculation using MCU


100 Comments

  1. jzzskijj says:

    Octapentaveega – VGA on Attiny85: https://github.com/Jartza/octapentaveega

    Reply
  2. Tomi Engdahl says:

    $5 VGA for Raspberry Pi
    http://hackaday.com/2016/02/21/5-vga-for-raspberry-pi/

    Hackaday.io user [mincepi] wanted a VGA output on his Raspberry Pi Zero. His quest led him to design a PCB that mates with a VGA monitor and the Pi board and–according to his estimates–costs about $3.62 each (although to get that price, you have to build three).

    The VGA hack uses the Pi’s built-in port for driving a VGA (the vga666 by [Gert])

    Super low cost VGA output for the Pi Zero
    Similar to the vga666 board, but re-designed for the Pi Zero.
    https://hackaday.io/project/9763-super-low-cost-vga-output-for-the-pi-zero

    Reply
  3. Tomi Engdahl says:

    VGA Output On A Freescale
    http://hackaday.com/2016/02/26/vga-output-on-a-freescale/

    Even though VGA is an outdated and becoming somewhat deprecated, getting this video output running on non-standard hardware is a rite of passage for some hackers. [Andrew] is the latest to take up the challenge. He got VGA output on a Freescale i.MX233 and also got some experience diving into the Linux kernel while he was at it.

    VGA Generation with Freescale i.MX23 + Linux
    http://www.theresistornetwork.com/2016/02/vga-generation-with-freescale-imx23.html

    Reply
  4. Tomi Engdahl says:

    NES Light Gun Turned (Video) Synthesizer
    http://hackaday.com/2016/02/25/nes-light-gun-turned-video-synthesizer/

    [Russell Kramer] made our day today. We’re tremendous fans of minimalism in electronics design, dirty noise hacks, and that old NES light gun. He’s posted up a project that combines all three to make a light-gun controlled, VGA video display that makes bleepy-bloopy noises to boot. Check out the video below!

    To appreciate this hack, you really need to read through the project logs in detail. Start with the VGA signal creation, for instance. The easiest way to go these days is to throw a microcontroller at the problem. But because he’s done that to death, [Russell] takes a step back thirty years and generates the sync pulses periodically with a relaxation oscillator and a binary counter IC.

    NES Zapper Video Synth Theremin
    Using a light gun to interact with a video synthesizer and produce sound.
    https://hackaday.io/project/9782-nes-zapper-video-synth-theremin

    Reply
  5. Tomi Engdahl says:

    Rasterphonic Glove
    Analog video synthesizer you can touch with a five finger light gun. Makes music too.
    https://hackaday.io/project/9847-rasterphonic-glove

    Reply
  6. Tomi Engdahl says:

    Low Cost STM32F0 based VGA Terminal
    This is an el cheapo VGA terminal using the STM32F030F4.
    https://hackaday.io/project/9992-low-cost-stm32f0-based-vga-terminal

    This can be used as a VGA and keyboard interface module in an embedded design. It can be connected to a VGA monitor, PS/2 keyboard and act as a terminal via TTL serial port.

    While there are a lot of ARM based VGA projects out there, this is an exercise to see what can be done with the low end STM32F030F4 that has only 4K of RAM and 16K of FLASH.

    STM32F030F4 is available from Aliexpress at $0.44 at QTY 10.

    Reply
  7. Tomi Engdahl says:

    A $5 Graphics Card For Homebrew Computers
    http://hackaday.com/2016/03/14/a-5-graphics-card-for-homebrew-computers/

    While not very popular, building a homebrew computer can be a fun and rewarding process. Most of the time, though, the video capabilities of these computers is as bare bones as it can get – running headless, connected to a terminal. While this is an accurate reproduction of the homebrew computers of the 1970s and 80s, there’s a lot to be said about a DIY computer with an HDMI-out port.

    A Parallax Propeller chip makes for a great video terminal with inputs for PS/2 keyboards and mice. A largish AVR, with the requisite NTSC video library, also makes for a great video interface for a homebrew computer. The Pi Zero is only five dollars, though.

    Color NTSC video directly from an AVR chip
    http://hackaday.com/2013/03/27/color-ntsc-video-directly-from-an-avr-chip/

    But using four pins from the microcontroller, connected via resistors in parallel, he is able to generate a color NTSC signal without using a chip like the AD723.

    Reply
  8. Tomi Engdahl says:

    Low Cost STM32F0 based VGA Terminal
    This is an el cheapo VGA terminal using the STM32F030F4.
    https://hackaday.io/project/9992-low-cost-stm32f0-based-vga-terminal

    This can be used as a stamp sized VGA and keyboard interface module in an embedded design. It can be connected to a VGA monitor, PS/2 keyboard and act as a terminal via TTL serial port.

    While there are a lot of ARM based VGA projects out there, this is an exercise to see what can be done with the low end STM32F030F4 that has only 4K of RAM and 16K of FLASH. It boots up instantaneously so it doesn’t miss critical boot up messages from the host.

    STM32F030F4 is available from Aliexpress at $0.44 at QTY 10.

    Reply
  9. Tomi Engdahl says:

    Better VGA On The STM32F4
    http://hackaday.com/2015/06/07/better-vga-on-the-stm32f4/

    [Cliff] is pushing VGA video out of a microcontroller at 800×600 resolution and 60 frames per second. This microcontroller has no video hardware.

    The microcontroller in question is the STM32F4, a fairly powerful ARM that we’ve seen a lot of use in some pretty interesting applications. We’ve seen 800×600 VGA on the STM32F4 before, with a circles and text demo and the Bitbox console. [Cliff]’s build is much more capable, though; he’s running 800×600 @ 60FPS with an underclocked CPU and most (90%) of the microcontroller’s resources free.

    Pushing Pixels
    http://cliffle.com/article/2015/06/06/pushing-pixels/

    The STM32F407 is a microcontroller from ST Microsystems, based around the popular ARM Cortex-M4F core. In terms of compute power, instruction latency, and overall capabilities, it is very much like a late-generation 486, only slightly faster and from a bizarro world where the 486 was RISC.

    The STM32F407 variant I’m using has 192 kiB of RAM and 512 kiB of Flash, which is roughly the amount of storage available in, say, an unexpanded Commodore 128 or the original Macintosh. But those computers have something I don’t: hardware for producing video.

    While the ’407 also has a whole mess of interesting peripherals, video generation is not among them4. Which is, of course, why we’re here!

    We need a way of making three analog signals — red, green, and blue — produce around 40 million samples per second (MS/s). A quick skim of the Reference Manual shows that the STM32F407 has a bazillion peripherals of various kinds; how many of them are relevant here?

    None of the analog output peripherals, that’s for certain: there are only two DAC channels, and they top out at just 1 MS/s6. So we’ll have to produce digital output and convert it to analog voltages outside the chip.

    Two peripherals seemed to fit the bill:

    The “Flexible Static Memory Controller,” or FSMC.
    The GPIO ports.

    On previous video projects I had used things like SPI controllers to generate monochrome video. While this sticks you with monochrome, it has a big advantage: these controllers often have built-in FIFOs, or at the very least a wide shift register. This lets you compute a few pixels’ worth of the image (often 32), stuff it into the FIFO, and go off and do other things, freed (for now) of your real-time obligations to the display.

    On the STM32F4, neither the FSMC nor the GPIO have FIFOs

    DMA controller is sort of like a really simple second processor that can be programmed to do a single thing: copy bytes from one address to another.

    To blow some data out a port (GPIO or FSMC) under DMA control on an STM32F4, the basic procedure looks something like this:

    Turn on the DMA controller and your peripheral9.
    Pick a DMA Stream to use.
    Arrange to have its associated DRQ strummed periodically.
    Turn it on.
    Kick back.

    Simple! And this is where things get tedious, with a good bit of Reference Manual cross-referencing. :-)

    To ST’s credit, the “Flexible” FSMC really is pretty flexible. You can configure it to act like a simple parallel bus. Perfect!

    We can also get it to run up to about 50% of the CPU frequency, which might allow for pixel clocks of up to 82 MHz. Neeeeeat.

    So we do all that DMA stuff I just described, and point the DMA controller at the FSMC’s memory region after configuring the FSMC.

    What do we get?

    We get bursty output, at any speed.

    It appears that the FSMC needs to breathe for one AHB cycle between external bus bursts. It cannot sustain 100% utilization.

    So the FSMC’s a no-go, despite its promise.

    This leaves the boring old GPIO controller as our only hope.

    We can configure maximum speed DMA from RAM to GPIO by, counter-intuitively, setting RAM as “peripheral” and GPIO as “memory.”

    At the chip’s maximum rated speed of 168MHz, this gives us a 42MHz pixel clock.

    We can’t slow it down.

    You’re going to get pixels at ¼ the CPU rate whether you like it or not.

    Which suggests a way of reducing the pixel clock: you slow down the entire system.

    Reply
  10. Tomi Engdahl says:

    Chibiterm Is A Tiny Low-Cost VGA Terminal
    http://hackaday.com/2016/05/13/chibiterm-is-a-tiny-low-cost-vga-terminal/

    Hackaday.io user [K.C.Lee] has created a low-cost terminal module for a VGA monitor and a PS/2 keyboard based around an inexpensive STM32F030F4 processor.

    To squeeze VGA from such an inexpensive device without extra hardware, he’s made use of the device’s SPI port as a fast shift register. This was not as simple as it sounds. He had to work carefully with the clock frequencies to make it work at the VGA pixel rate. He goes into detail on the chip’s internals in how he achieved this, as well as the mechanics of character generation.

    The resulting device is tiny enough, but his latest project log shows how it will eventually be fitted within a connector adaptor case. It’s all open-source, so if you want to take a closer look you can find everything you need in the Github repository.

    This is a bare metal VGA Text library + projects/examples for the STM32F030F4
    https://github.com/FPGA-Computer/STM32F030F4-VGA

    Reply
  11. Tomi Engdahl says:

    No Frame Buffer for FPGA VGA Graphics
    http://hackaday.com/2016/06/16/no-frame-buffer-for-fpga-vga-graphics/

    Usually, when you think of driving a VGA–in software or hardware–you think of using a frame buffer. The frame buffer is usually dual port RAM. One hardware or software process fills in the RAM and another process pulls the data out at the right rate and sends it to the VGA display (usually through a digital to analog converter).

    [Connor Archard] and [Noah Levy] wanted to do some music processing with a DE2-115 FPGA board. To drive the VGA display, they took a novel approach. Instead of a frame buffer, they use the FPGA to compute each pixel’s data in real-time.

    The FPGA can track up to 64 objects on the screen at a time including depth.

    https://people.ece.cornell.edu/land/courses/ece5760/FinalProjects/s2016/cwa37_nml45/cwa37_nml45/cwa37_nml45/index.html

    Reply
  12. Tomi Engdahl says:

    BSODOMIZER
    http://www.grandideastudio.com/bsodomizer/

    BSODomizer is a small, battery-powered device that connects between a target computer and VGA monitor, and injects a fake BSOD (Blue Screen of Death) onto the monitor at random time intervals or when triggered by an infrared remote control. The BSODomizer can automatically detect when the target computer is turned off or reset, in which case it will revert to the harmless video pass-through mode leaving the user unaware of any wrongdoing.

    Originally designed as a mischievous gadget, the BSODomizer can also be used for penetration testing and video display calibration.

    DEF CON: BSODomizing In High Definition
    http://hackaday.com/2016/08/06/def-con-bsodomizing-in-high-definition/

    Reply
  13. Tomi Engdahl says:

    XORYA – extremely low cost game console on PIC32
    https://hackaday.io/project/5507-xorya-extremely-low-cost-game-console-on-pic32

    XORYA game console is just one chip PIC32MX170F256B (32-bit MIPS core, 256K flash, 64K data mem) in DIP28 package and a few other components

    XORYA is extremely low cost game console that consists of just 1 chip (in its base configuration) – DIP28 integrated circuit PIC32MX170F256B (32-bit MIPS core, 256K flash, 64K data memory) with cost below $5 and a few capacitors and resistors. XORYA is connected to NTSC TV through composite video input and it’s running applications created with help of open source XORLib game library ( http://xorlib.org ) specifically developed for this platform.

    Reply
  14. Tomi Engdahl says:

    Bitbanging VGA Fits In under 1 kB
    http://hackaday.com/2016/12/08/bitbanging-vga-fits-in-under-1-kb/

    Don’t throw those old VGA monitors away, turn them into works of art with [danjovic] and VGA Blinking Lights. This circuit uses a PIC16F688 to generate VGA video. Not just a random spray of monochrome dots either. VGA Blinking Lights puts up an ever-changing display of 48 colored squares.

    VGA Blinking Lights
    Pseudo Random VGA blinking lights generator
    https://hackaday.io/project/8537-vga-blinking-lights

    Reply
  15. Tomi Engdahl says:

    VGA Monitor Becomes Drawing Toy
    http://hackaday.com/2016/12/08/vga-monitor-becomes-drawing-toy/

    We hate to break it to [Rob Cai], but he’s built a VGA drawing toy, not an Etch-a-Sketch. How do we know? Simple, Etch-a-Sketch is a registered trademark. Regardless, his project shows how an Arduino can drive a VGA monitor using the VGAx library. Sure, you can only do four colors with a 120×60 resolution, but on the other hand, it requires almost no hardware other than the Arduino (you do need four resistors).

    VGA Etch-a-Sketch With Arduino Uno
    http://www.instructables.com/id/VGA-Etch-a-Sketch-With-Arduino-Uno/

    When I was a child I have spent a lot of time playing with “Etch a Sketch”, a classical game where you can draw sketches on a plastic board turning two wheels.

    Recently I realized that not only it can be reproduced in colors with an Arduino on a VGA monitor, but that I already have all the necessary hardware. All I need are few lines of code!

    The hardware is indeed the same of my first Instructables: VGA Pong with Arduino Uno.

    Reply
  16. Tomi Engdahl says:

    ATtiny Does 170×240 VGA With 8 Colors
    http://hackaday.com/2015/12/17/attiny-does-170×240-vga-with-8-colors/

    The Arduino is a popular microcontroller platform for getting stuff done quickly: it’s widely available, there’s a wealth of online resources, and it’s a ready-to-use prototyping platform. On the opposite end of the spectrum, if you want to enjoy programming every bit of the microcontroller’s flash ROM, you can start with an arbitrarily tight resource constraint and see how far you can push it. [lucas][Radical Brad]’s demo that can output VGA and stereo audio on an eight-pin DIP microcontroller is a little bit more amazing than just blinking an LED.

    Quark-85 Demo Kube – 184 x 240 VGA with 8 Colors and Sound on an Tiny85!!
    http://www.avrfreaks.net/forum/quark-85-demo-kube-184-x-240-vga-8-colors-and-sound-tiny85

    Reply
  17. Tomi Engdahl says:

    1Kb Space Invaders
    Reimplementation of the retro game Space Invaders in an attiny for the 1 Kb Challenge
    https://hackaday.io/project/18674-1kb-space-invaders

    Many shortcuts will be taken to fit this into the allowed 1024 bytes. I do however expect to create a fully functional, playable game in the end with scoring, sound and color VGA output in 640×480 60Hz mode.

    The project will be coded in assembly, with the VGA and sound output being bit banged with precise timing control.

    Reply
  18. Tomi Engdahl says:

    Does This Demo Remind You of Mario Kart? It Should!
    http://hackaday.com/2017/02/16/does-this-demo-remind-you-of-mario-kart-it-should/

    Here’s a slick-looking VGA demo written in assembly by [Yianni Kostaris]; it’s VGA output from an otherwise stock ATmega2560 at 16MHz with no external chips involved. If you’re getting some Super Mario Kart vibes from how it looks, there’s a good reason for that. The demo implements a form of the Super Nintendo’s Mode 7 graphics, which allowed for a background to be efficiently texture-mapped, rotated, and scaled for a 3D effect.

    [Yianni] posted the original demo a year earlier, but just recently added detailed technical information on how it was all accomplished. The AVR outputs VGA signals directly, resulting in 100×120 resolution with 256 colors, zipping along at 60 fps.
    http://www.avrfreaks.net/comment/2081946#comment-2081946

    Reply
  19. Tomi Engdahl says:

    A Multicore ZX Spectrum
    http://hackaday.com/2017/02/16/a-multicore-zx-spectrum/

    From the blog of [telmomoya] we found his latest project: a hardware based multicore solution for a ZX Spectrum Emulator. It’s not the first time we feature one of his builds, last year we was working on a ARM Dual-Core Commodore C64. Luckily for Speccy fans, it seems a ZX Spectrum project was just unavoidable.

    At its heart is the EduCIAA NXP Board, a Dual Core (M4 & M0) 32-bit microcontroller, based on the NXP LPC4337. It’s an Argentinan-designed microcontroller board, born from an Argentinian academic and industry joint venture. [telmomoya] took advantage of the multicore architecture by running the ZX Spectrum emulator on M4 core and generating the VGA signals with M0 core.

    On the software side, [telmomoya] adopted Aspectrum, a ZX Spectrum Emulator fully written in C, modified to his needs.

    A multicore solution for a ZX Spectrum Emulator
    http://telmomoya.blogspot.fi/2017/01/a-multicore-solution-for-zx-spectrum.html

    I made a multicore baremetal ZX Spectrum Emulator app for a dual core ARM microcontroller (Cortex M4 & M0 Cores).

    Initially I used a low cost TFT as output device and later VGA screen. As no video hardware support is available, software signals generation was needed for componentless VGA.

    I developed a multicore solution, runnnig emulator on M4 core and generating VGA signals with M0 core (Asymmetric Multi Processing).
    This technique can be useful for other projects since critical timings involved in VGA generation remains isolated from emulation or any task running on other core.

    This project invloved many issues, like componentless COLOR VGA generation (with GPIO DMA), Inter Process Comunication and bus sharing.

    Reply
  20. Tomi Engdahl says:

    VGA Without A Microcontroller
    http://hackaday.com/2017/03/07/vga-without-a-microcontroller/

    One of the most challenging projects you could ever do with an 8-bit microcontroller is generating VGA signals. Sending pixels to a screen requires a lot of bandwidth, and despite thousands of hackers working for decades, generating VGA on an 8-bit microcontroller is rarely as good as a low-end video card from twenty years ago.

    Instead of futzing around with microcontrollers, [Marcel] had a better idea: why not skip the microcontroller entirely? He’s generating VGA frames from standard logic chips and big ‘ol EEPROMs. It works, and it looks good, too.

    VGA signals are just lines and frames, with RGB pixel values stuffed in between horizontal sync pulses, and frames stuffed between vertical sync pulses. If you already know what you want to display, all you have to do is pump the right bits out through a VGA connector fast enough.

    Breadboard VGA from TTL and EEPROM
    Look Ma, no microcontroller
    https://hackaday.io/project/20161-breadboard-vga-from-ttl-and-eeprom

    Concept tester for VGA output using two old-skool EEPROM’s and a handful of 74LS series TTL chips.

    This circuit generates a 640×480 VGA signal and renders an 160×120 16 color image in it. The resolution is limited by the memory capacity and speed. The parrot image is stored in the right EEPROM (32kB) as 4-bit “RGBI”. This 150 ns grade ROM is barely fast enough to keep up with the pixel clock: in fact, technically it is slightly too slow, but it works nonetheless..

    This project was completed in two days and included learning how to burn an EEPROM in two different ways using an Arduino

    Reply
  21. Tomi Engdahl says:

    Anacon-xC
    https://hackaday.io/project/20053-anacon-xc

    Analog video console based on XMOS xCore with VGA/NTSC/PAL video output and PS/2 mouse/keyboard input. 32-bit scanline-based rendering.

    My goals:
    * Put my XMOS StartKit to good use
    * Design my own interface circuitry and PCBs
    * Generate scanline-based video in real time
    * Learn all about the intricacies of SD analog video signals I grew up with
    * Experiment with effectively mixing xC, C, and C++ code in a single project
    * Find out how far I can push a 32-bit multi-core microcontroller

    Reply
  22. Tomi Engdahl says:

    Low Cost VGA Terminal Module
    https://hackaday.io/project/9992-low-cost-vga-terminal-module

    This is a low cost module to add VGA and keyboard connectivity to retro computer, development board or embedded computer via serial port.

    This is a VGA and keyboard interface module for embedded computers that need text output on a monitor. It can be connected to a VGA monitor, PS/2 keyboard and act as a VT100 terminal via TTL serial port. It boots up instantaneously so it doesn’t miss critical power on messages from the host.

    While there are a lot of ARM based VGA projects out there, this is an exercise to see what can be done with the low end STM32F030F4 that has only 4K of RAM and 16K of FLASH.

    Small embedded microcontrollers do not usually come with a video output. The aim of this project is design a low cost stamp sized module that can be used to provide a VGA text display rendered at full 640×400 or 640×480 and interface with a PS/2 keyboard. The module acts as an embeddable VT100 terminal to the host via serial port. It takes care of the video generation, critical timing issues and simplifies the driver for the embedded host. The host only need to deal with sending/receiving characters and control code via serial port.

    Reply
  23. Tomi Engdahl says:

    MULTI-PLAYER RETRO GAMING ON AN ARDUINO VGA CONSOLE
    https://blog.arduino.cc/2017/04/17/multi-player-retro-gaming-on-an-arduino-vga-console/

    When you’re introduced to an Arduino Uno, perhaps you want to take button inputs, control a few LEDs, or move a hobby servo motor. These boards are quite good at that, but with some creative coding, they can actually control a VGA monitor and even play low-resolution games like Pong, Snake or Tetris.

    Reply
  24. Tomi Engdahl says:

    Arduino Video Display Shield
    An Arduino video display shield with integrated framebuffer and analog video output.
    https://hackaday.io/project/21097-arduino-video-display-shield

    Now seriously, the Arduino family of compatible boards is lacking a solid hardware support option to display images, animations or video. This board provides an analog composite video display with integrated frame buffer memory accessible through SPI or parallel bus. It will not display 4K video but somebody will hack it to run Doom, Joust or Ultra-Cricket. PAL, NTSC and VGA output formats are supported, resolution is up to 640×480 with reduced color count.

    The heart of this design is the VLSI VS23S010D-L chip. It is a 1 Megabit SPI SRAM with Serial and Parallel Interfaces and Integrated Video Display Controller, which outputs a composite video signal.

    Reply
  25. Tomi Engdahl says:

    Open Source Graphics Card
    https://hackaday.io/project/15588-open-source-graphics-card

    Advanced graphics for anything from homebrew computers to weather reporting boxes and everything that can communicate over 3.3-5v UART.

    It uses a Parallax Propeller to output VGA and NTSC video. It can be interfaced with 115200 baud UART. Now with a datasheet!

    Reply
  26. Tomi Engdahl says:

    Hackaday Prize Entry: A Mess Of VGA On A Breadboard
    https://hackaday.com/2017/11/06/hackaday-prize-entry-a-mess-of-vga-on-a-breadboard/

    Before all our video games came over the Intertubes, before they were on CDs, and before they were on cartridges, video games were all discrete logic. Pong was the first and you can build that out of several dozen logic chips. The great [Woz] famously built Breakout out of 44 simple chips.

    For [Marcel]’s entry to the Hackaday Prize, he’s taking the single board microprocessor-less computer to the next level. He’s building a multi-Megahertz 64-color computer on a breadboard. What’s the capacitance of a breadboard? Just ask [Marcel].

    8-bit color computer from TTL
    https://hackaday.io/project/20781-8-bit-color-computer-from-ttl
    “Just because”:
    The single-board microcomputer that runs without a microprocessor

    Reply
  27. Tomi Engdahl says:

    ARDUINO BASIC PC WITH VGA OUTPUT
    http://www.instructables.com/id/Arduino-Basic-PC-With-VGA-Output/

    shown how to build a retro 8-bit computer running BASIC, by means of two Arduino, and with an output signal in B&W for a TV screen.

    Now I will show how to build the same computer, but with the output signal in color for a VGA monitor!

    You can input the variables and the BASIC program with a PS2 keyboard, and it generates the output for a VGA monitor with a text resolution of 24 columns x 10 rows of 5×6 pixels characters, in four colors.

    This project can also be used to print simple text messages on the monitor

    One Arduino is the “master”, and it runs Tiny Basic Plus, a C implementation of Tiny Basic, with a focus on support for Arduino. It also control a PS2 keyboard. The output is then sent via the serial port to the second Arduino which generates the VGA output thanks to the VGAx library.

    Download the VGAx library from this link on GitHub.
    https://github.com/smaffer/vgax

    The easiest way is to copy it in the Arduino software subfolder named “libraries”, to be immediately recognized.

    IMPORTANT: this library works for Arduno IDE 1.6.4 but it is not fully compatible with elder or newer versions.

    |technology
    Open Menu
    ARDUINO BASIC PC WITH VGA OUTPUT
    by Rob Cai
    2.24933

    Introduction: Arduino Basic PC With VGA Output
    Picture of Arduino Basic PC With VGA Output
    Picture of Arduino Basic PC With VGA Output
    Picture of Arduino Basic PC With VGA Output

    In my previous Instructable I have shown how to build a retro 8-bit computer running BASIC, by means of two Arduino, and with an output signal in B&W for a TV screen.

    Now I will show how to build the same computer, but with the output signal in color for a VGA monitor!

    You can input the variables and the BASIC program with a PS2 keyboard, and it generates the output for a VGA monitor with a text resolution of 24 columns x 10 rows of 5×6 pixels characters, in four colors. You can see it in action in the upper video. The program can then be saved on the Arduino EEPROM, and you can still control the I/O pins directly via Basic dedicated commands.

    This project can also be used to print simple text messages on the monitor, as shown in the third picture in this page.

    One Arduino is the “master”, and it runs Tiny Basic Plus, a C implementation of Tiny Basic, with a focus on support for Arduino. It also control a PS2 keyboard. The output is then sent via the serial port to the second Arduino which generates the VGA output thanks to the VGAx library.

    The idea to use one or more Arduino to create an old style PC running a dialect of Basic is not new but, as far as I know, none of them has a color output. In some projects available on the net, people used LCD displays, while in others, to allow the use of monitors, it has been used the TVout library, which is B&W. Furthermore in many of these projects special shields or hardware has to be build. Here you need just two Arduino, few resistors and the connector for the PS2 keyboard and the monitor, as shown in the above pictures.

    Step 1: Build the Arduino Master With TinyBasic and PS2 Keyboard
    TinyBasic Plus and the VGAx library work for Arduino IDE 1.6.4.

    First download it from the Arduino official web page. If you have a newer versions on your PC, the best is to download it in .zip format and uncompress them on your PC. Click this link to download the Windows version.

    You need then the PS2keyboard library. You can find it at the bottom of this page. Just uncompress it and copy the PS2keyboard folder in: arduino-1.6.4\libraries

    Finally, in this page, download the file: TinyBasicPlus_PS2_VGAx.ino, uncompress and upload it on your Arduino.

    This is a variation of the standard TinyBasic Plus where i have added the PS2 library and modified the code to accept the variables from it.

    More details on TiniBasic Plus and tutorials can be found at this link.

    If there are no problems, and compatibility issues, Tiny Basic is already running. You can test it trough a serial monitor in your PC. For this purpose I use PuTTY, but many other programs are available.

    You have to set the correct COM port (it is the same you find in the Arduino IDE) and baud rate = 4800

    Here you can already test some program in Basic just by typing them with your PC keyboard (NB later on I will show how to connect the PS2 keyboard directly to the Arduino).

    Try for instance:

    10 PRINT “Hello, World!”

    20 GOTO 10

    RUN

    You can then stop the infinite loop just by typing ctrl+c.

    Note that this combination will not work for the PS2 keyboard.

    In the next step I will show how to connect the PS2 keyboard to Arduino.

    Attachments
    TinyBasicPlus_PS2_VGAx.inoTinyBasicPlus_PS2_VGAx.ino
    PS2Keyboard.rarPS2Keyboard.rar

    Step 2: Connect the PS2 Keyboard to the Master Arduino
    Picture of Connect the PS2 Keyboard to the Master Arduino
    I got all the informations and library from this Instructable.

    Essentially you need to connect the folowing four pins:

    keyboard Data to Arduino pin 8,
    keyboard IRQ (clock) to Arduino pin 3;
    you need to connenct GND and +5V as well.
    I got an old PS2 female connector from a broken PC motherboard. You can simply unsold it with a heat gun.

    In the picture shown in this step, you can find the function of the needed pins of the PS2 connector.

    Step 3: Upload the VGAx Library and Code on the Second Arduino and Put Everything Together
    Picture of Upload the VGAx Library and Code on the Second Arduino and Put Everything Together
    First download VGAx-PC.ino code at the bottom of this page and copy it on your PC in a directory with the same name.

    Download the VGAx library from this link on GitHub. The easiest way is to copy it in the Arduino software subfolder named “libraries”, to be immediately recognized.

    IMPORTANT: this library works for Arduno IDE 1.6.4 but it is not fully compatible with elder or newer versions.

    Upload the VGAx-PC.ino in your second Arduino board (I tested it for the Nano version but the Uno should work as well).

    A warning for low available memory is normal. If you do not have other errors everything is ok and you can immediately start to build your own 8-bit PC.

    For this you need:

    two Arduino Uno Rev. 3 or two Arduino Nano 3.x (ATmega328)
    a DSUB15 Connector, i.e. a VGA female connector or a VGA cable to be cut.
    resistors: 2 x 68 Ohm and 2 x 470 Ohm
    a PS2 female connector
    wires
    facultative: a breadboard or a strip board

    Reply
  28. Tomi Engdahl says:

    FPGA Magic Puts Little Embedded Screens Up On The Big Screen
    https://hackaday.com/2018/03/11/fpga-magic-puts-little-embedded-screens-up-on-the-big-screen/

    VGA1306 (VGA-out for DIY Arduboys implemented on an FPGA!)
    https://community.arduboy.com/t/vga1306-vga-out-for-diy-arduboys-implemented-on-an-fpga/4851

    I had an idea for an OLED display to TV OUT. which should be doable but it is one of many projects on my project heap. Would be awesome to hook Arduboy to a video projector

    The FPGA chip I am aiming at only costs around $7 (AUD), just need to work on a PCB design now – and then I should be able to produce a small board that could slot into any DIY Arduboy in place of the OLED, and plug into VGA… (the breadboard in the photo is just there for a 5V to 3.3V level shifter between the Arduino & the FPGA):

    Reply
  29. Tomi Engdahl says:

    How to Produce 640×480 Color VGA Video From an 8-Bit Arduino!
    https://dqydj.com/how-to-produce-640×480-vga-color-video-from-an-arduino/

    The VGA industry standard, which is pretty much the default case “we-can-always-fallback-to-this” video standard (640 pixels wide by 480 pixels tall by 60 frames per second), requires pixels to be clocked out at 25.175 MHz:

    25,175,000 > 16,000,000.

    And that was just one of the barriers to pulling off this silly project. And, yes, with the hack I told you about last time (Please see my notes below), more is possible without overclocking the Arduino – roughly 800 or so pixels wide in 4 bit color should be doable with a 16MHz part, and, probably 1024 pixels in 4 bit color are in reach for 20 MHz clocked parts.

    I did it with 6 ICs, 10 resistors, one VGA port and a bunch of jumper wire.

    How Did You Achieve 640×480?
    Click to Zoom
    Click to Zoom

    At this point I’d like to thank three folks in particular for inspiring this project. Nick Gammon is the first – his VGA library was the start point for this successful project, and this demo requires his Timing library. His timers greatly simplified the interrupt writing necessary for this project. His wiring diagrams and initial code-base were also invaluable to sanity checking my early prototypes.

    As for my project? At the most basic level, I treated the 8-bit microcontroller hobbyists love to love as a 4 bit microcontroller by dividing its output into two logical parts.

    http://www.gammon.com.au/forum/?id=11608

    Reply
  30. Tomi Engdahl says:

    Arduino VGA Pong (with colors)
    https://www.youtube.com/watch?v=mrRGosn48gw

    “Arduino Pong” with colors and sound, running for a VGA monitor. The game does not need a special shield or support IC, but just few resistors, a DSUB15 connector, a pair of potenziometers and a buttons.

    VGA library for Arduino UNO
    https://github.com/smaffer/vgax

    Reply
  31. Tomi Engdahl says:

    Arduino VGA PC running BASIC
    https://www.youtube.com/watch?v=1NaU4-wtS2c

    8-bit PC done with two Arduino, running BASIC and generating the output for a VGA monitor. The first Arduino is the “master”, where TinyBasic Plus and PS2 keyboard library are uploaded, while the second is used as a graphic display. This runs the VGAx library, which allows the generation of a 4 colour, 10 rows x 24 columns of ASCII caracters. Arduino I/O can be directly driven by the BASIC: as shown in this video, a LED blinking is driven by a few program lines.

    More details are available in the following Instructables:
    http://www.instructables.com/id/Arduino-Basic-PC-With-VGA-Output/

    Reply
  32. Tomi Engdahl says:

    Native-C PIC32 color video on TV
    https://hackaday.io/project/29198-native-c-pic32-color-video-on-tv

    Native C language environment with the color video system. including a text editor, compiler, linker, assembler. It likes RetroBSD.

    Reply
  33. Antonio says:

    Arduino ZX Spectrum like vga library
    https://github.com/ajcasado/ardvga

    Work in progress…

    Reply
  34. Tomi Engdahl says:

    VGA output with PIC Microcontroller
    http://www.toughdev.com/content/2011/02/vga-output-with-pic-microcontroller/

    make a PIC16F84A display some test patterns on my monitor.

    PIC 16F84 Microcontroller VGA interface

    Interested in easy to use VGA solution for embedded applications? Click here!
    http://tinyvga.com/pic-vga

    This scheme, designed by Eric Schlaepfer, widespreads in the Internet. Unfortunately, at it there is an error in distributing of the pins of the controller, and the program, enclosed it, is intended for a CGA/MDA of monitors and with VGA DOES NOT WORK. A nice joke ;-))) I offer the fitted scheme and program adapted for VGA of a mode 640×480 60Hz.

    Reply
  35. Tomi Engdahl says:

    PIC Graphics Demo
    https://hackaday.io/project/18682-pic-graphics-demo

    Generate 640×480 64-color VGA graphics with an 8-bit PIC and an SRAM framebuffer

    Reply
  36. Tomi Engdahl says:

    Build Yourself This ESP8266 Pong Game with VGA Output
    https://blog.hackster.io/build-yourself-this-esp8266-pong-game-with-vga-output-2194403f68f0

    for simple devices that lack video output altogether, it can actually be easier to hack together analog video than digital. That’s the case with Rob Cai’s VGA Pong game, and his tutorial will show you how to build your own with an ESP8266.

    https://www.instructables.com/id/ESP8266-VGA-Pong/

    Reply
  37. Tomi Engdahl says:

    https://github.com/smaffer/espvgax

    The library implements a resolution of 512 x 480 pixels, stored in a framebuffer inside the RAM, which requires 30720 bytes. The resolution is huge in comparison to the Arduino TVout or VGAx ones (128 x 96 and 120 x 60 pixels respectively).

    Reply
  38. Tomi Engdahl says:

    Do Other Things Besides Output Video
    https://hackaday.com/2019/01/15/do-other-things-besides-output-video/

    Small microcontrollers and tiny systems-on-chips are getting more and more popular these days as the price comes down and the ease of programming goes up. A Raspberry Pi is relatively inexpensive and can do pretty much everything you need, but not every chip out there can do something most of us take for granted like output video. For a lot of platforms, it’s next to impossible to do while saving any processor or memory for other tasks besides the video output itself.

    [Dave] aka [Mubes] has been working on the Blue Pill platform which is a STM32F103C8 board. W

    Video output on a device this small and lightweight is an impressive feat, especially while saving room for other tasks.

    VGA Video out on BluePill
    http://shadetail.com/blog/vga-video-out-on-bluepill/

    One major limitation during the development of an embedded system, especially for programmers who are used to PCs, is the lack of video output. That’s exactly what Vidout provides, using only 24% of the CPU on a STM32F103.

    Reply
  39. Tomi Engdahl says:

    Spoofing Cell Networks with a USB to VGA Adapter
    https://hackaday.com/2018/04/23/spoofing-cell-networks-with-a-usb-to-vga-adapter/

    RTL-SDR brought cheap and ubiquitous Software Defined Radio (SDR) to the masses, opening up whole swaths of the RF spectrum which were simply unavailable to the average hacker previously. Because the RTL-SDR supported devices were designed as TV tuners, they had no capability to transmit. For the price they are still an absolutely fantastic deal, and deserve to be in any modern hacker’s toolkit, but sometimes you want to reach out and touch someone.

    Now you can. At OsmoDevCon [Steve Markgraf] released osmo-fl2k, a tool which allows transmit-only SDR through cheap USB 3.0 to VGA adapters based on the Fresco Logic FL2000 chip. Available through the usual overseas suppliers for as little has $5 USD, these devices can be used unmodified to transmit low-power FM, DAB, DVB-T, GSM, UMTS and GPS signals.

    https://osmocom.org/projects/osmo-fl2k/wiki/Osmo-fl2k

    Reply
  40. Tomi Engdahl says:

    ESP32 VGA [Arduino, 3D]
    https://www.youtube.com/watch?v=G70CZLPjsXU

    This video shows a VGA implementation for the ESP32 micro controller that runs in the Arduino IDE. It is capable of rendering 3D-models in real-time and supports several screen resolutions.
    The ESP32 is tweaked beyond the specs to be able to achieve high resolutions, color count and performance.

    Project page: http://bitluni.net/esp32-vga
    Code: https://github.com/bitluni/ESP32VGA

    Reply
  41. Tomi Engdahl says:

    Back to Video Basics with an ESP32 VGA Display
    https://hackaday.com/2019/02/05/back-to-video-basics-with-an-esp32-vga-display/

    Can you coax VGA video from them? Yes, you can, with an ESP32, a handful of resistors, and a little bit of clever programming. At least that’s what [bitluni] has managed to do in his continuing quest to push the ESP32 to output all the signals. For this project, [bitluni] needed to generate three separate signals – red, green, and blue – but with only two DACs on board, he had to try something else. He built external DACs the old way using R/2R voltage divider networks and addressed them with the I2S bus in LCD mode.

    http://bitluni.net/esp32-vga/

    Reply
  42. Tomi Engdahl says:

    FabGL Turns Your ESP32 Into a VGA Gaming Platform
    https://blog.hackster.io/fabgl-turns-your-esp32-into-a-vga-gaming-platform-c7c1f2fe0d19

    FabGL
    ESP32 VGA Controller and Graphics Library
    http://www.fabglib.org

    Reply
  43. Tomi Engdahl says:

    Bitluni Releases ESP32 VGA Board as a DIY Kit to Display Graphics on a VGA Screen
    https://blog.hackster.io/bitluni-releases-esp32-vga-board-as-a-diy-kit-to-display-graphics-on-a-vga-display-6697f0e94b8a

    produce a 320 x 240 signal, and eventually pushed it to 460 x 480

    those who wanted to undertake his ESP32 hack on his website, but now he’s offering it for sale in kit form with a price tag of $15.

    http://bitluni.net/esp32-vga/

    Reply
  44. Tomi Engdahl says:

    Build a DIY VGA Video Card Utilizing the Correct Signal Timing and Crystal Oscillators
    https://blog.hackster.io/build-a-diy-vga-video-card-utilizing-the-correct-signal-timing-and-crystal-oscillators-933ccbc99f5d

    Eater’s circuit was created using a series of 74LS161 binary counters to count said pixels (from 0 to 264), as well as several 8-input NAND gates that handle the front porch, sync, and back porch signals. The complete DIY VGA video card uses 20 logic chips, along with the circuit, all housed on four breadboards strung together.

    Reply

Leave a Comment

Your email address will not be published. Required fields are marked *

*

*